
Want to cut down on mechanic bills? Here’s how to service your car by yourself, from your own garage or driveway.
We all know that any vehicle needs regular servicing and car maintenance to keep it in tip-top shape, that’s why most cars have a 10-12K mile or yearly interval where you need to take it in to a garage to get your book stamped. The truth is though, you can never really service a car too often, and that goes double if it’s hard driven, if you cover far more than the average miles in a year, or if you are partial to the odd track day.
What we’re doing this time is a simple home oil service. We’re not suggesting that you never take your car to the professionals of course. Many will check the whole thing over and advise on other work that needs doing. But, when you know that all is well (if you’ve just had an MoT for example), it’s never a bad idea to treat your ride to some fresh new oil and a filter. And while you’re there, you might as well change those air and pollen filters too – the hood’s up already, right? So, here’s how you can save a few quid by doing it yourself..
How to service your car
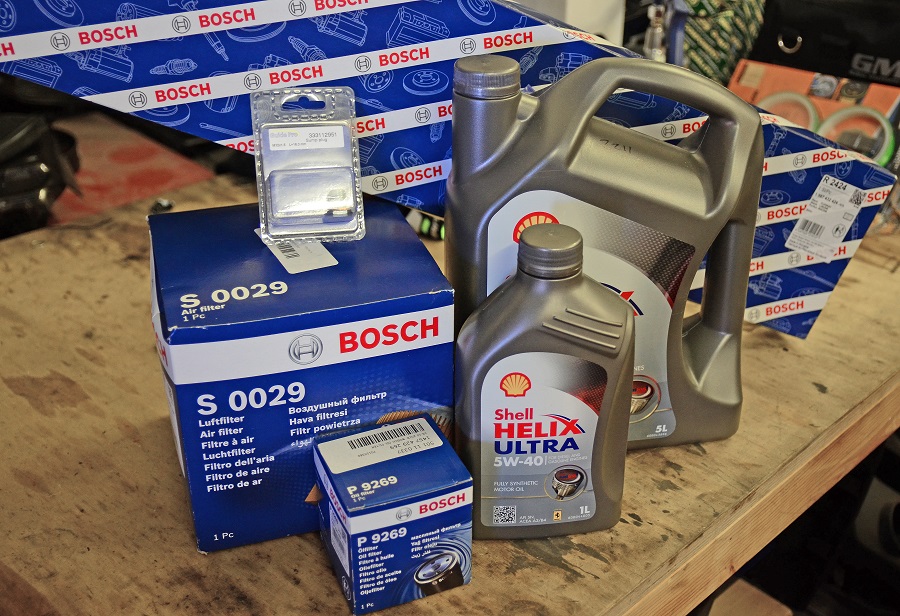
What parts do I need to service a car?
All the parts you need will be vehicle-specific, even the oil has to be the correct grade. The essential thing is to make sure that you have the right gear; in other words, parts that fit your car exactly. There’s nothing worse than getting halfway through a job like an oil change and finding you have the wrong filter – it’s not like you can use the car to go get a new one, right?
This time we’ll be doing three separate service jobs; the air and pollen filters, along with an oil change. All stuff that’s useful to do in-between main services, and all bits you can do yourself.
Required tools
You get to use lots of lovely tools for this one. Most of ‘em you’ll already have though. A jack, axle stands, screwdrivers and sockets will usually be needed, but none of these are anything out of the ordinary. Specialist tools wise, you’ll likely need an oil filter removal tool and you will definitely need a torque wrench. Sometimes you’ll need some extra drain keys, but that’s rare.
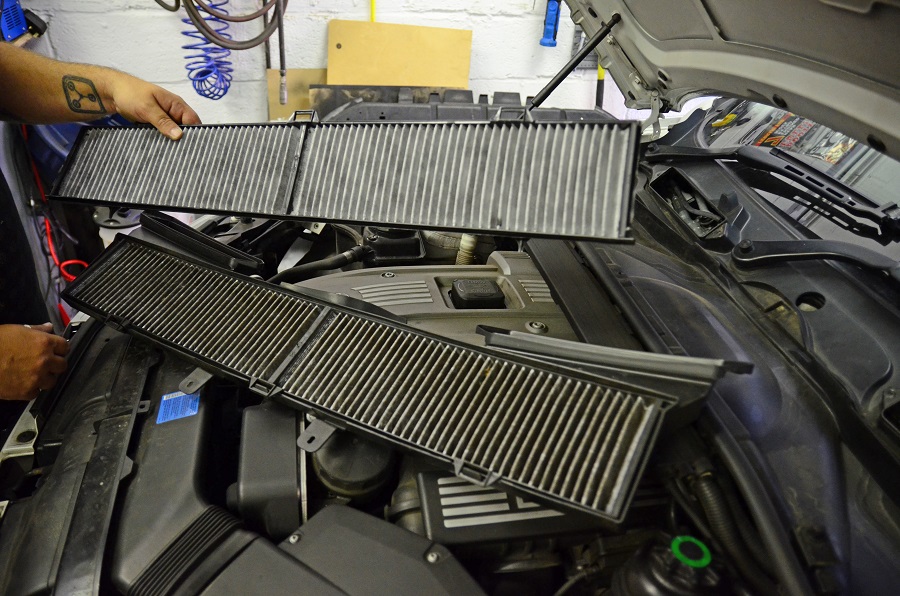
Pollen / cabin filter
We’ll start with the pollen (or cabin) filter, because this is the one that’s most overlooked. In fact, most of the time you’ll find that yours is pretty dirty because it’s rare for people to bother to change them. It could have been in there for years! When you think about it, it’s all a bit silly. They’re not expensive and these are the only thing that stop pollen, not to mention all the other nasty stuff floating around on the roads, from being sucked into the cabin. There’s also the fact that a filthy blocked filter won’t do wonders for the life of your air conditioning system. Often you’ll find that you can eliminate weird cabin odors just by swapping filters.
On the bright side, changing one of these is an easy job. You can’t really go wrong here, and there’s plenty of forums that will tell you exactly where yours is located. For most of the cars we see featured in Fast Car, you’ll find the filter housing under the scuttle panel, although in others it will be in the cabin behind the glovebox. You might be lucky (like with this E91 Beemer) and find the housing right in front of you under the bonnet. Quite often though, the real trick is getting to it. You may have to remove the glovebox or the wipers, but the best advice is to be methodical and take note of any screws, nuts or trim you have to remove.
Once you’ve found yours it will be a simple case of unscrewing or unclipping the housing, sliding the old filter out and popping the new one in. Make sure the new one goes in the right way around and you’re sorted. Lovely clean air for all!
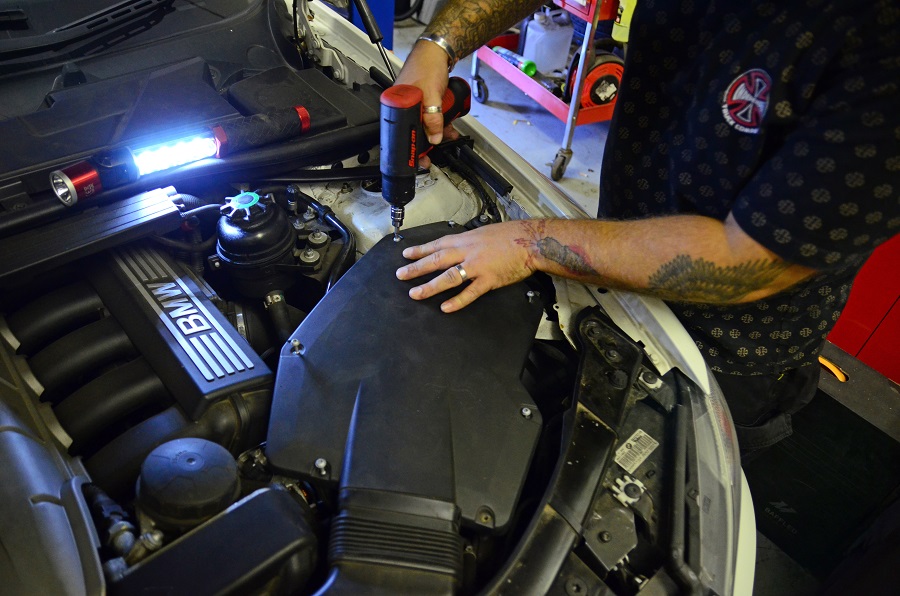
Air filter change
Now we’re getting to the really ‘service-y’ stuff. Changing the air filter is perhaps the easiest job out there. We all know what air filters do – clean the air that’s on its way to your engine. And, although standard paper filters don’t flow as much air as performance panel filters or aftermarket induction kits, they still do a great job of protecting your lump, just as long as you change them often.
The best bit is that, generally speaking, you’ll find the airbox as soon as you raise the hood. After all, manufacturers don’t want to make it too difficult for their dealers, right? On an older car (one with a carb setup) this will usually be a big frying pan style-box on top of the engine and a simple case of unbolting the top, and popping in the new filter. But in the vast majority of modern cases, you’ll
have a fuel-injected motor, with an airbox that sits somewhere to the side of the engine.
Once again, it’s very straightforward. The top of the airbox will either be clipped or screwed down. Get this off, pull out the old filter, and drop in the new one. Most of the time they’ll have a flat panel filter, but they come in all shapes and sizes. Just make sure you get the filter in the right way (take note of the one you’re taking out) making sure any rubber seals are seated in the box properly.
Oil change
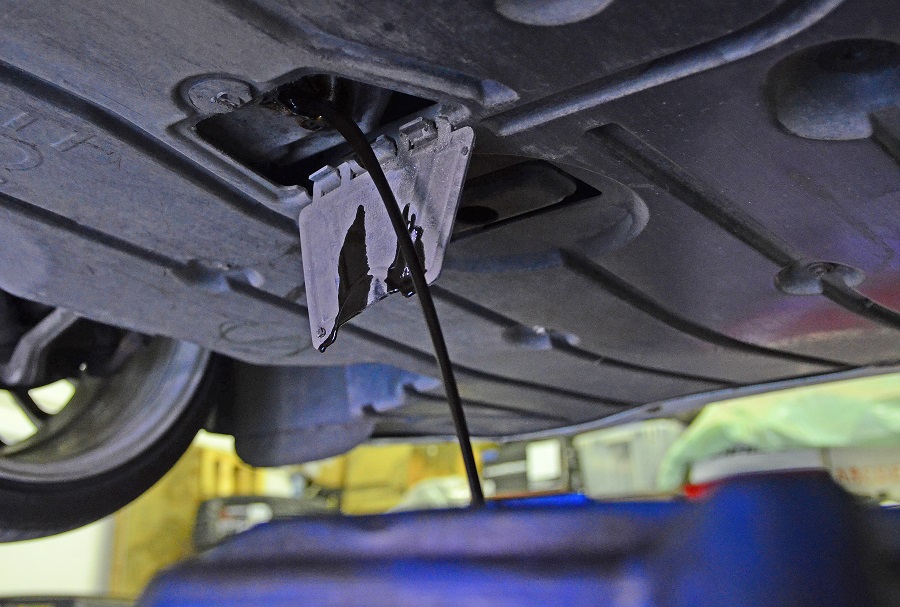
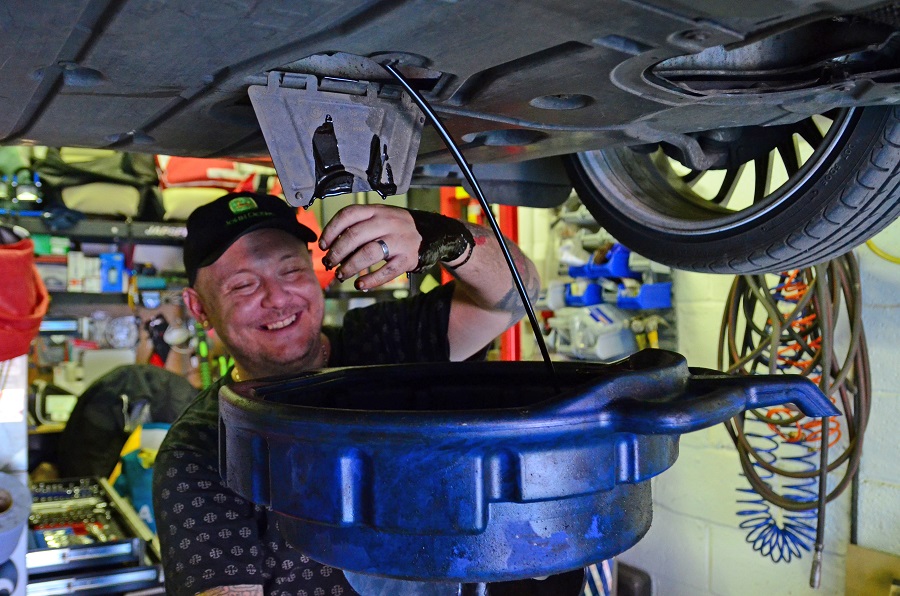
Out of the servicing jobs this may be the biggest one, but it’s still relatively easy. Of course, it’s even easier if you have a lift (especially if you’re getting old and your knees hurt), but that’s not to say it’s not simple enough anyway. Assuming you’re not using a pump (we’ll get to that), getting access to the sump and oil filter is the only challenge.
Most of the time it’s a simple case of getting the car in the air, so jack it up and secure it on axle stands. It’s not always possible of course, but in an ideal world it’s best if the car is level to make sure all the old oil comes out of the bottom of the sump (especially if the sump plug is on the front of the engine). Many take the time to jack the front and the rear of the car to be safe.
For most cars you’ll need to remove the undertray, although once again we’re lucky because BMW have had the foresight to put in a little flap. Before you remove the oil, you’ll want to make sure the car is at operating temperature, this will help it flow out more easily. So, start her up, and let her run for a bit,
Draining the oil
There’s two main methods of draining the oil. The first is using an extractor pump, a method that many main dealers choose. These are designed to fit down the dipstick hole into the sump and create a vacuum to suck out the oil. You don’t even need to lift the car if you have one of these.
The chances are though, you won’t, so the far more common method is to simply undo the sump plug and let the oil drain out into a suitable container. You’ll need an old bucket, a drain tray or your mum’s washing up bowl (trust me, she’ll love that). Just make sure the container you use is big enough (yes, I’ve made this mistake myself).
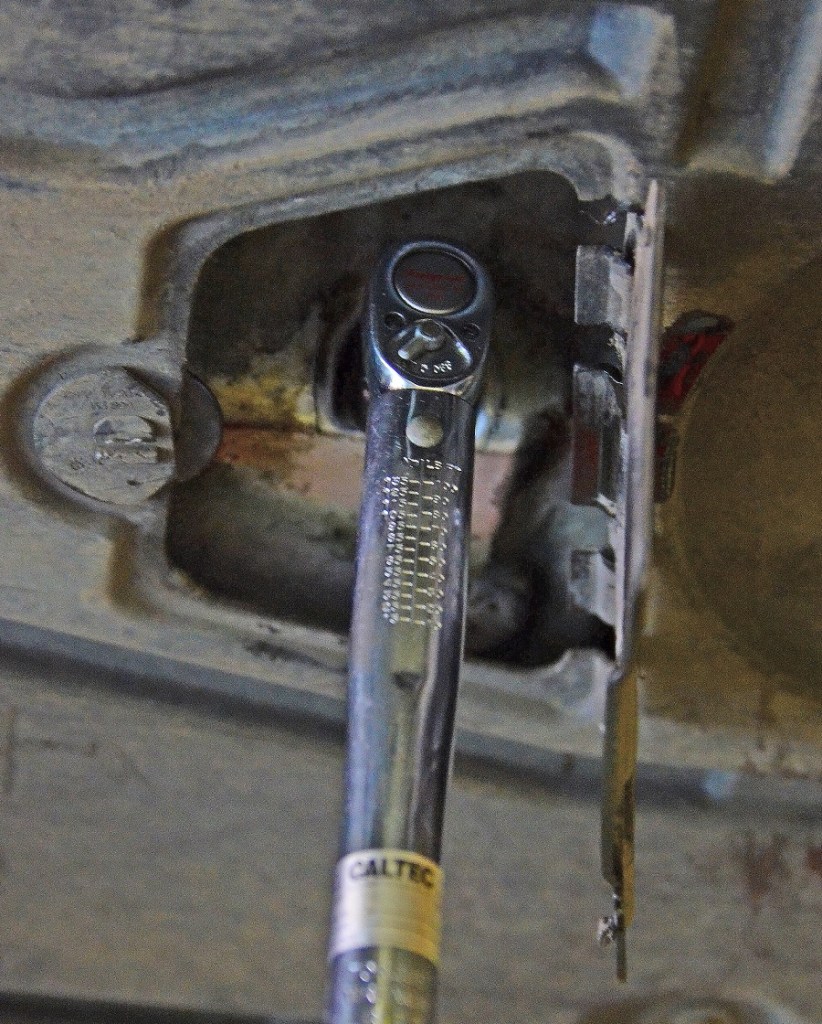
Simply speaking, larger engines have a larger oil capacity… but you’ll already know that because you’ve just ordered the right amount of new oil. When it comes to sump plugs, these can be anything from a standard bolt, to a torx or hex fitting. In some rare cases they can require a special drain key for removal. Obviously, it makes sense to check that you have the right tool first (in our case it’s a normal 17mm bolt).
Remove the oil cap at the top, whip the sump plug out and let the oil drain. Be careful though, don’t forget that engine is still hot!
Sump plug
Sump plugs need to seal properly to stop all your oil dripping out, that much is obvious. The way that most do this is by using some sort of washer and this will nearly always need to be replaced. On some cars (particularly VAG motors) the washer isn’t designed to be removed from the plug, and that means you’ll need a whole new one. That said, they’re cheap and most of the time it’s best to get one anyway (as we have) just to be safe.
Once you have your new plug or washer (or both) you’ll need to screw it back in and tighten it to the manufacturer’s recommended torque. This is vital to make sure it seals properly without stripping the thread in the sump. Many modern cars use alloy sumps, and these can be damaged with much less torque than you might think. Don’t just hang off it, use a torque wrench and you can’t hurt it.
Changing the car oil filter during the service
Before you put in your nice new oil, you’ll want to change the filter. These will almost always be full of old oil, so for starters, make sure your container is right underneath, ready to catch any spillage. There’s two types of oil filter, the common ‘spin-on’ type, and the ones like we’ve got here; cartridge filters.
The first trick is to find yours and work out whether you take it off from the top or underneath. On the rare occasion it may be necessary to get access through the wheel arch.
Spin-on filters
For a spin-on job you’ll usually find that you need a special tool to get the leverage for removal. These come in all shapes and sizes, but they all do the same job. Once you’ve unscrewed the filter and cleaned up the mounting surface, you can ‘spin-on’ your new one.
It’s always best to prime these filters by filling them with new oil, but this will depend on the angle that they screw on – it’s no good if all your oil ends up on the floor. The idea here is to make sure oil is pumping around the engine for the first few seconds when you start up. With a spin-on filter it’s also essential to lubricate the rubber seal with a little clean oil and screw it back on hand tight.
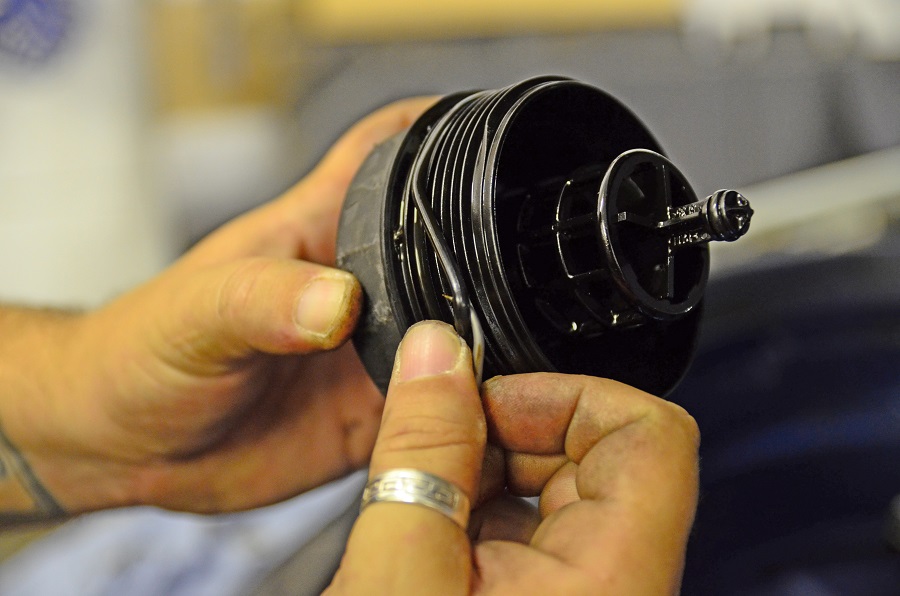
Cartridge filters
A cartridge filter, as you’ve probably guessed, fits into a cartridge. You’ll need to unscrew this cartridge pull out the filter inside, and then clip in the new one. A couple of things to remember here is to replace the rubber sealing ring (usually included with the new filter) on the cartridge and then lubricate with some clean oil. You’ll also need to use a torque wrench to tighten it up to the right spec, it’s only plastic after all.
With some BMWs the procedure is a little different. The cartridge filter is often at the top of the engine, so it’s often best for you to take it out before dropping the oil to enable any old oil to drain back into the sump. You can then pop in the new one just before you fill up. With this particular cartridge there’s an extra (smaller) O-ring that we needed to fit too.
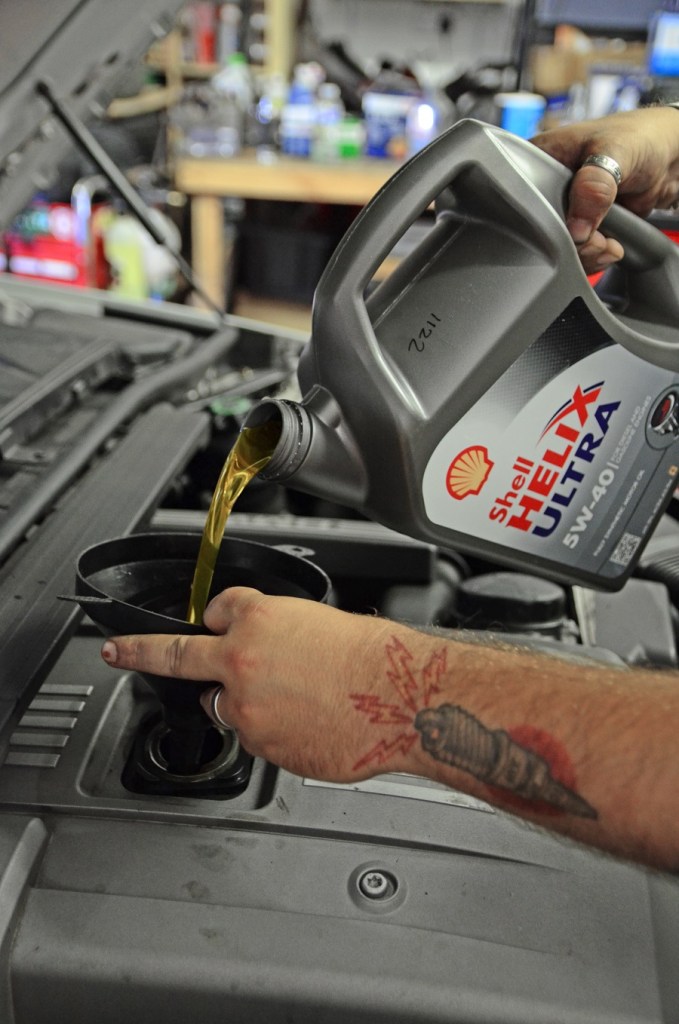
New oil
With the filter and sump plug reinstalled, you can put in your new oil, but first make sure you’ve dropped your car down on level ground. The key thing when refilling is to take your time, use a funnel and make sure you mop up any spilt oil sharpish. I always find the best method is to put in around a liter less than the maximum capacity, and then pour in a bit at a time checking the dipstick as you go.
Once you have the correct level, replace the cap and run the engine for a couple of minutes, so all the oil can go through the filter. Then go have a cuppa while the car cools so the oil can drain back into the sump. Maybe even watch an episode of me and Jules messing about on the Fast Car YouTube channel. After 10 minutes or so, re-check the level, and top up if necessary.
Once again, the procedure is a little different here with our BMW, because the car doesn’t have a conventional dipstick. In our case we put in half a liter short of the capacity and then ran the car for a few minutes, let it cool down, and checked the level using the computer. Same thing, just a bit less mechanical.
Apart from popping on undertrays and the like (and making sure you dispose of your old oil at a proper recycling center) you’re done. I told you it was easy…


