
Looking for a simple and effective car audio upgrade? Well, here’s a slice of… ahem, sound advice. This is all you need to know about how to fit car speakers.
Whacking in some better speakers is one of the age-old car mods that really has stood the test of time. Even with standard car stereo systems getting better and better over the years, there’s always – and we do mean always – a cheeky upgrade to be had. And this isn’t just about being able to play your music loud – although that does come into it of course – it’s all about getting better sound quality with hardware that’s better at the job of reproducing your music.
No matter how expensive your car, the manufacturer will build the stock speakers to a strict budget – just like your exhaust system or air filter, which naturally results in limitations. So, by installing better quality aftermarket speakers (that are more durable and constructed from materials that are more effective at reproducing sound), it’s relatively easy to transform your system into something far punchier and more well-rounded. In fact, a simple speaker upgrade is probably one of the best investments you’ll ever make.
In most cases, especially if you’re a beginner, you’ll be looking to sort out your front door speakers first with a relatively easy drop-in upgrade. Simply because this will make the most difference to your system. But don’t forget that upgrading any other car speaker is essentially the same job. The basics will always remain the same.
So, if you’re looking for better quality sound without a whole load of hassle and expense, you’ve come to the right place. Here’s our FC guide to everything you need to know about fitting a set of car speakers…
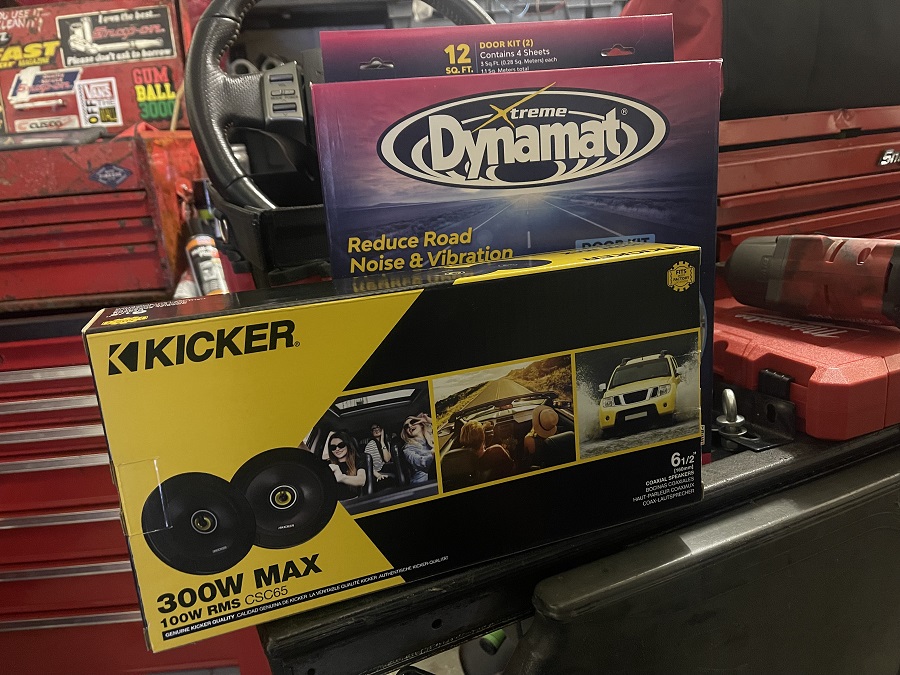
Step 1: Get the right kit
There’s three things to look out for here; the type of speaker, the physical size and any other hardware you’ll need to fit them into your doors.
Speaker Setups
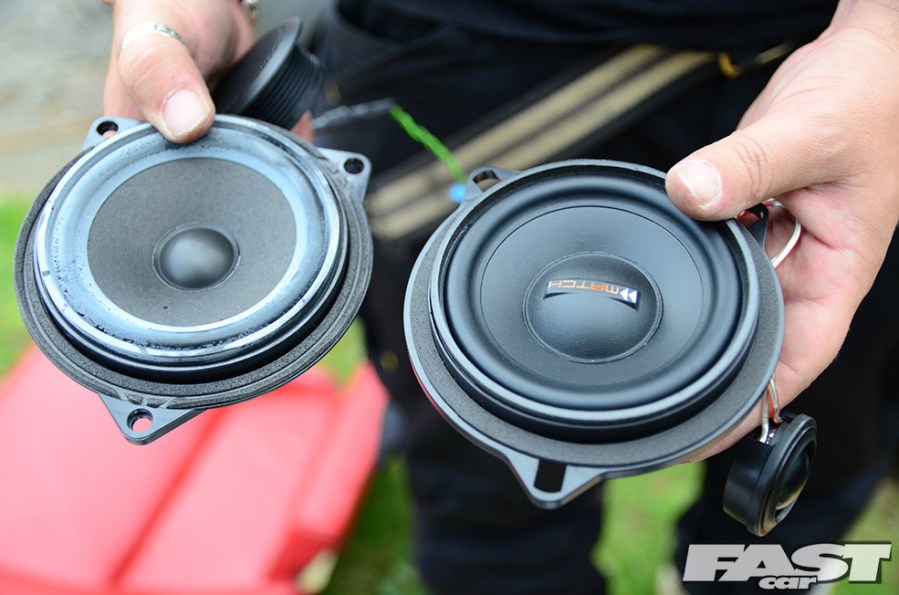
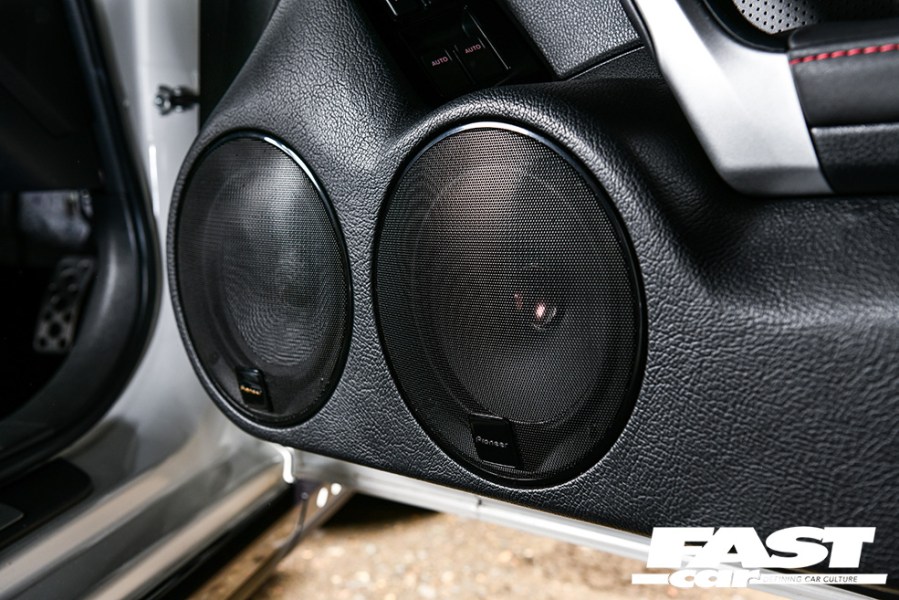
The three main types of car speaker are coaxial, component and convertible speakers. This simply refers to how and where the tweeter (the tiny speaker that reproduces the high frequencies) is mounted in relation to the mid-range driver (the speaker with the larger cone). So, with this in mind it’s also true to say that any car speaker unit is actually a collection of two speakers that between them take care of every part of the audible frequency range. Except of course the ultra-low frequency sub bass which requires a subwoofer to reproduce.

Coaxial Speakers
Coaxial speakers are perhaps the simplest to install because they come as an all-in-one unit. The tweeter is mounted directly over the mid-range driver on one axis, hence the name. On most cars you’ll find these as standard and they’re pretty easy to hook up because the speaker unit itself splits the signal between the two parts. You just plug ‘em in and away you go. These may be the most basic upgrade, but they will always make a huge difference.
Component & Convertible Speakers
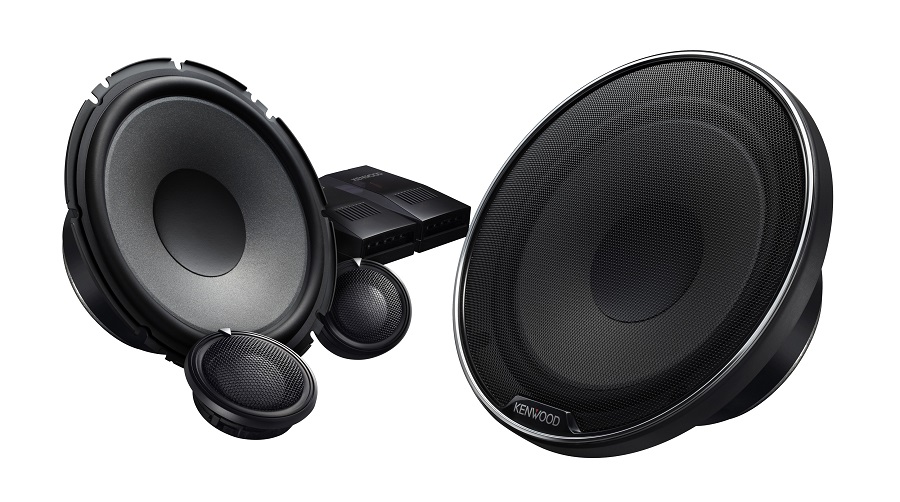
Component speaker units come as two separate speakers. The tweeter and the mid can be mounted in different places allowing for flexibility in the system. Basically you can choose where each part of the sound spectrum is coming from. Component speakers utilize a crossover unit to split the signal and ensure that each part of the frequency range is channelled to the correct speaker. These crossovers can either be built into the wiring or come as a separate unit that you’ll have to mount and hook up accordingly.
Many cars nowadays have components as standard, you’ll often find the tweeters higher up in the doorcards or even behind the dashboard. Something to consider when choosing your type of upgrade.
Convertible speakers are a combination of the two types. As the name would suggest the mid and tweeter can be mounted separately in component mode, or the tweeters can be dropped into the middle of the mid to run them as coaxial speakers.
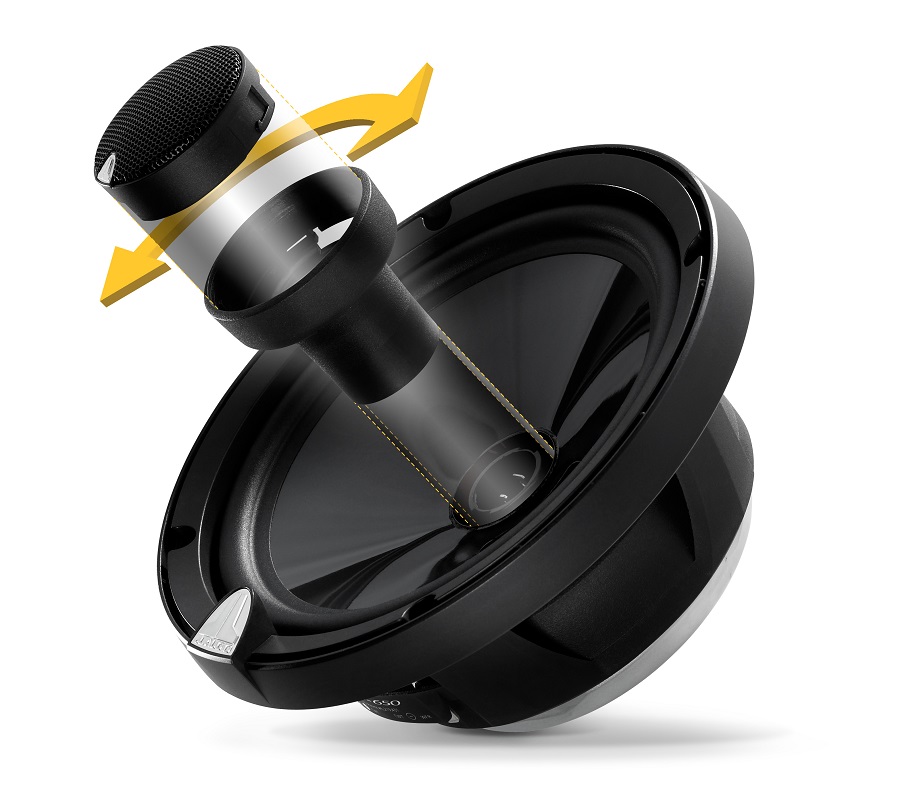
Convertible speakers give you adjustable mid and tweeter positioning.
Standard Setups vs Upgrades
In most cases, you’ll be looking to fit the same type of speaker that your car has as standard, but that doesn’t mean you have to. It’s extremely common for people to keep it simple and replace a component system with a set of coaxials. It’s also common to ‘upgrade’ to component speakers when building a full system more focused on speaker placement, even if the car doesn’t have these as standard. Most component kits will also come with universal pods which allow remote tweeter mounting in the place you choose. With all types of speakers, the main difference comes with how you wire them up… but we’ll get to that.
Speaker Sizes
The size of the speakers you choose is also vital because, to put it bluntly, they have to actually fit.
Speaker sizes are denoted by the diameter of the mid-range driver cone and, in the case of most aftermarket speakers, these are standardized to enable fitment in a number of different vehicles. In other words, for the most part, aftermarket car speakers are universal items you adapt to fit your specific vehicle. Nowadays they come in all sorts of sizes, most commonly 4, 5.25 and 6-inch circular items. Bear in mind though that although they’re by no means as common, some cars may use oval speakers, too. It’s always worth checking before you buy any upgrade.
For drop-in installations – and by that we mean where you’re not using custom door pods to cram in the biggest (or multiple) speakers – you’ll be looking for a speaker diameter that’s closest to the size of the standard mounting hole. But it’s crucial to check the depth of the speaker, too.
Aftermarket speakers tend to have larger magnets than the standard items. In some cases, these may be too girthy to sit inside the standard location. When it comes to door speakers, don’t forget that your windows slide into the doors when they’re open. You don’t want a massive magnet sitting in the way, right? When you’re checking the available space in any car door it always pays to roll the window down first.
If you’re not planning on whipping the doorcard off and breaking out the measuring tape, at the very least do your research to see what sizes other people have fitted in the same vehicle.
Speaker Adaptors
Car speakers may come in a range of standardized sizes, but standard door speakers don’t. There can be all sorts of weird shapes and sizes so aftermarket replacements may require an adaptor to make them fit properly.
In terms of the sound quality your speakers can deliver, getting the optimum fitment for your equipment is as important as the actual hardware you choose. It’s as easy to make expensive, high-end speakers sound terrible as it is to make more affordable speakers sound better than you’d expect. The performance potential of your speakers is all down to effective fitment. The better you mount them, the better they will sound, it really is that simple.

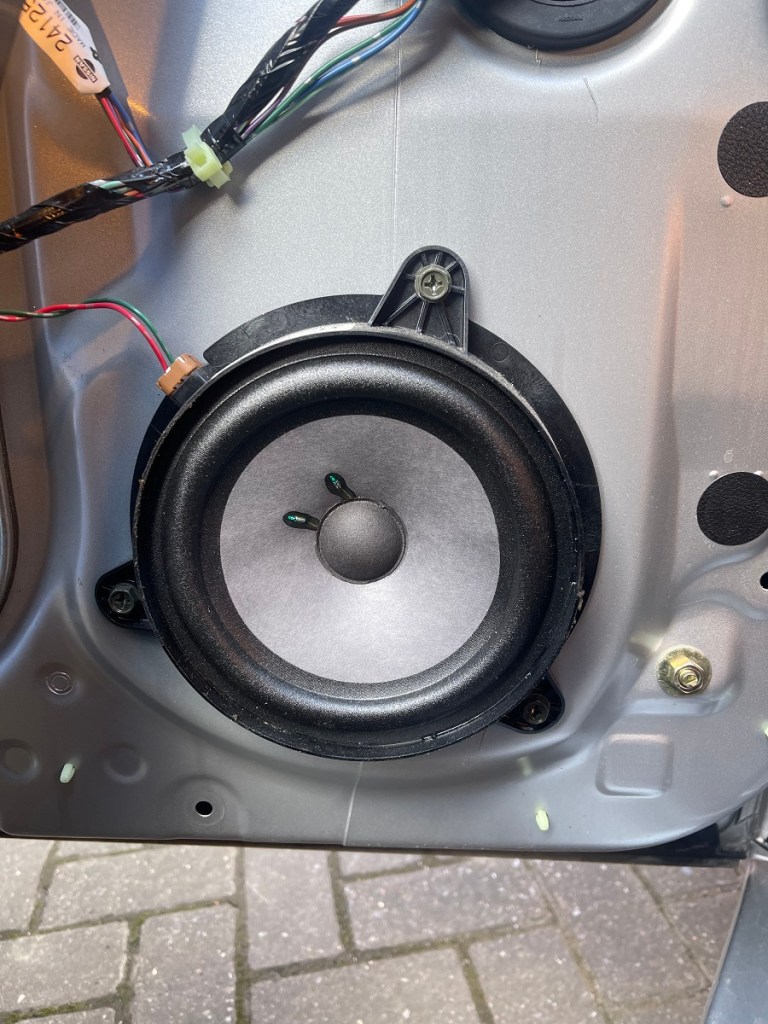
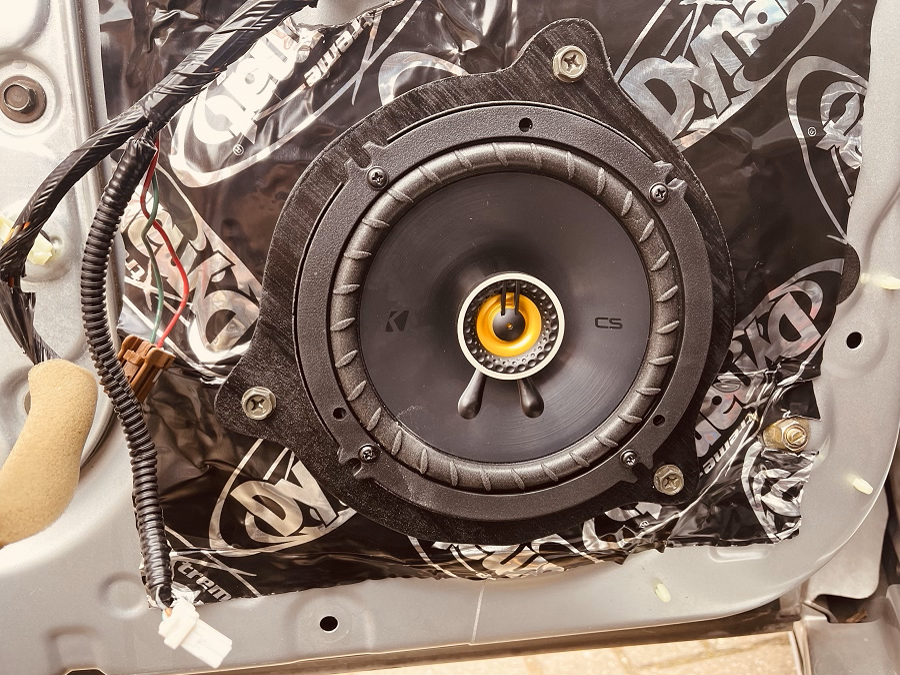
This V35’s stock speaker has been removed, exposing the the standard mount support.
All speaker cones work by shifting air to create the soundwaves that travel to your ears. The larger the speakers, the more support they require to get the best sound. This is why we screw them down to be as grounded as possible, first so they’re not rattling around but also to give them a solid surface to work against.
But it’s not just the speaker frames, the cones themselves also benefit from support. In much the same way that you mount a subwoofer in a box so the the internal air supports the cone, door speakers create their own kind of box in the inner doors. By firmly mounting them and cutting down on air leaks, this will significantly improve their performance.
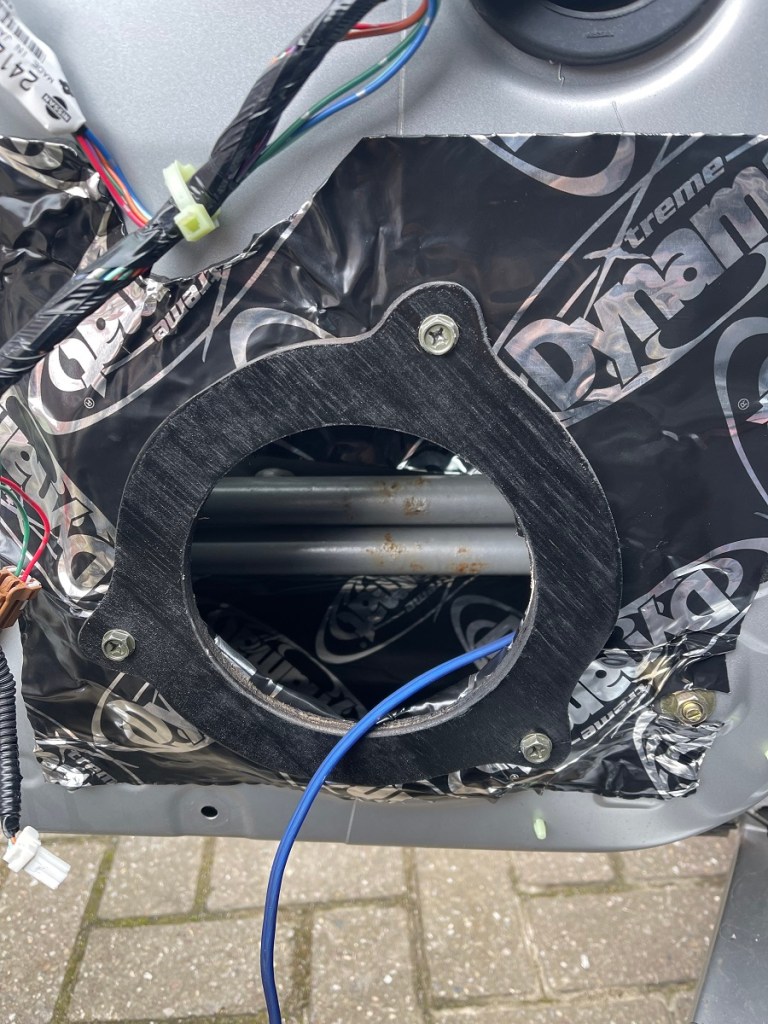
Sound deadening is added around the speaker mount
Sound Deadening
Improving performance is also the reason why professionals use sound deadening products (such as Dynamat) behind the speakers and around the mounting surfaces. This not only helps to physically reinforce the ‘box’ you’ve created, but helps the soundwaves bounce back into the car rather than passing through the to the outside. Keeping the music in and the road noise out is the goal here and doing it effectively will always improve sound quality.

The V35’s stock mount is able to support the new aftermarket speakers
Aftermarket vs Home-made Adaptors
All this brings us on to vehicle-specific speaker adaptors. Just like the facia adaptor you may have to make your aftermarket head unit fit your dashboard, these mimic the shapes and sizes of standard speakers. This not only enables optimum fitment but helps avoid drilling holes in your car to mount them. Basically all they do is make a speaker fit a hole that’s a little bigger, or a different shape.
Speaker adaptors are available for most core cars, they cost pennies and they can make much more of a difference than you might think. Some even come with wiring adaptors that plug into the standard plugs, making hooking them up easier than ever.
In some cases of course, especially with the more weird and wonderful cars out there, speaker adaptors might not be available so you may have to make your own from plywood or MDF rings. Again, this is straightforward, but we always recommend using the standard speakers as a template. As you can see in the pictures above of this V35 Skyline, very often you can use the standard mounting holes and screws so you don’t have to do any drilling. It’s worth the effort, we’ll say it again; when it comes to speaker performance, fitment is everything.
Step 2: Installation
Once you have the correct kit, your sound deadening and any adaptors you may need, the actual fitting is a straightforward job. In fact, we’re not going to tell you how to drop a speaker in a hole and screw it down, because you’ve already got that covered. There are a couple of other things to look out for though, and they mostly come down to the wiring…
Easy Fitting?
Hooking up your door speakers is dead easy with coaxial setups, a little more involved with component speakers and can be a complete nightmare if you’re upgrading to huge powerful drivers that require a lot of power to get the cones moving. This is because – in the majority of cases where it’s a simple drop-in upgrade – you’ll be splicing into the standard speaker wires to get the music signal to your speakers. And yes, its perfectly fine to do this because it’s all down to the current the head unit (or more specifically the built-in amplifier in the head unit) can deliver.
Typically, standard head units will deliver perhaps 10watts or so per channel and aftermarket head units around 50watts. Some modern cars have an amplified system as standard that will deliver a little more but, again, this is always through the standard wiring loom.
Speaker Power
The standard speaker wires that run from the head unit to your doors may be relativity thin, but they’ll easily take the load. In fact, they’ll take quite a bit more. This means that a relativity sensible door speaker upgrade will work happily off the head unit power and stock wiring. It’s also the reason why most of the full range speakers out there don’t have enormous power ratings, because they’re designed for simple fitment and the flexibility to take power from either a head unit, standard system amplifier, or an aftermarket external amplifier.
The flip side of course is speakers that have massive power ratings which are specifically designed for use with seriously powerful aftermarket amplifiers. In a way these are a toned-down equivalent of a subwoofer and used when building a serious install for either the loudest output or the optimum sound quality. There are huge advantages when running speakers on an external amp of course, but it does mean that you need to hook up yours using more sturdy wire. And you need to run it directly to the speakers. If that means running it through to the inner doors, in many cars this can be a huge undertaking. This is why speaker power rating is one more key consideration when you’re choosing your kit. You don’t want to under power huge speakers causing them to struggle because that just leads to distortion and broken hardware.
Coaxial Speaker Installs
As for wiring up a simple speaker install, as we said the idea is to splice into the standard wiring for your old speakers. With coaxial speakers (if you’re not using vehicle specific wiring adaptors) just cut, strip and crimp the relevant connectors to the wires, and plug them in. As long as you use good quality electrical connectors, and make sure the connection is is solid, you won’t have any trouble.
The only thing to look out for here is if you’re fitting coaxial speakers on a car that comes with components as standard. Here your car will have a built-in crossover to filter the frequencies to each tweeter and mid. Ideally, you’ll want to wire your new speakers to the main signal before it’s split up. And that means splicing in before it gets to the crossover.
In some cases, you won’t find the standard crossover because the signal splits before it actually reaches the doors, so here we’re always looking to wire our new coaxial to the output for the standard mid-range drivers. Then you can simply disconnect the standard tweeter so it doesn’t interfere with the sound.
Component & Convertible Speaker Installs
Components and convertible speakers are nearly as easy to hook up, but the process depends on the specific car and the type of upgrade. If your car has components as standard, you can wire in an upgrade simply by splicing into the standard wires at the mid, and then at the tweeter. Easy peasy.
If you’re upgrading a car that doesn’t have components as standard, you need to filter the signal yourself using the crossover supplied with the new components. If you’re lucky, this will be in-line on the supplied loom, with plugs on the end for the mid-range driver and speaker. But then, it’s not too difficult with a separate crossover, either. You just take the standard speakers wires and connect them to the signal input on your crossover, and then wire your new speakers to that, making sure that the split signal goes to the correct speaker.
Step 3: Test
It’s a simple step, but one that many forget. Before you start reinstalling your doorcards and trim, flip on your head unit and test out your speakers to make sure everything works as it should. Get your ear right up to each of them to make sure they’re vibrating and actually reproducing your music. Then crank up the volume a little to make sure they’re mounted securely and not rattling around. When you’re happy get your interior bits and pieces back together and marvel at the transformation.


