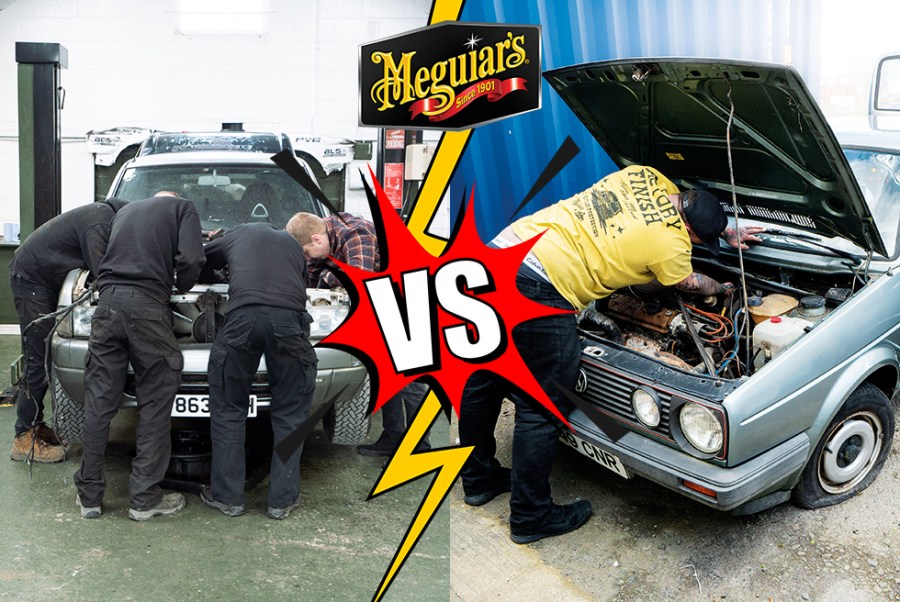
All good things come in threes, right? And that’s why the world’s most iconic detailing duo are back for another battle. It’s time for the Meguiar’s build-off 2022!
Unless you’ve been living under a rock for the last few years, then you must be aware of the Tom v Dale saga that has been running since 2019. For those still looking a little confused, Tom Clarke and Dale Masterman are both long serving members of the Meguiar’s UK team. After struggling to agree on the finer details of the brand’s own demonstrator vehicle back in 2018, the top dogs at Meguiar’s decided the lads would be better off both building their own cars and going head-to-head for bragging rights.

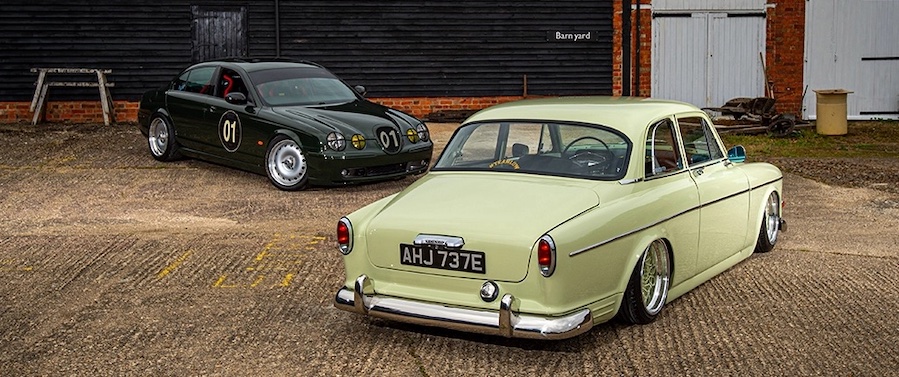
Round one saw Tom build a wide-arched R5GTT, while Dale went for a customised Merc W115. Round two saw Dale put his race-inspired Jag S-Type R (read the build) against Tom’s old-skool, flam-popping Volvo Amazon (read the build).
But it’s now time for the trilogy and we’re delighted to announce that we’re going document the builds right here, on Fast Car. So, without further ado, it’s Meguiar’s Build-off 2022.
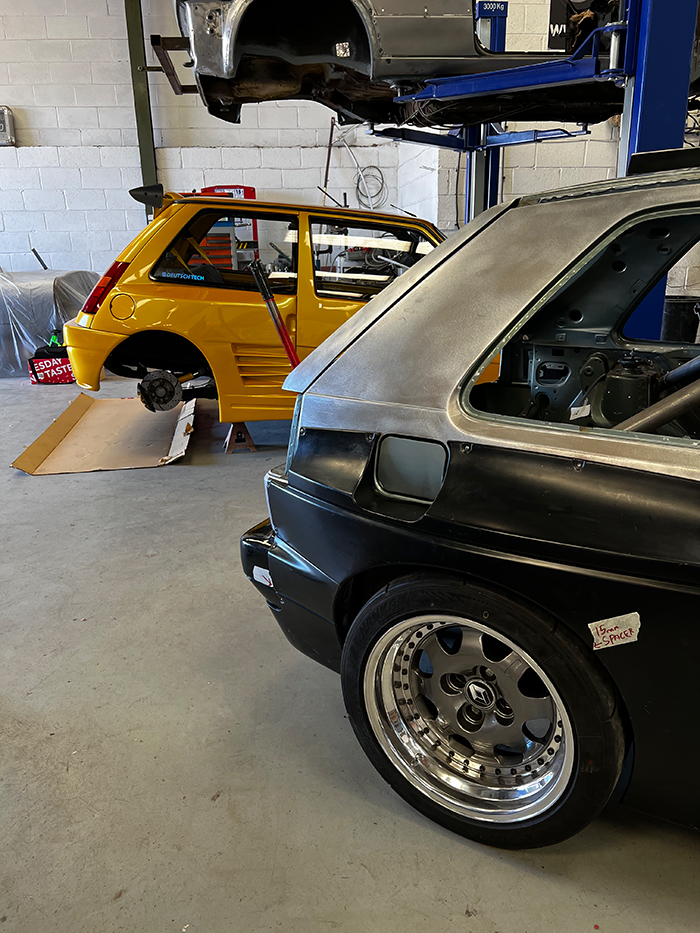
Meguiar’s Build-Off 2022 – Tom’s Mk2 VW Golf
Part 13 – Don’t Go Changing
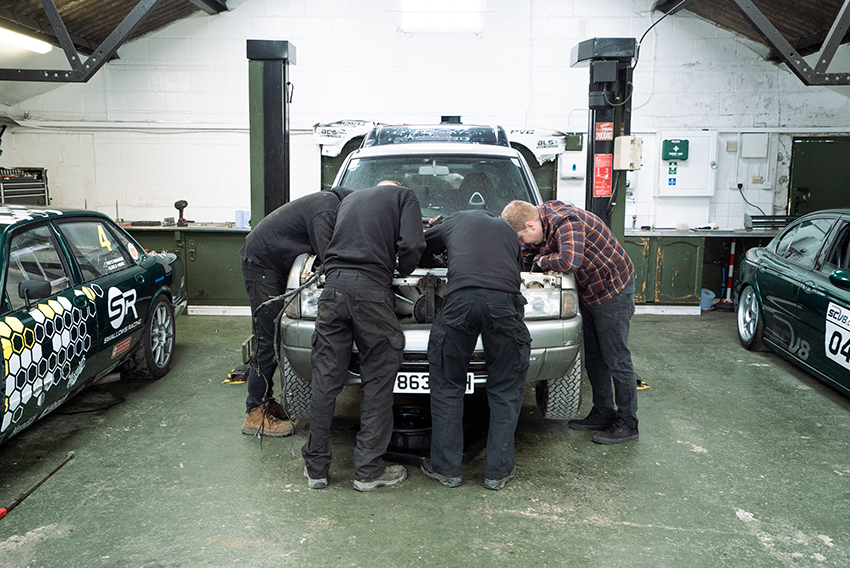
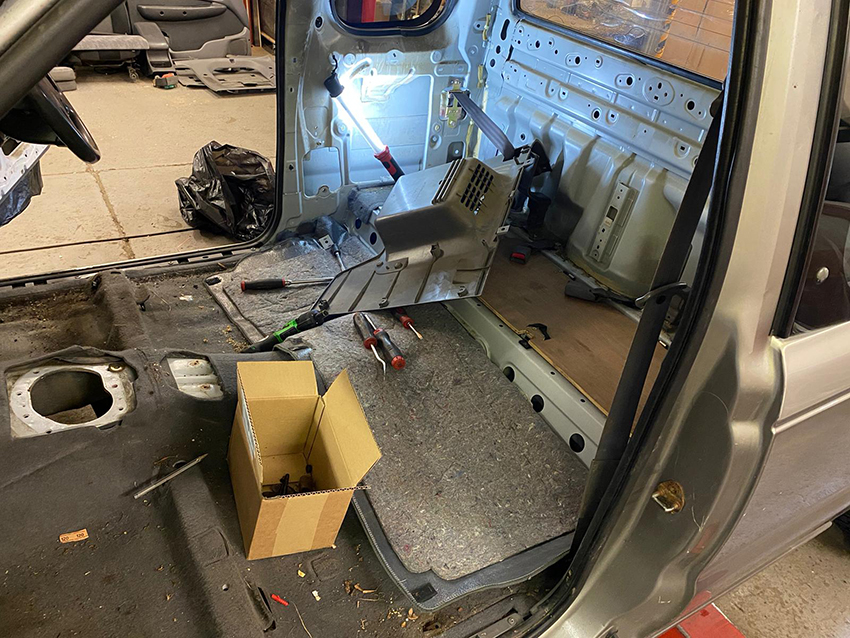
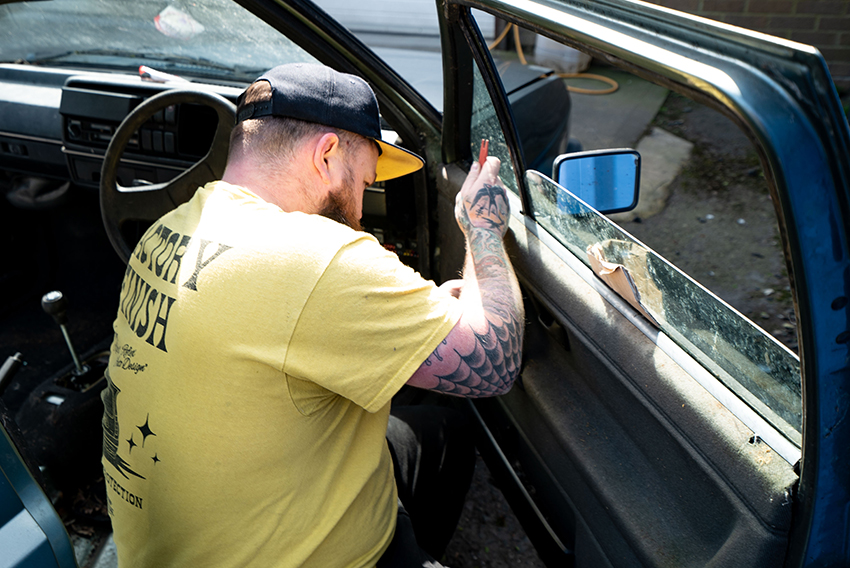
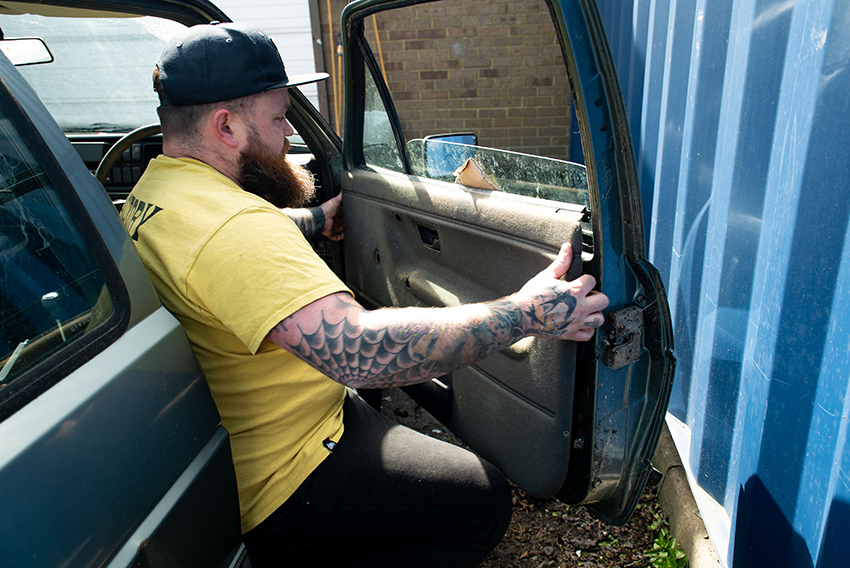
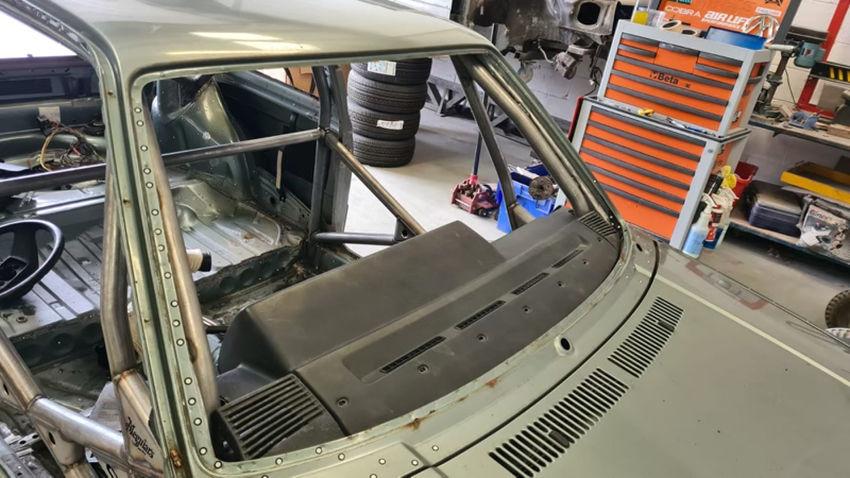
As with everything this is modified, you alter one thing and for some reason expect everything else on the car to fit/work out okay around that change. Obviously, that’s very rarely the case and it’s even less likely when you’re in the 11th hour rushing to meet a deadline. Why do we do it to ourselves?!

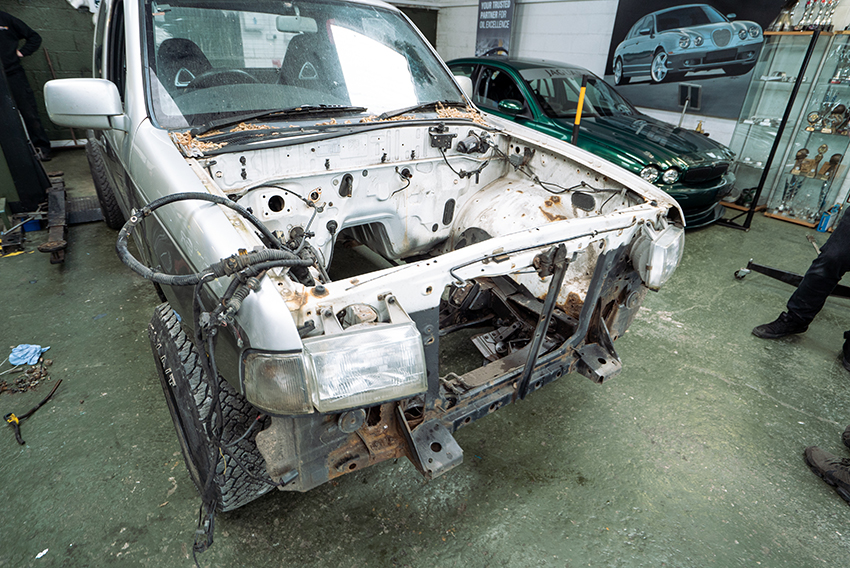
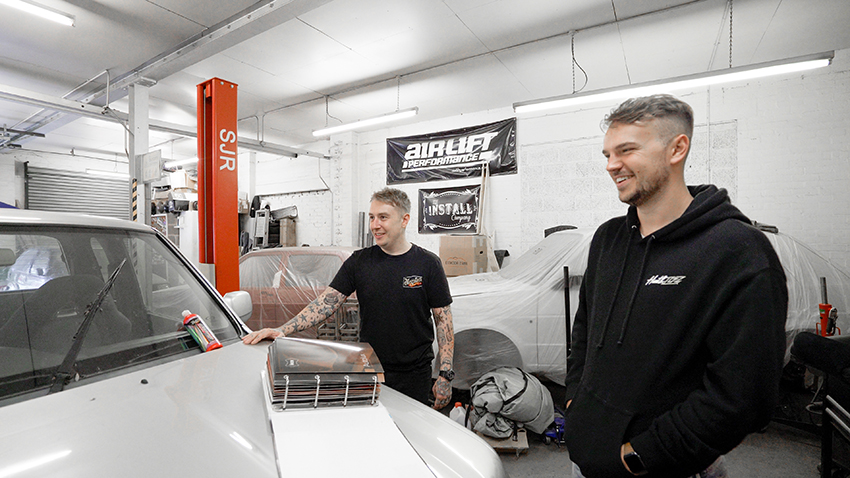
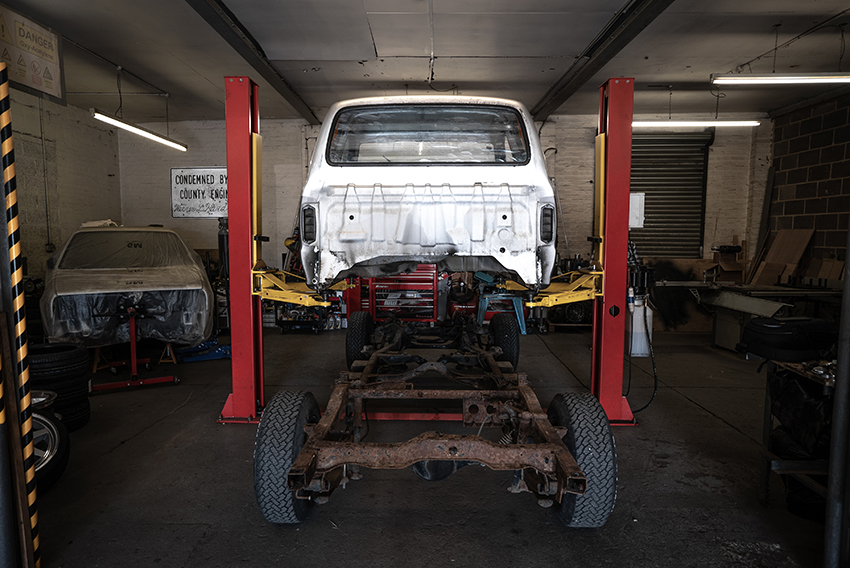
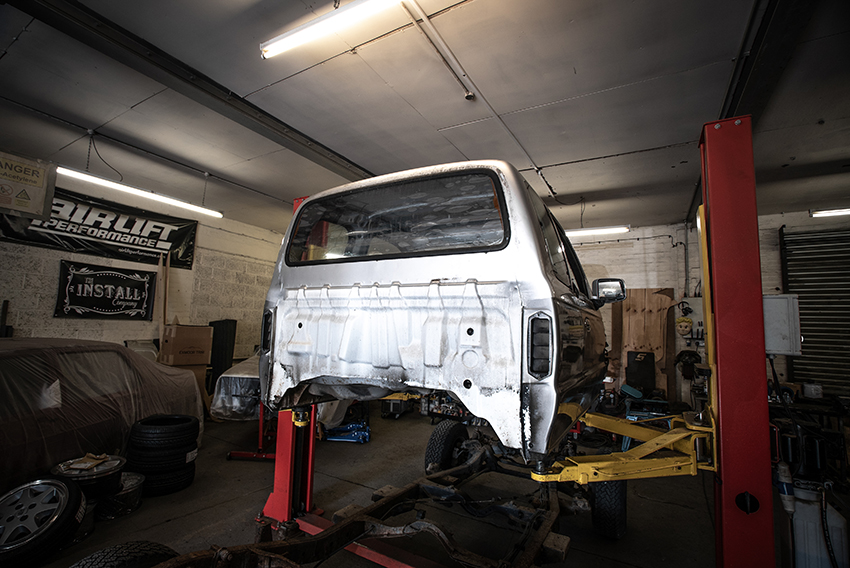
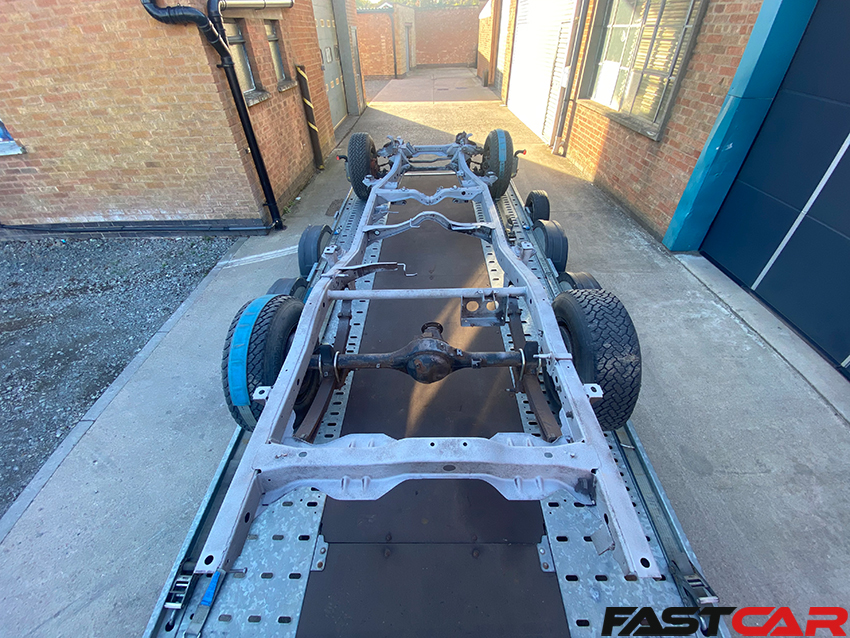
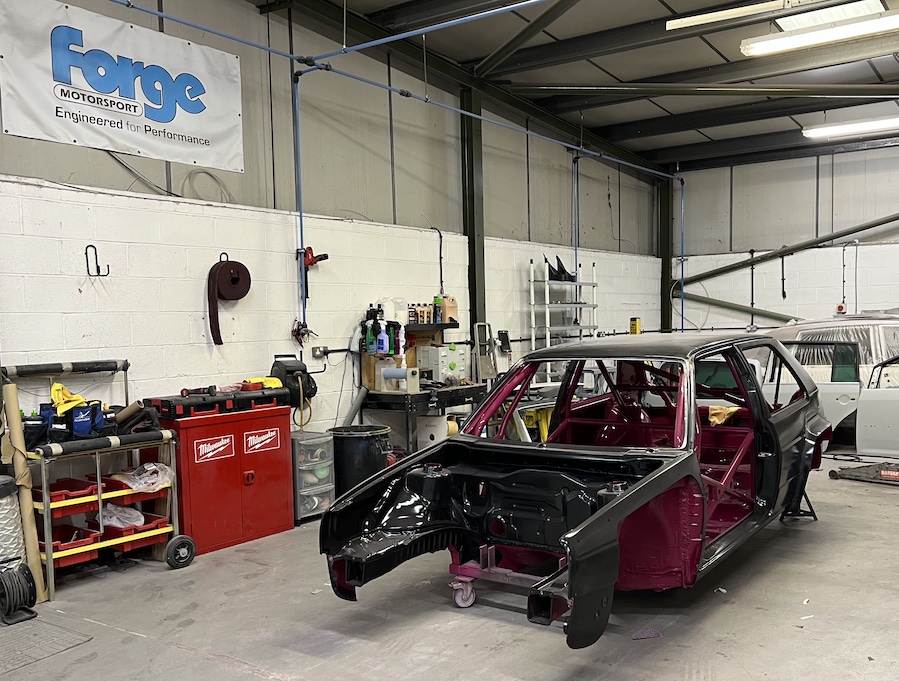
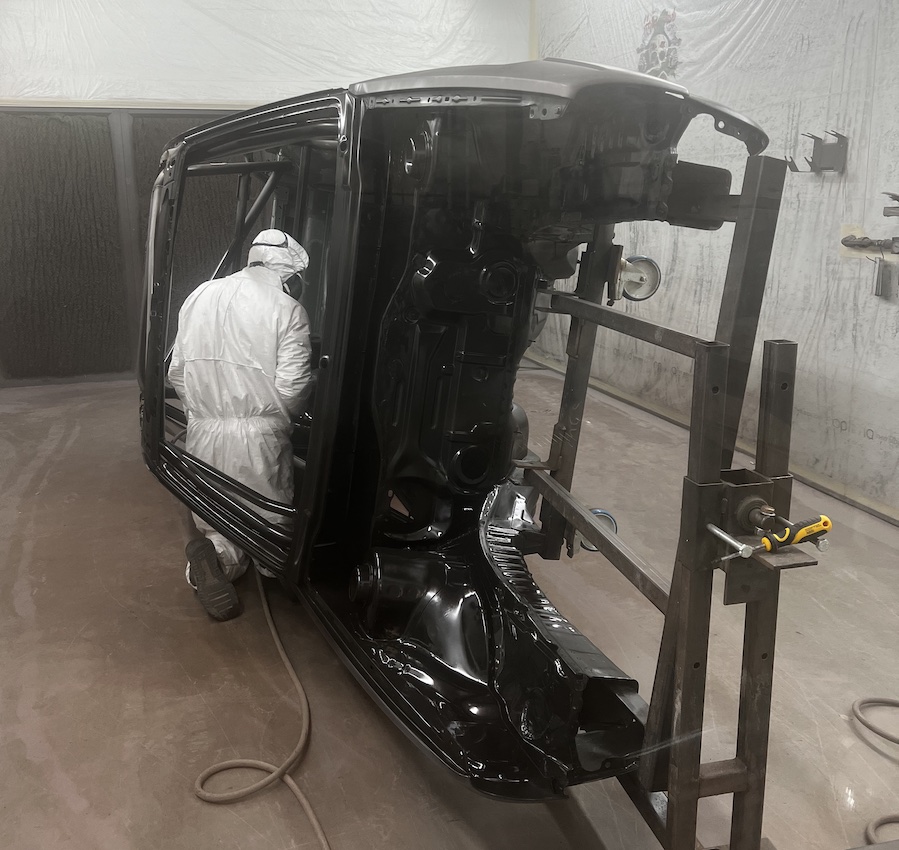
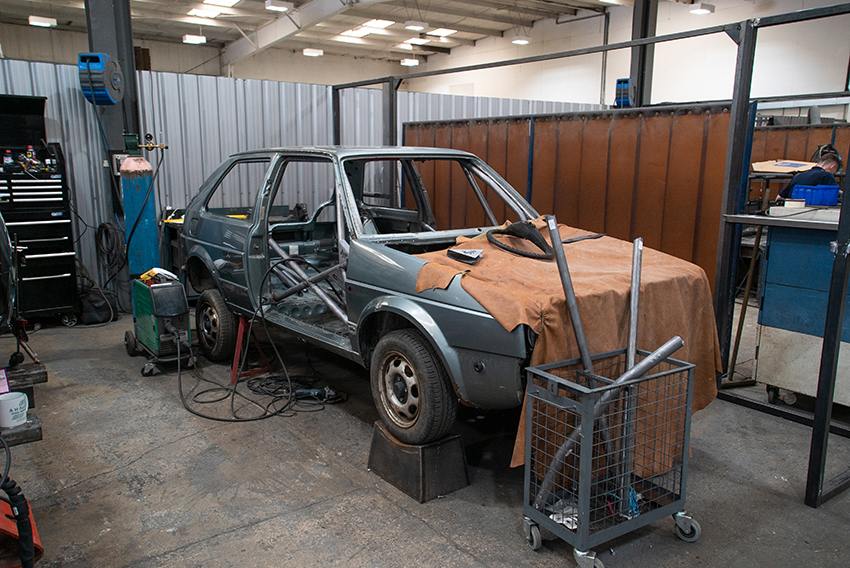
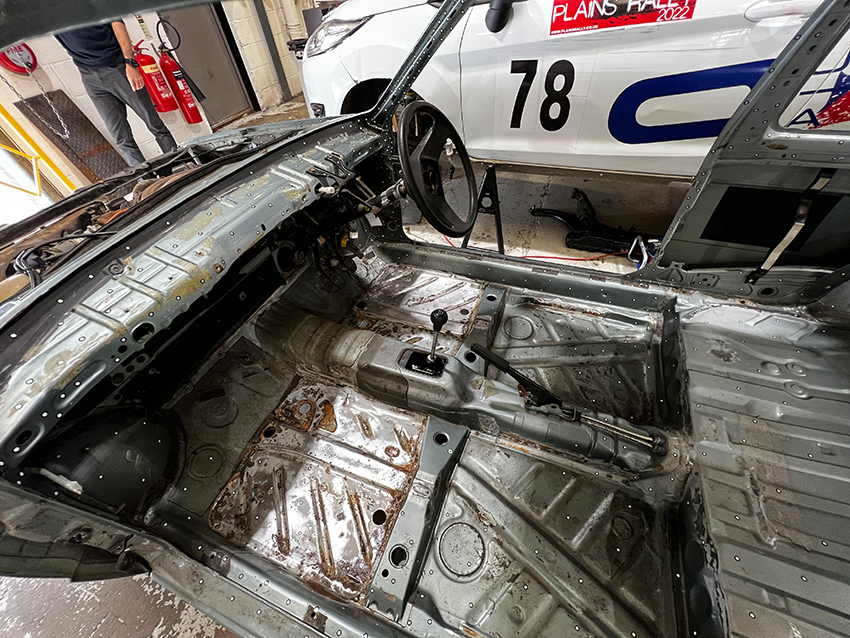
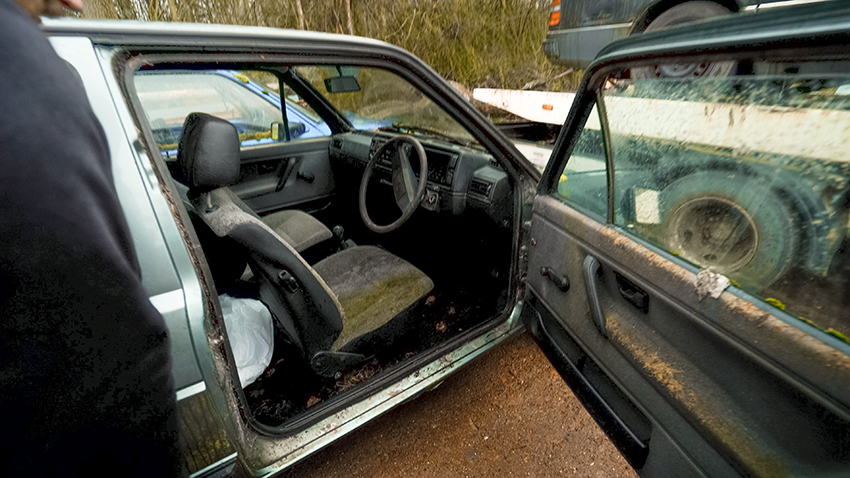
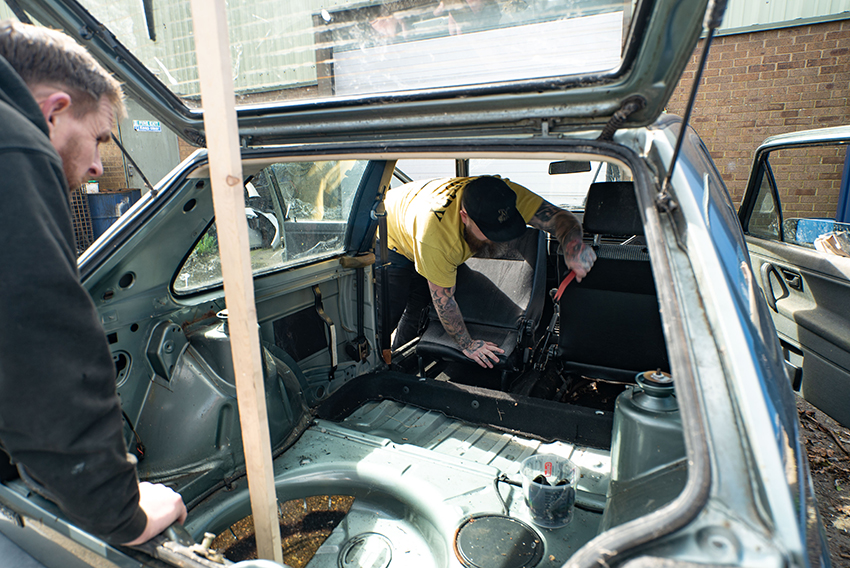
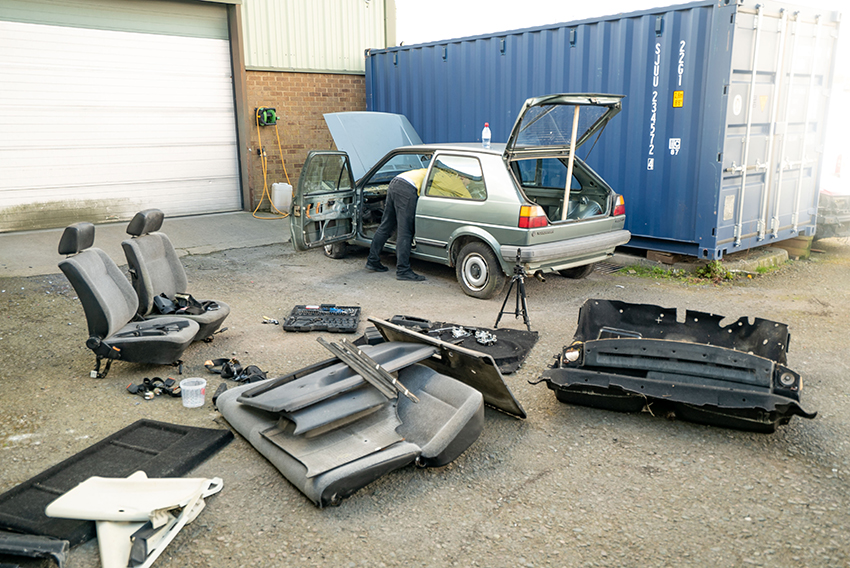
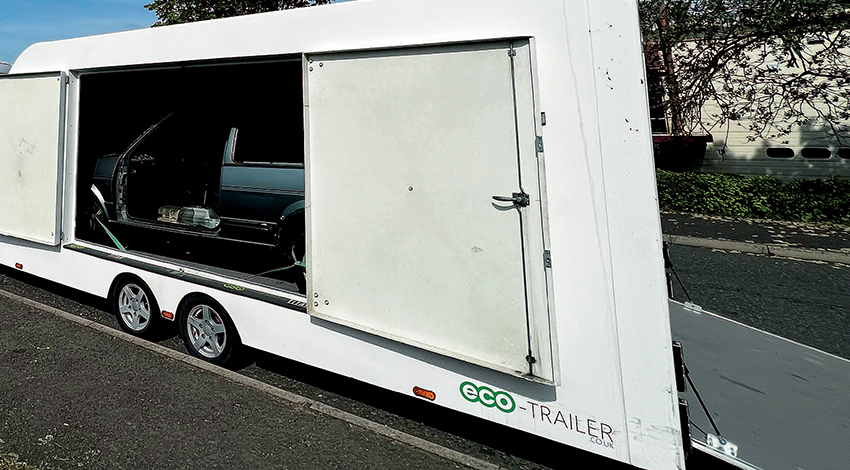
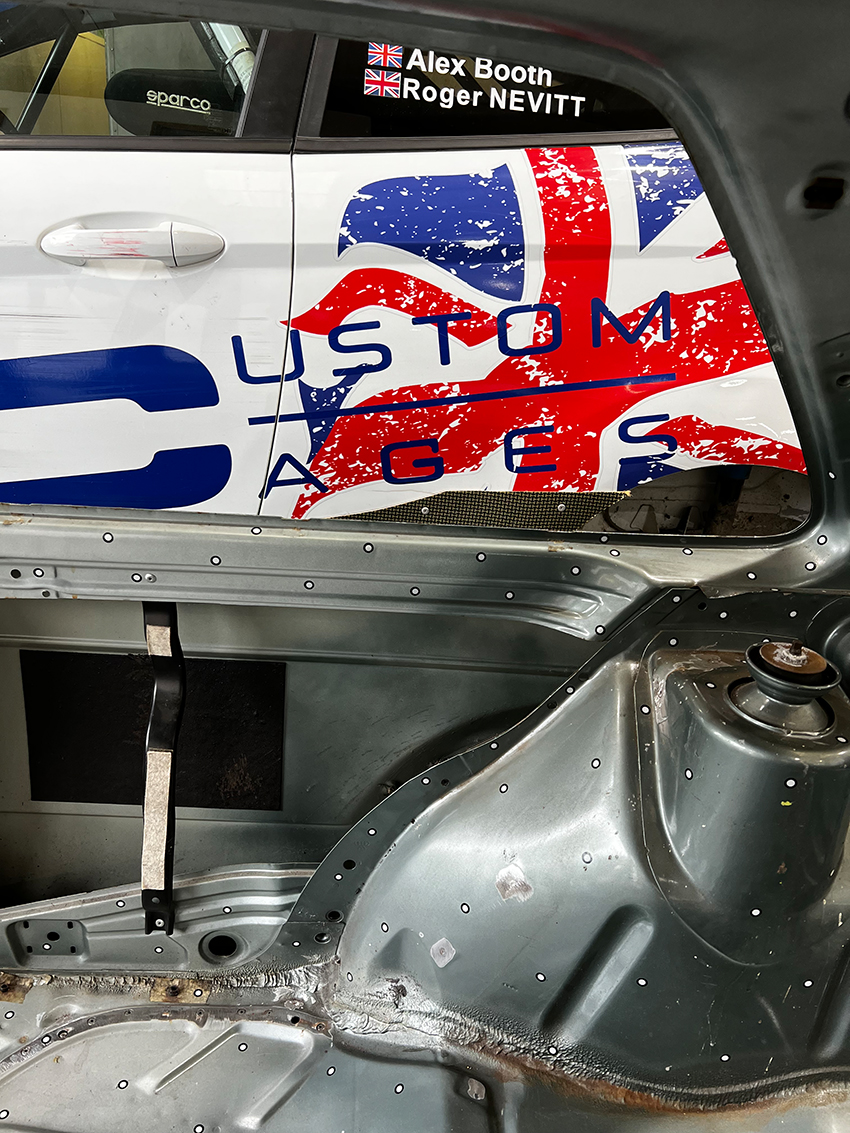
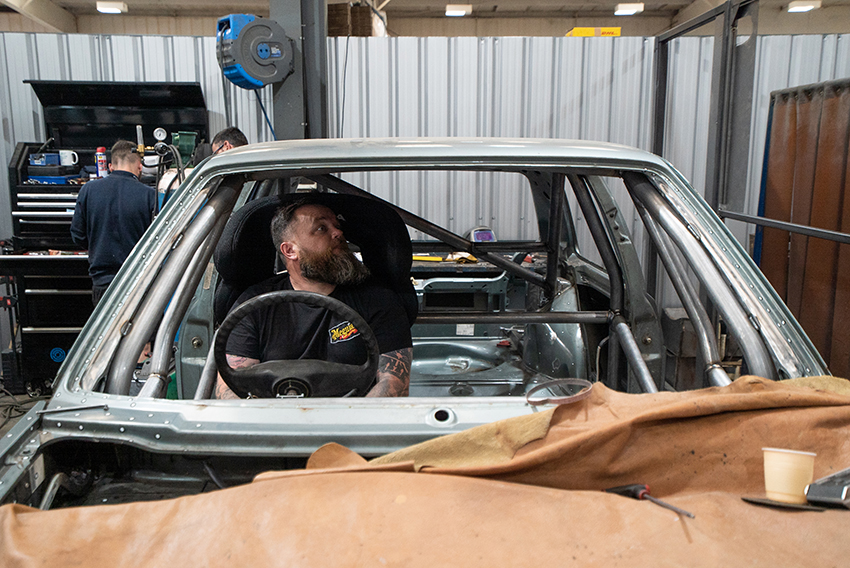
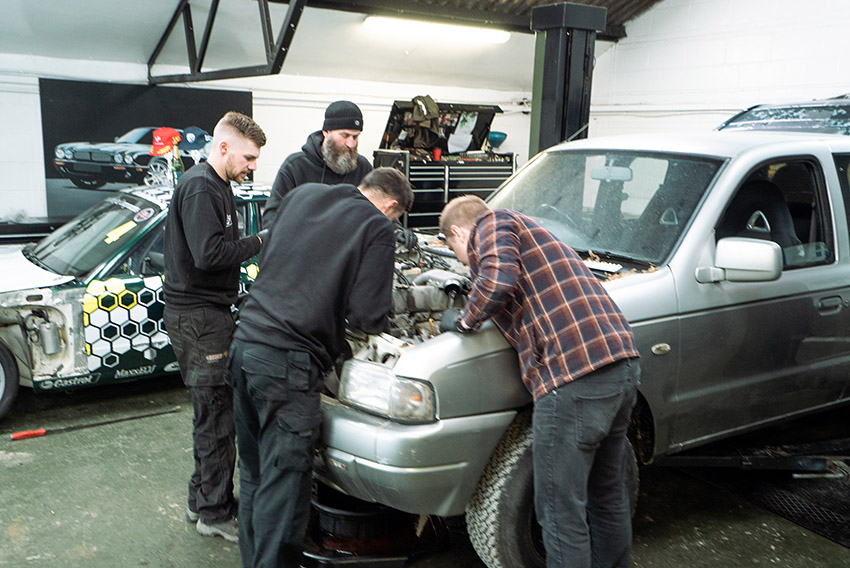
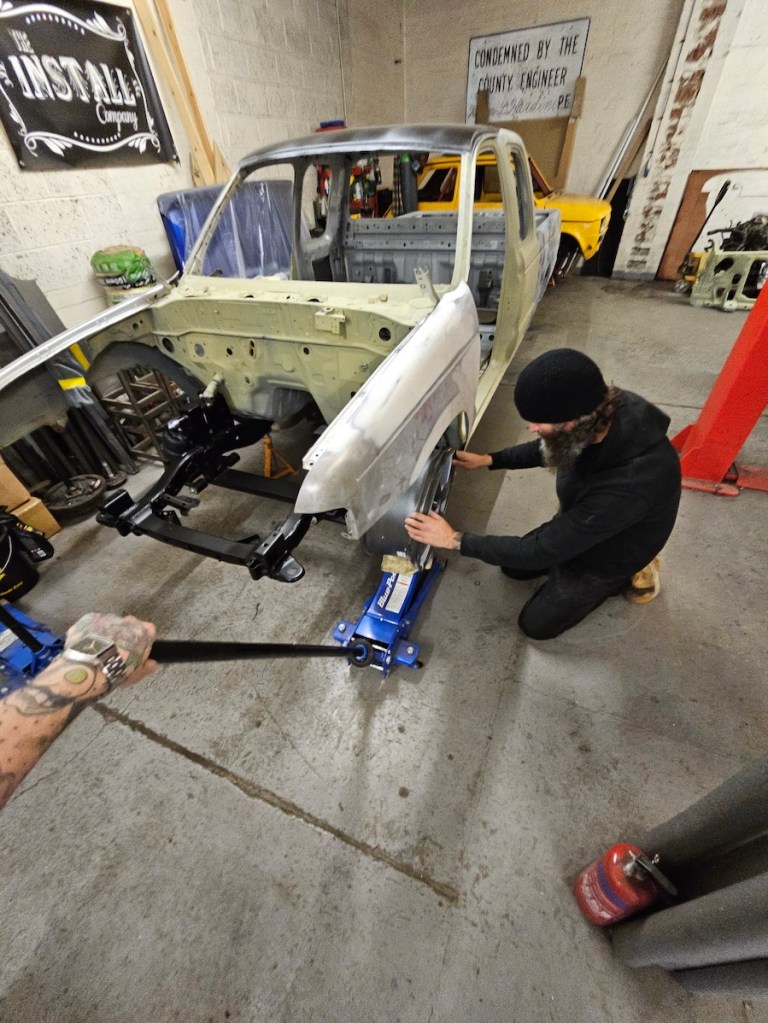
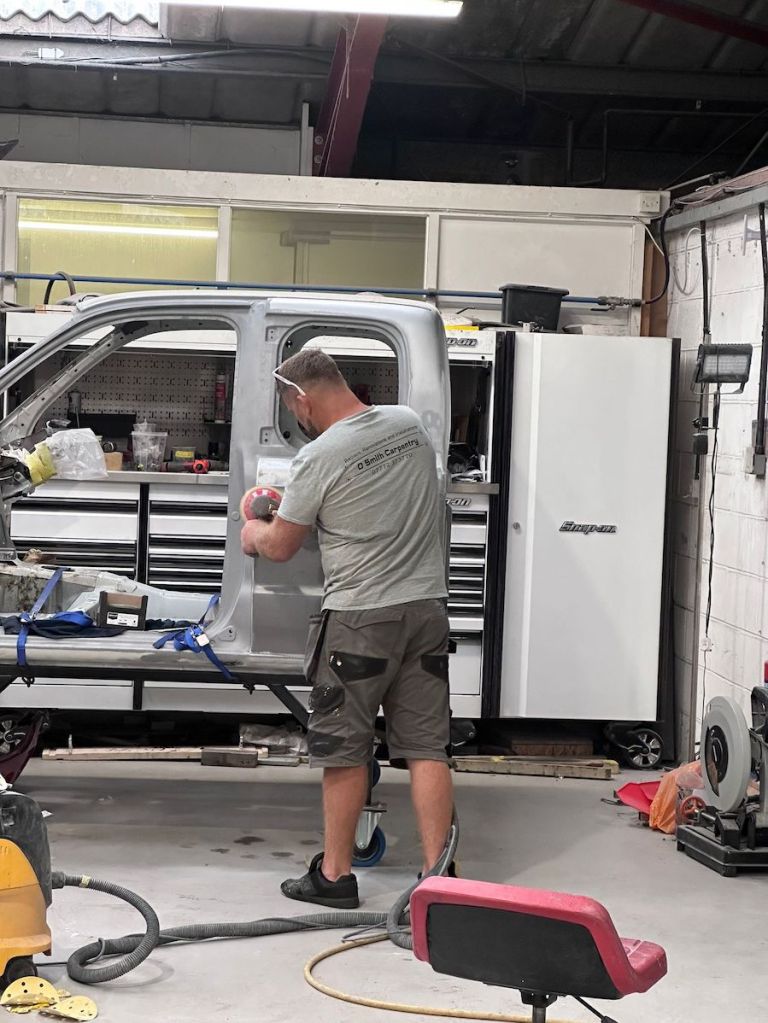
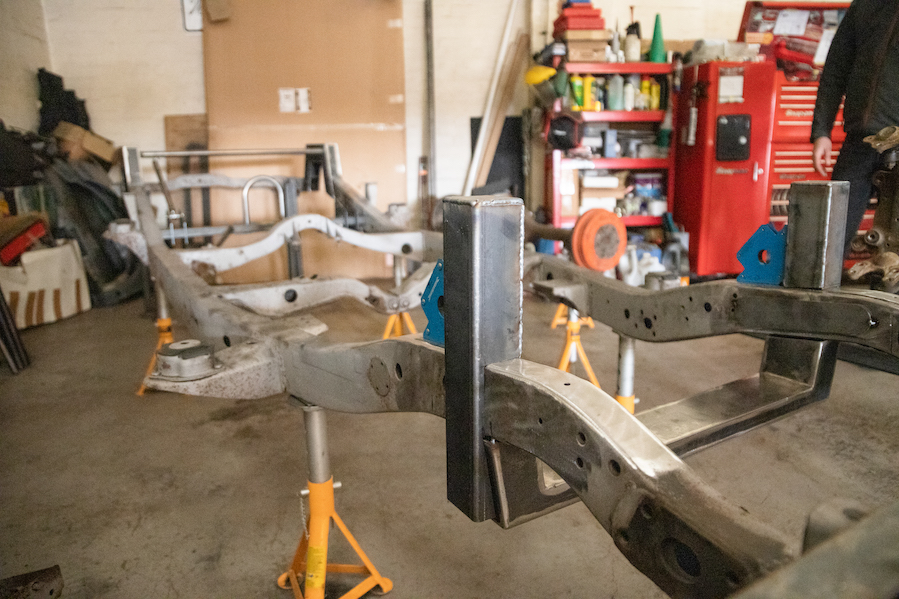
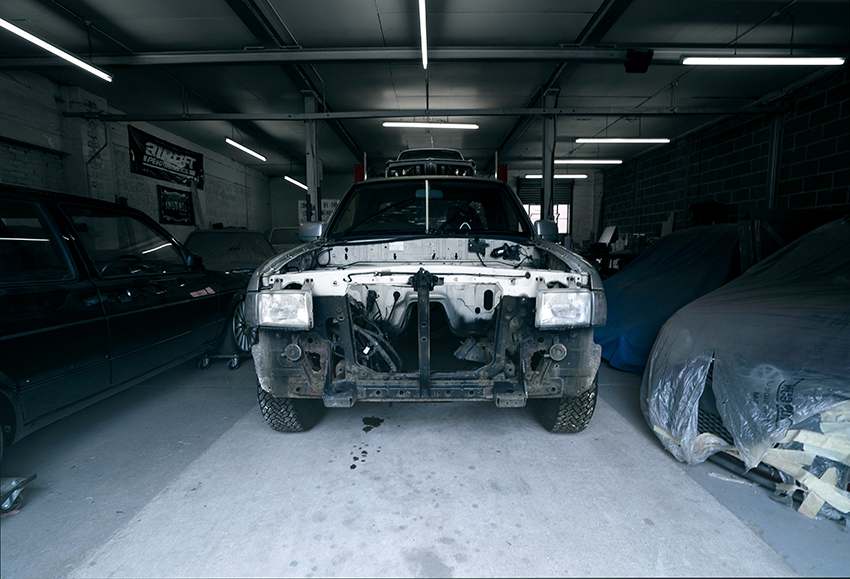
So, with our Ultimate Dubs debut looming, the car finally left the Reflex bodyshop and headed to JTech as a rolling shell. Well, when I say rolling shell, what I mean is, it rolled into the closed trailer on a set of dolly wheels and a trolley jack.
If that sounds a bit sketchy, then you haven’t heard the half of it. We hadn’t left them with much time to rebuild the car before the show you see – under three weeks, in fact. Other than the glass being fitted, the door handles and mirrors on, plus the bumpers, everything else was missing from the car.
Jamie and the JTech team are used to challenges, though, and thankfully the shell was in tip top condition when it arrived for them to start the big jigsaw puzzle (the glory-boy bit? – Ed).
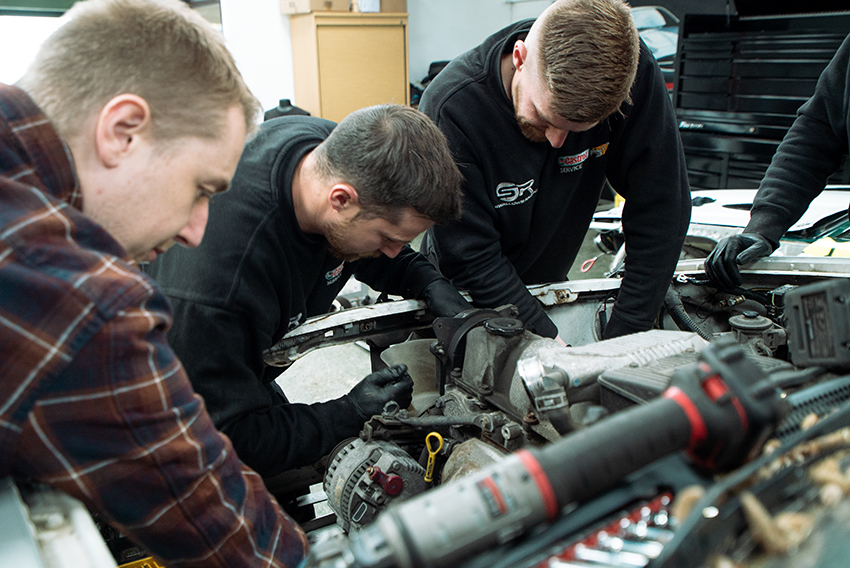
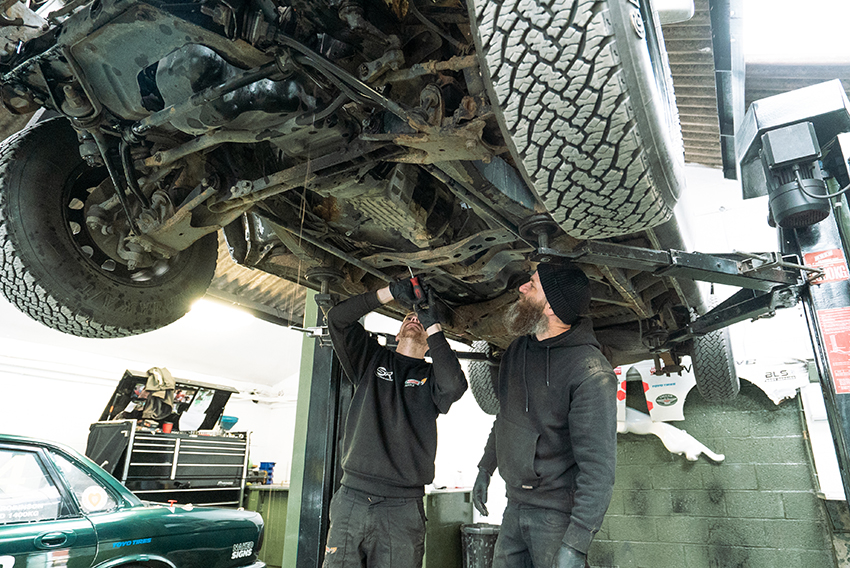
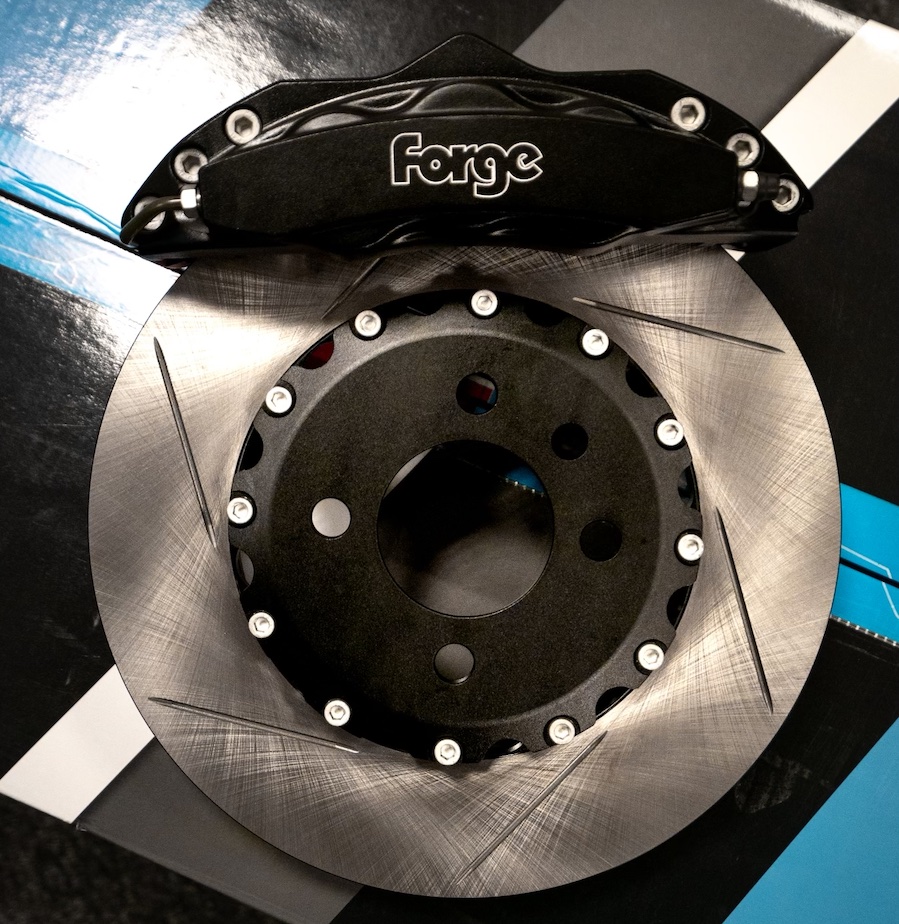
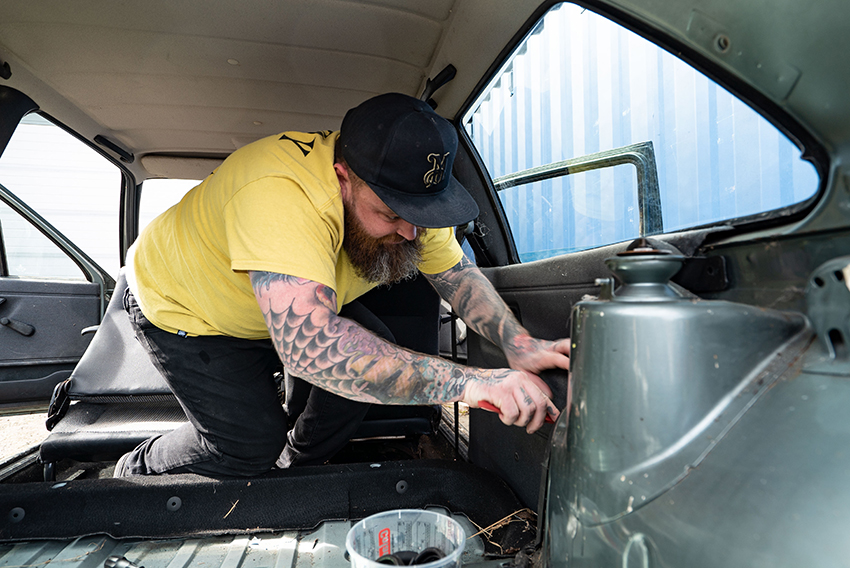
The lads were keen to get the car rolling as soon as possible, however, frustratingly the Image wheels were one of the last things to arrive. Because the Forge big brake kit was so, er, big, it meant the stoppers couldn’t be bolted on until the wheels arrived, as they simply wouldn’t fit behind the temporary wheels JTech were using. This didn’t stop Leo getting stuck in and fitting new brake lines throughout the car. He’s an absolute genius and has a particular soft spot for brake lines. Or was that hard spot?

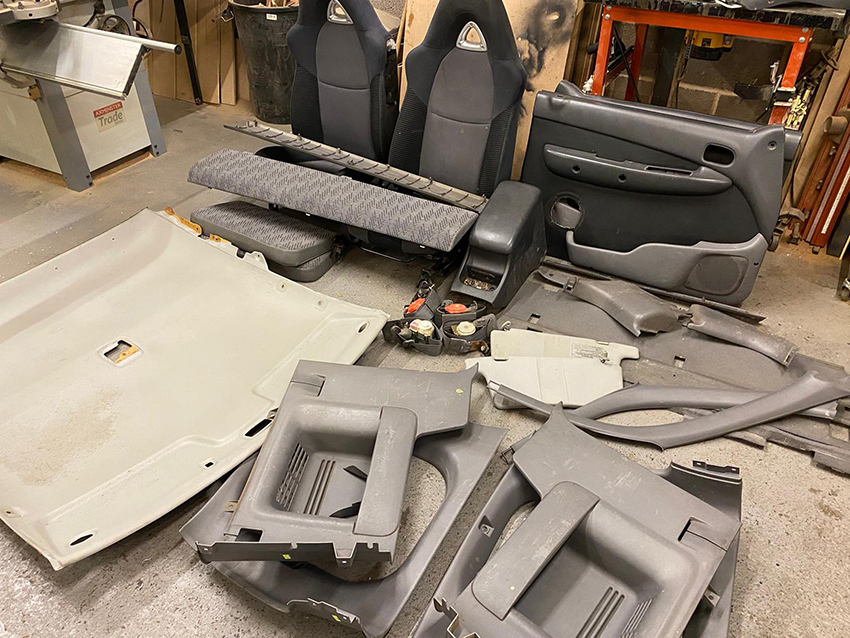
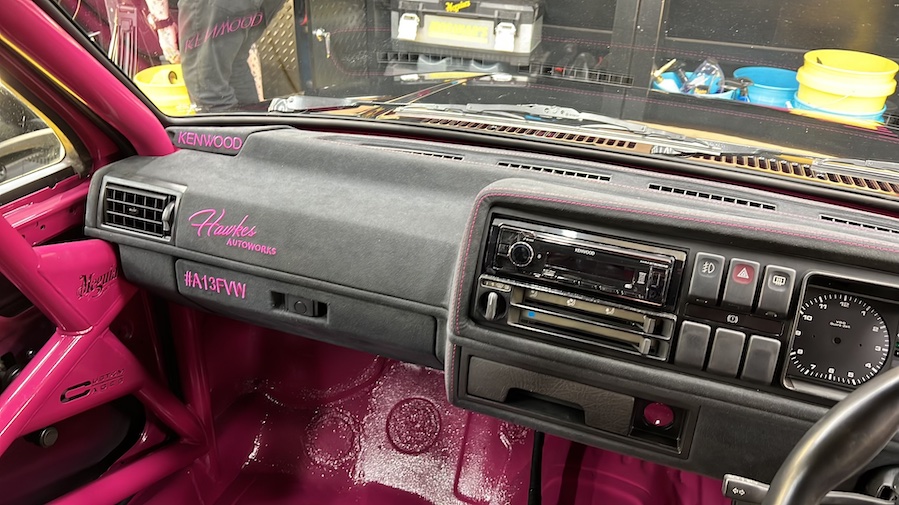
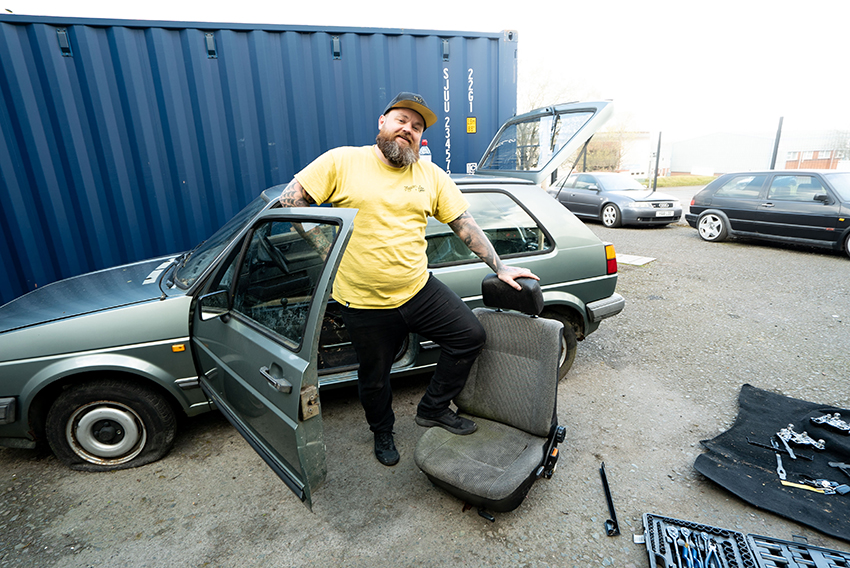
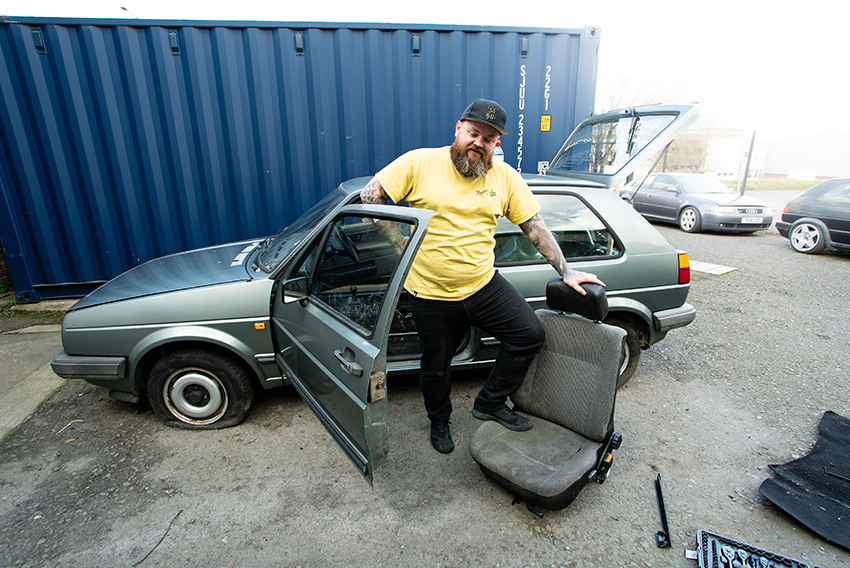
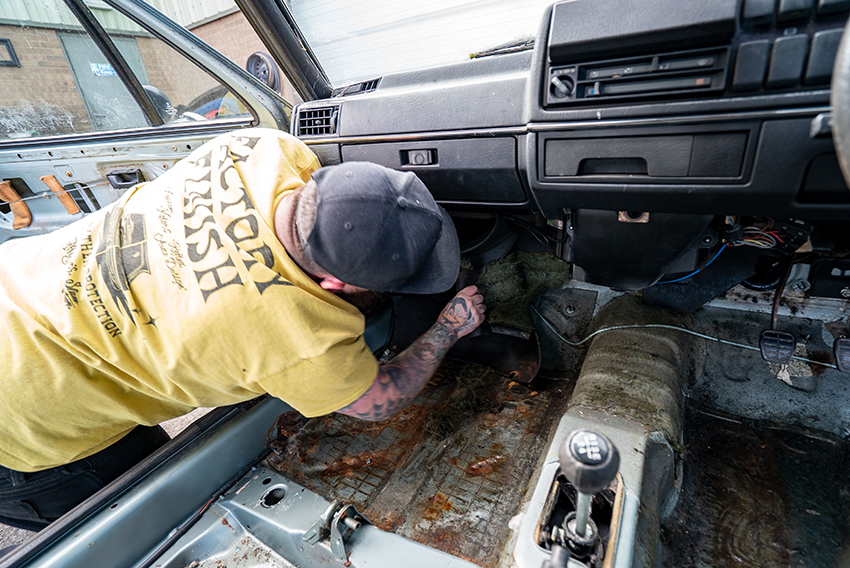
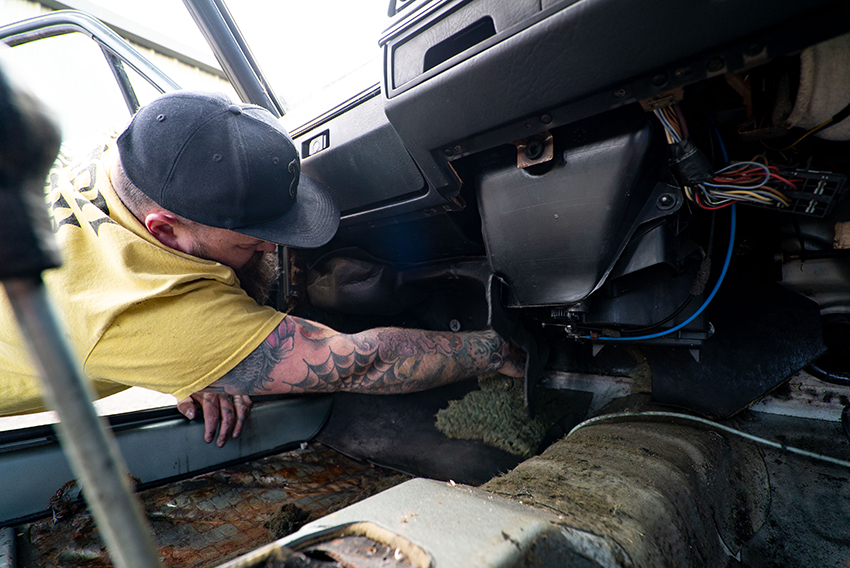
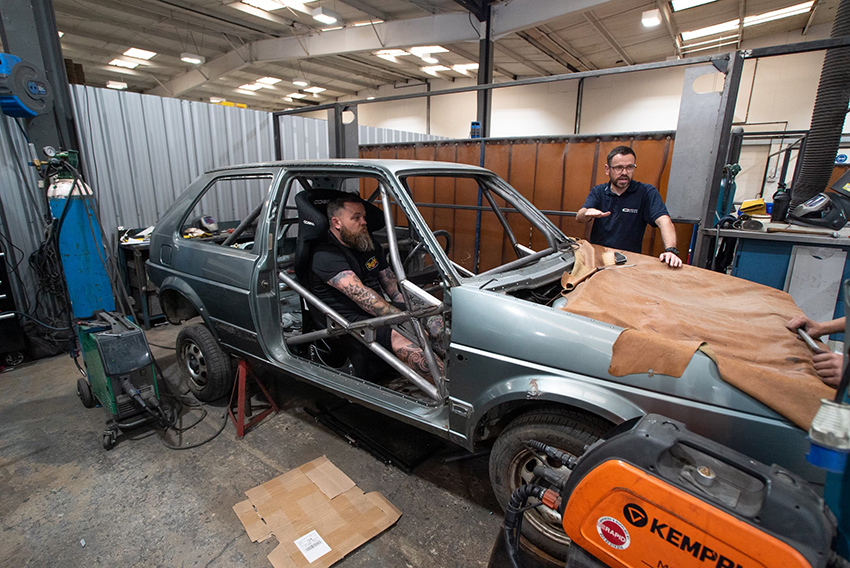
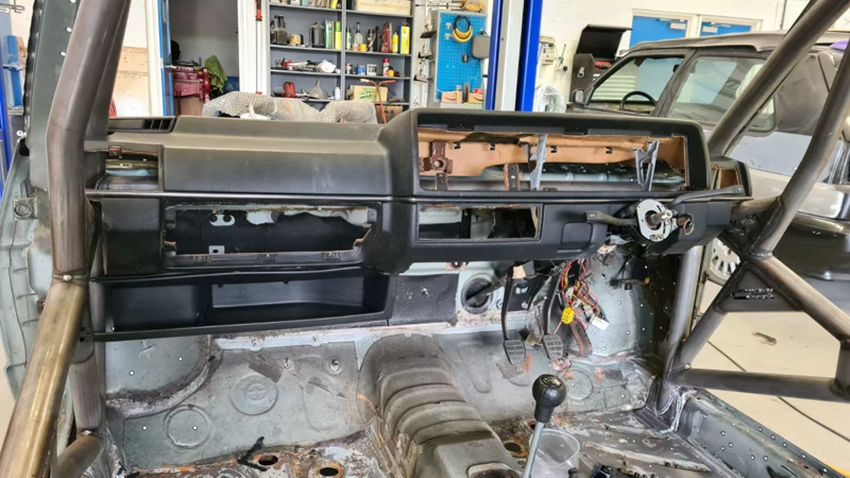
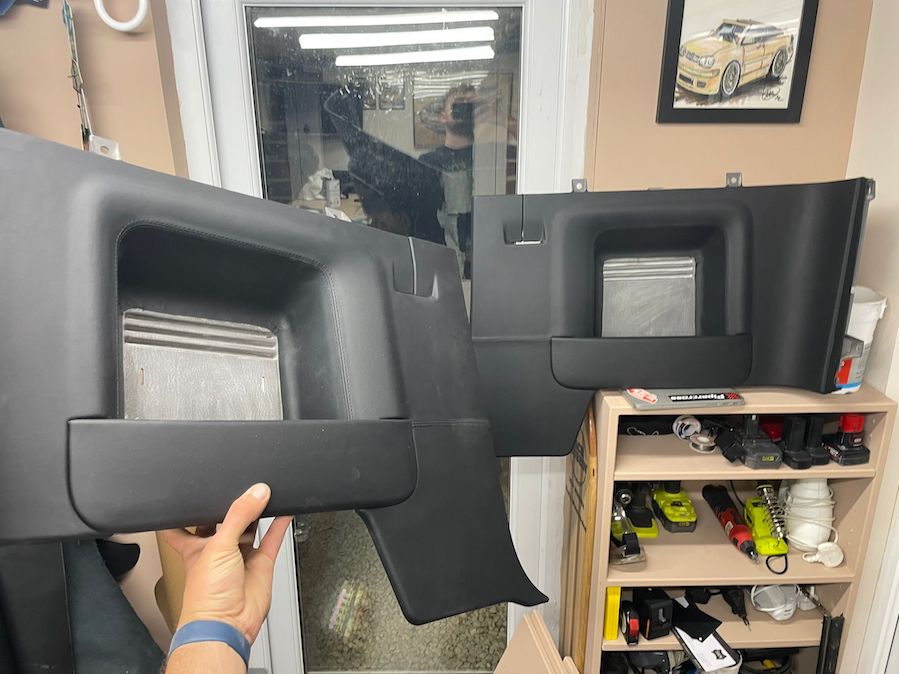
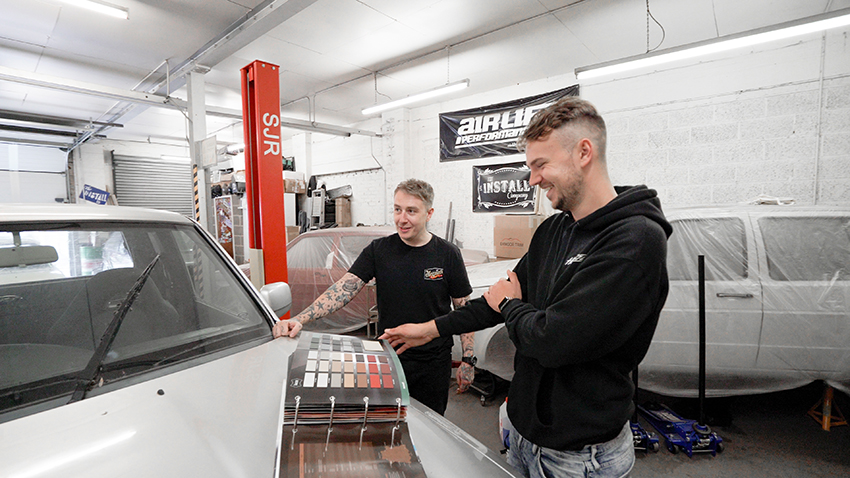
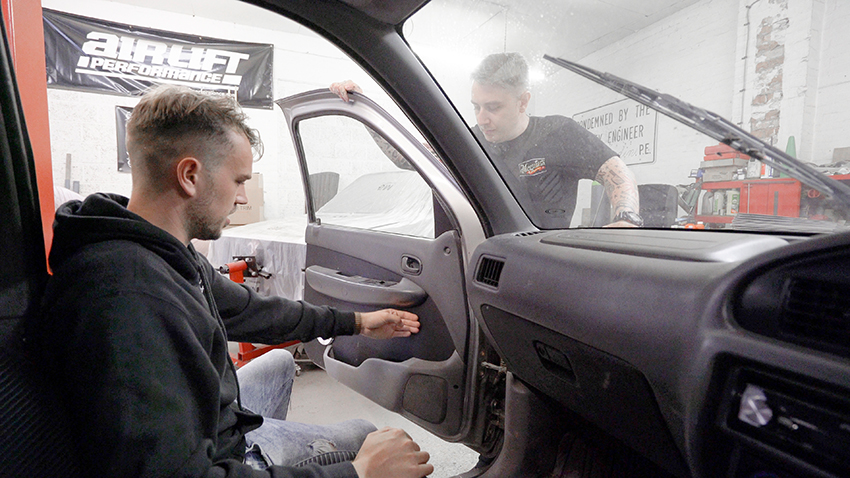
All the suspension and chassis parts went on next, and then engine dropped in soon after. While JTech were busy with the mechanics (I wanted to say oily bits, but they were pretty damn clean to be honest), Max at Hawkes Autoworks headed over and fitted the freshly trimmed dash.
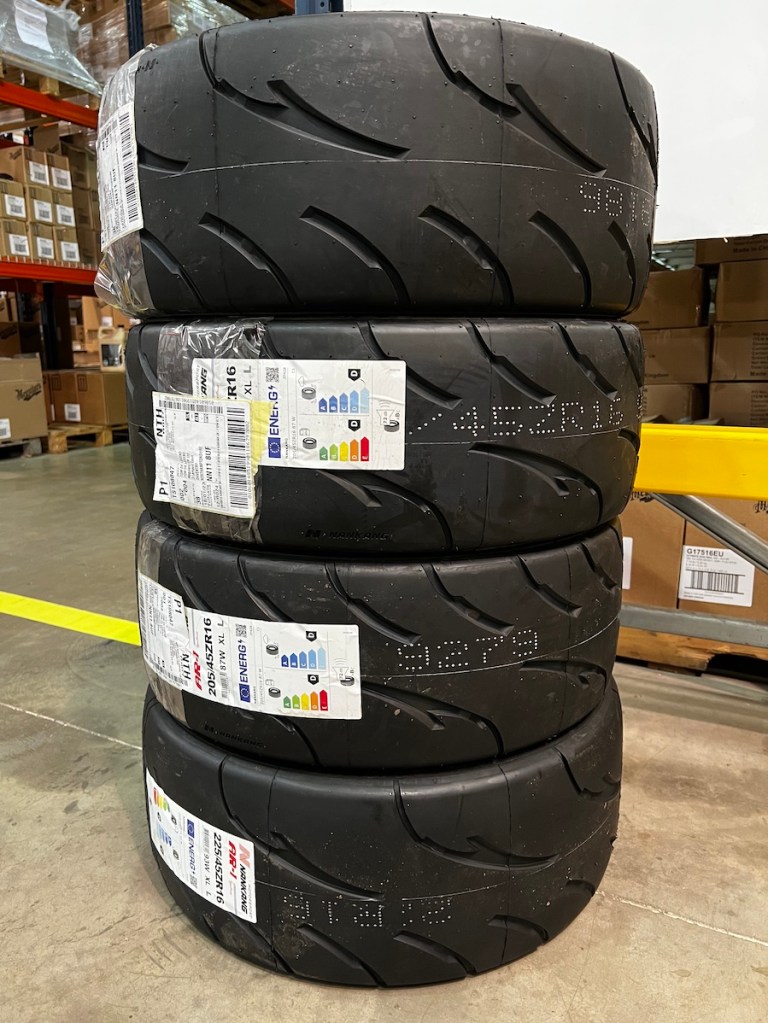
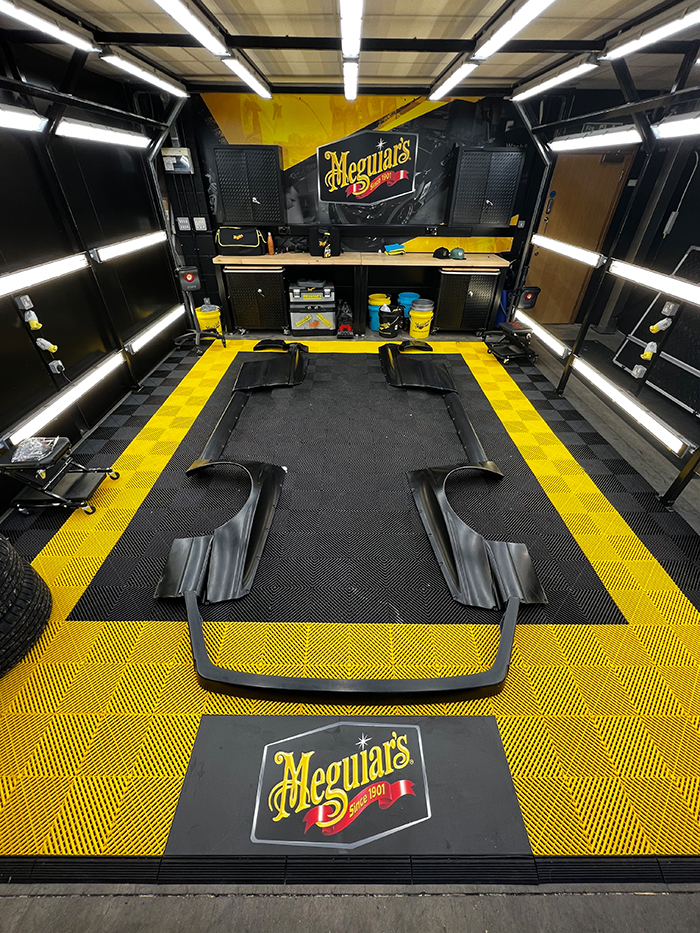
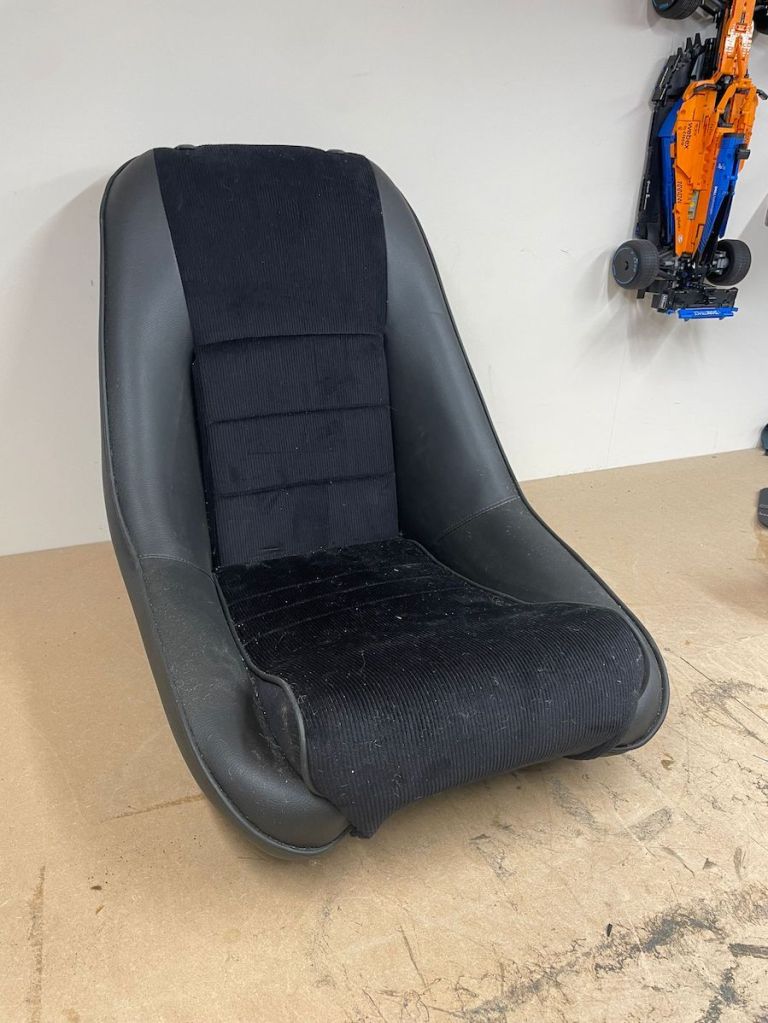
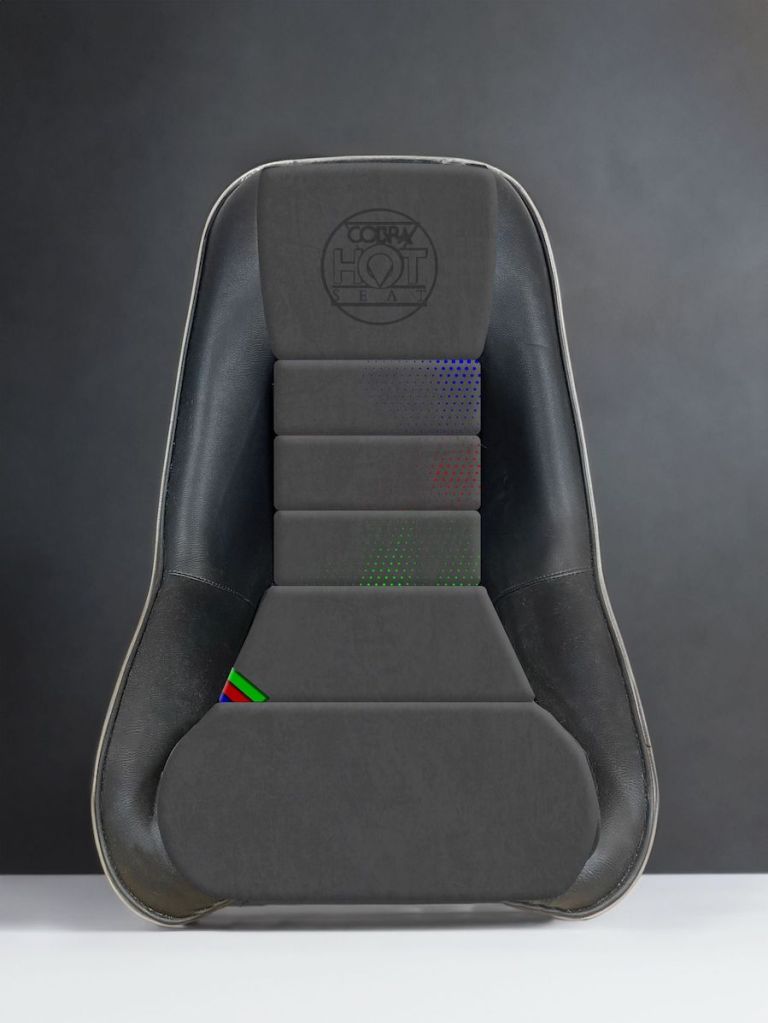
The custom Cobra seats then went in and the car started looking like a complete, er, car! Finally, the wheels arrived from Image and got mated to their Nankang AR1 cut slick tyres, all in the nick of time. Of course, nothing was straight forward and challenges were met and overcome in a calm fashion.
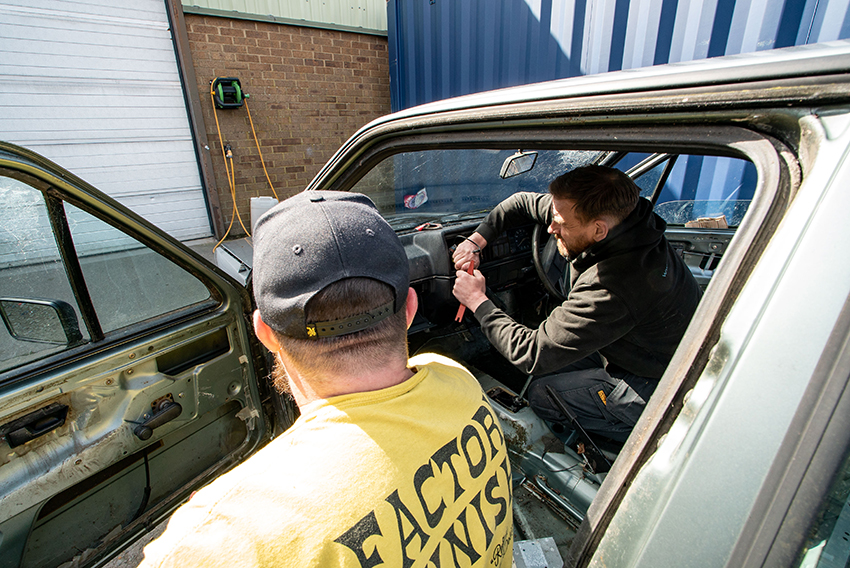
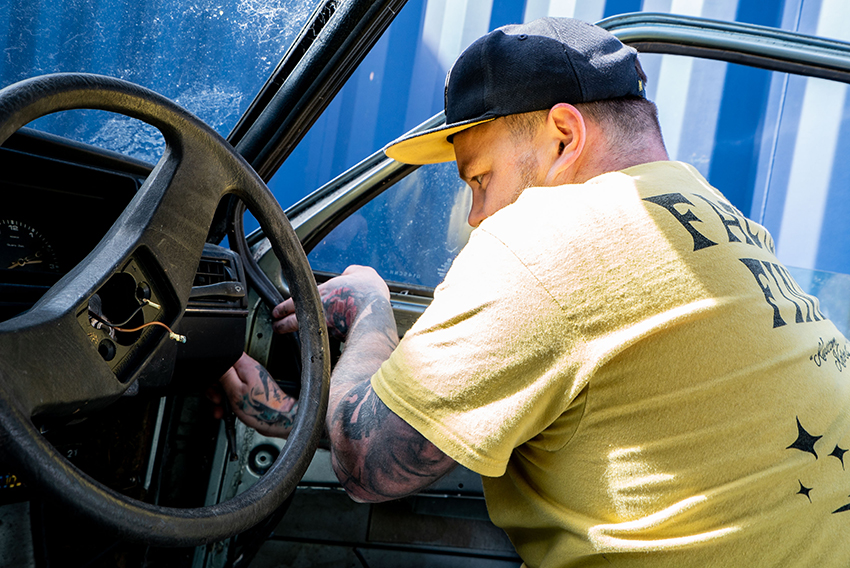
Okay, I wanted to cry for about a week straight in the lead up to the show. But, we got to the ball on time. Yes, the eagle-eyed among you may have spotted we were running the latest, super-rare Bluetooth coil packs (okay, the car went straight back to JTech after the show to get the harness fitted and the thing fired up, but thankfully the car went down a storm.
Obviously, we’ve skimmed over a lot of the details here, so you get to read all about the ups and downs in the full feature which is coming very soon. We are aiming for the July issue, which will give the JTech team more than enough time to wrap up the finishing touches. As for Dale and his project? Yeah, well, I’ll tell you all about that in my feature, too…
Part 12 – Relay Race
As the latest Tom v Dale Meguiar’s build-off approaches the final stages, it’s clear Tom is potentially on to a winner. But, then, we would say that as Tom’s building a Rocket Bunny-kitted Mk2 running a built 16v on ITBs, whereas Dale, well, the less said about his Ford Ranger build the better. However, in order to win a race (or battle) first you have to finish it and that’s what’s got us a little bit worried.
Now, Tom was always planning to debut the car in the metal at Ultimate Dubs 23, however, he was also hoping the project would be finished in enough time for us to shoot it for the cover of this very issue, which hits the news stands just before the show. Well, as you have probably noticed, he didn’t make the magazine deadline and, to be honest, we’re a bit worried at the UD launch as well. Tom still sounds optimistic, but then he always does put a positive spin on stuff. In the real world, however, there’s still plenty to do.
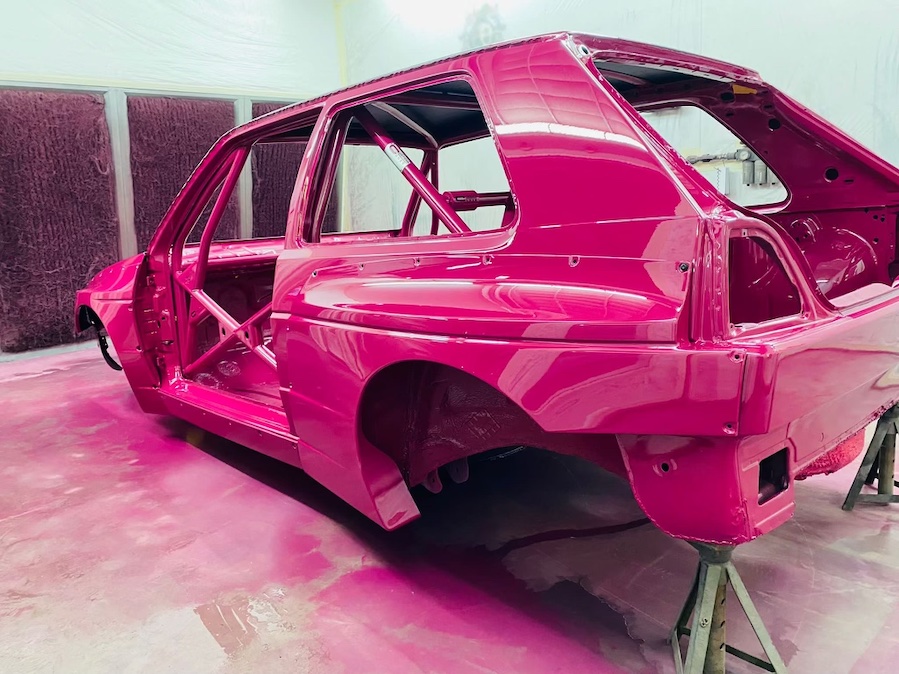
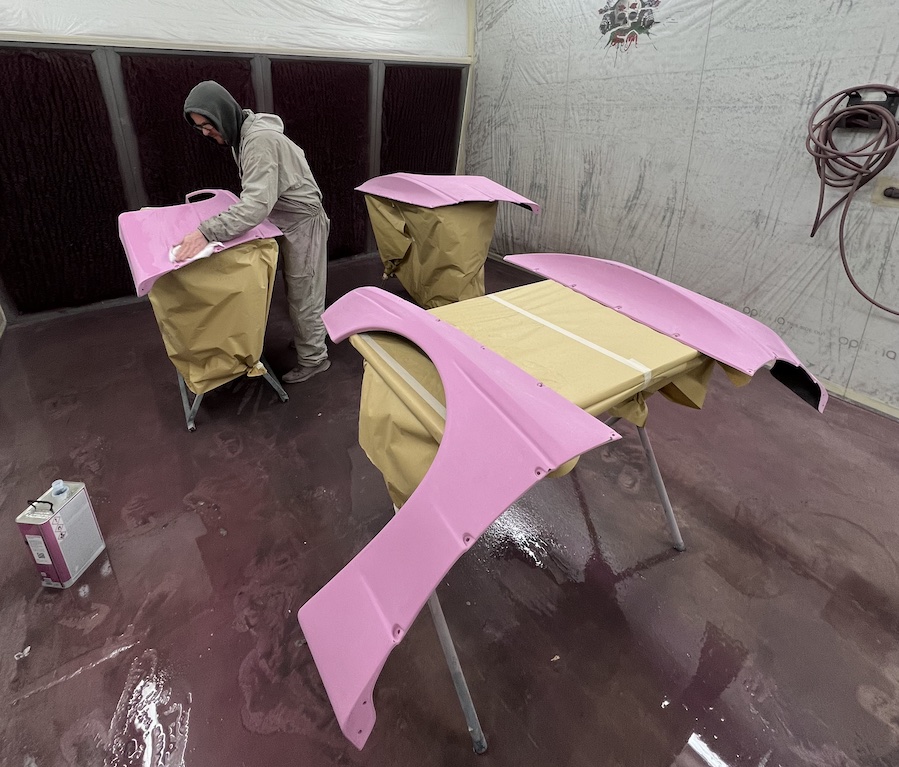
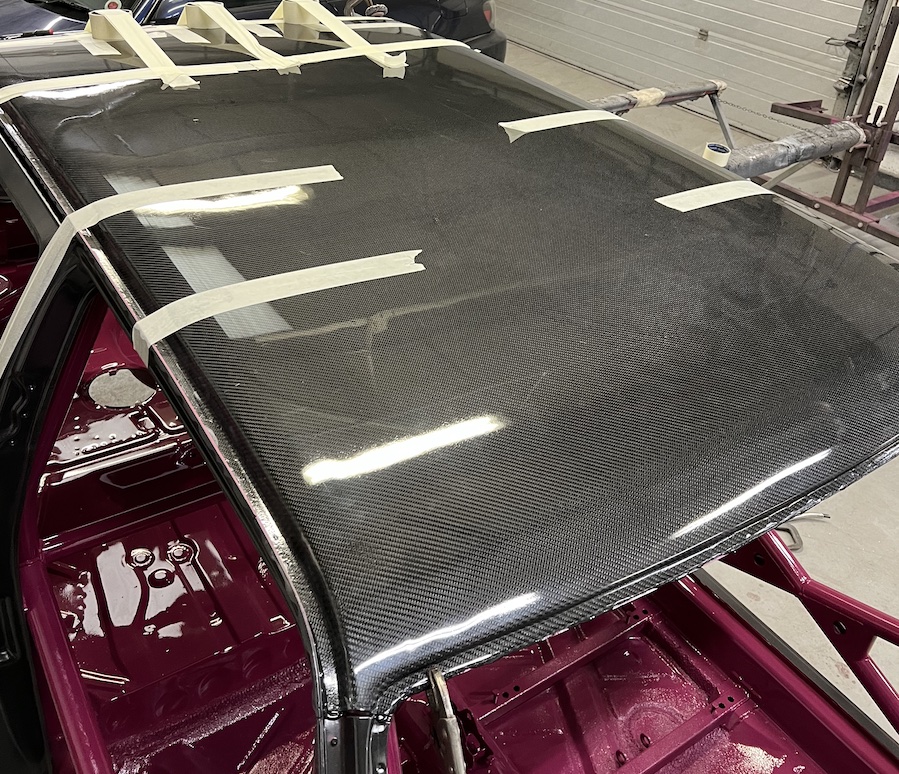
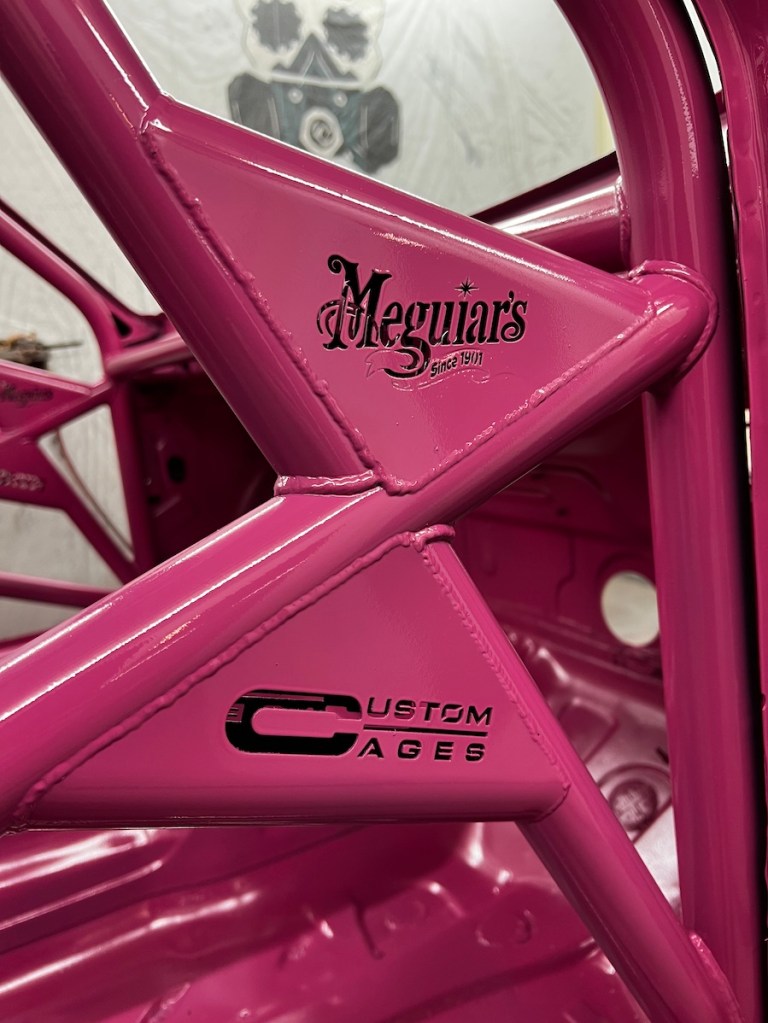
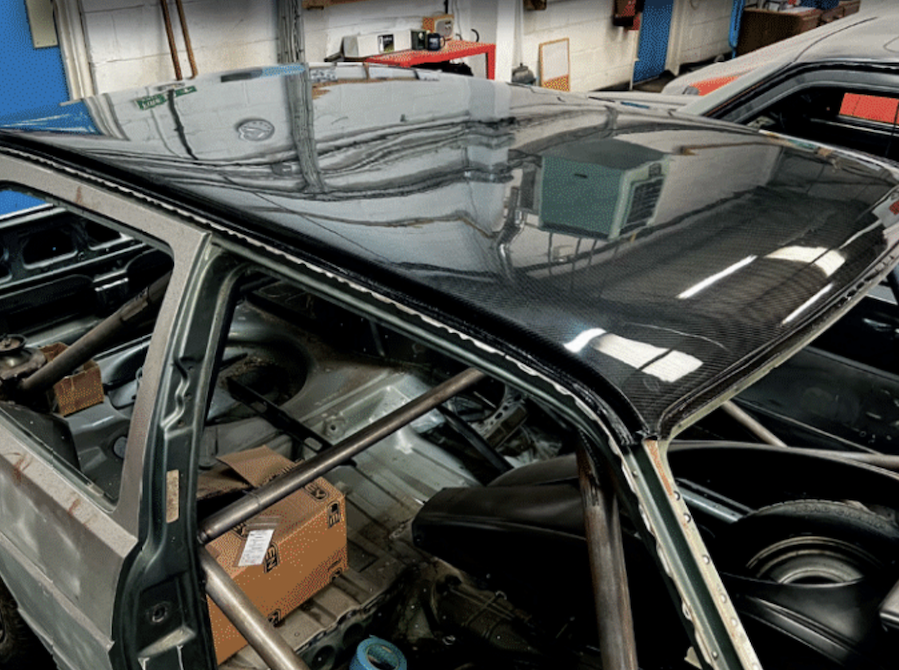
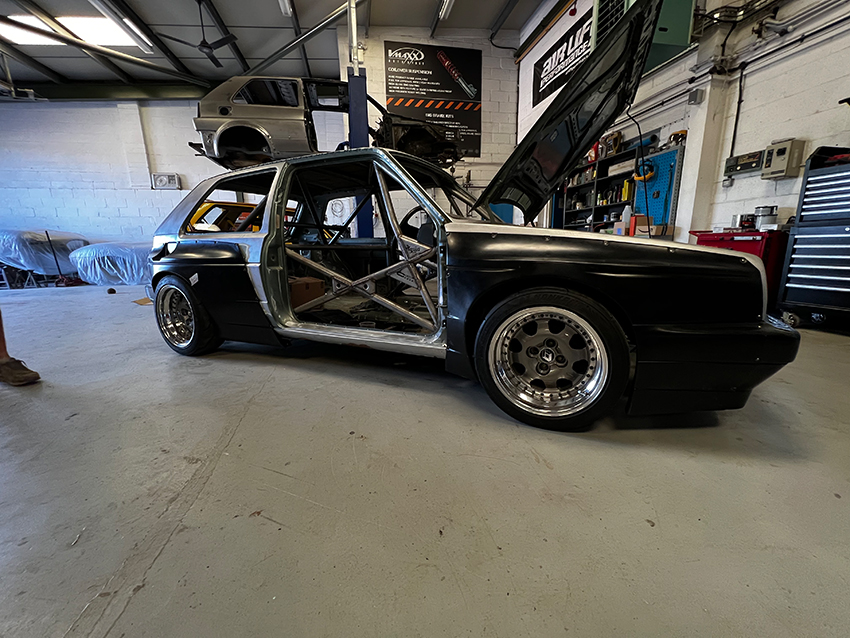
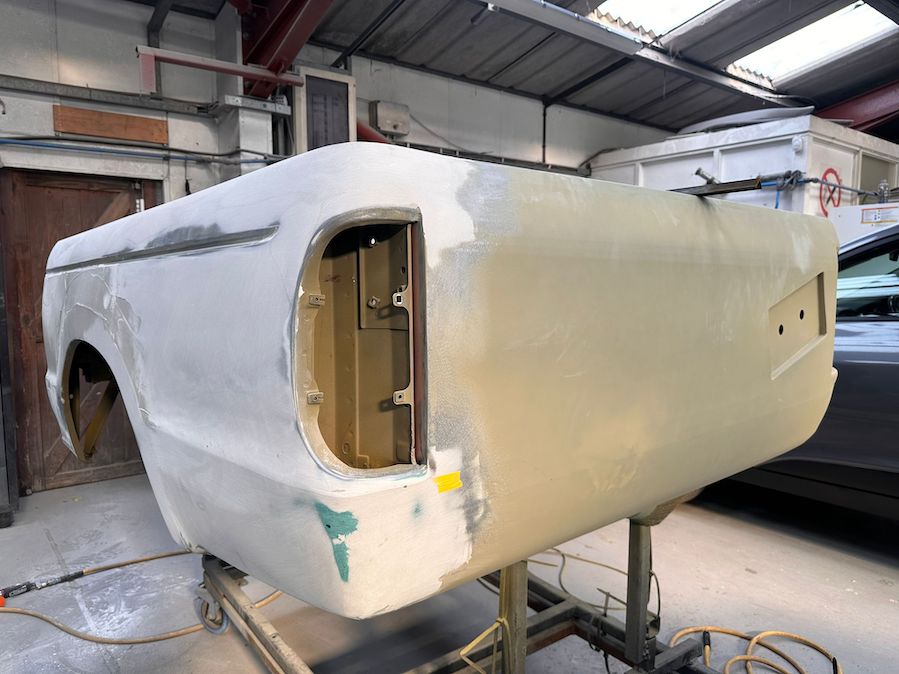
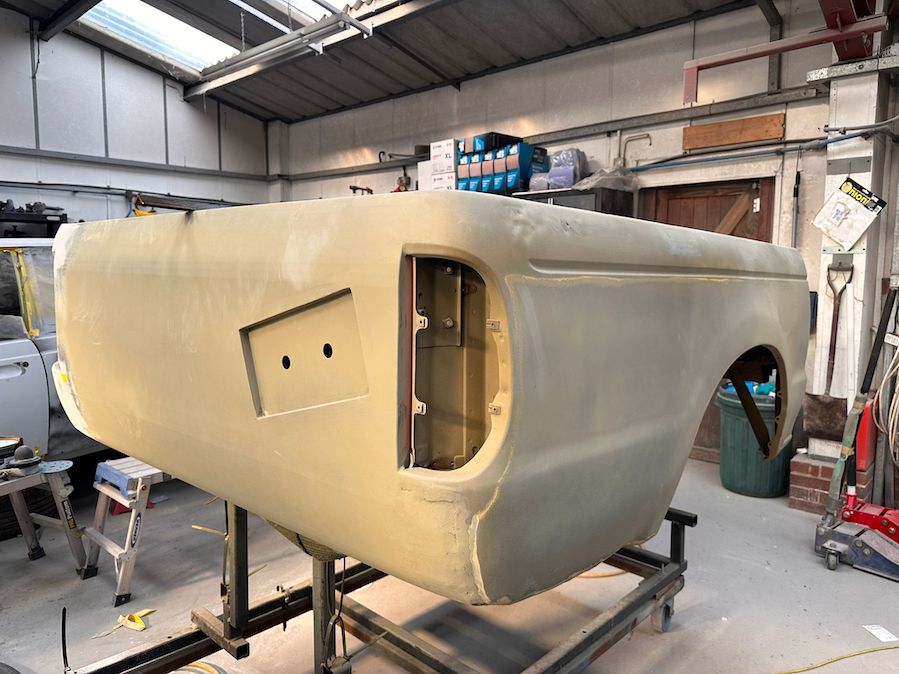
On the plus side, the guys at Reflex worked wonders over the last few weeks getting the car painted (inside and out), the bodykit fitted up, along with the bumpers, and even the carbon-skinned roof has been bonded in place. We love the contrast between the Rubystone Red (pink) paint and the gloss black bumper sections. This is a theme that will continued throughout the car, as most of the engine and chassis details will be black as well.
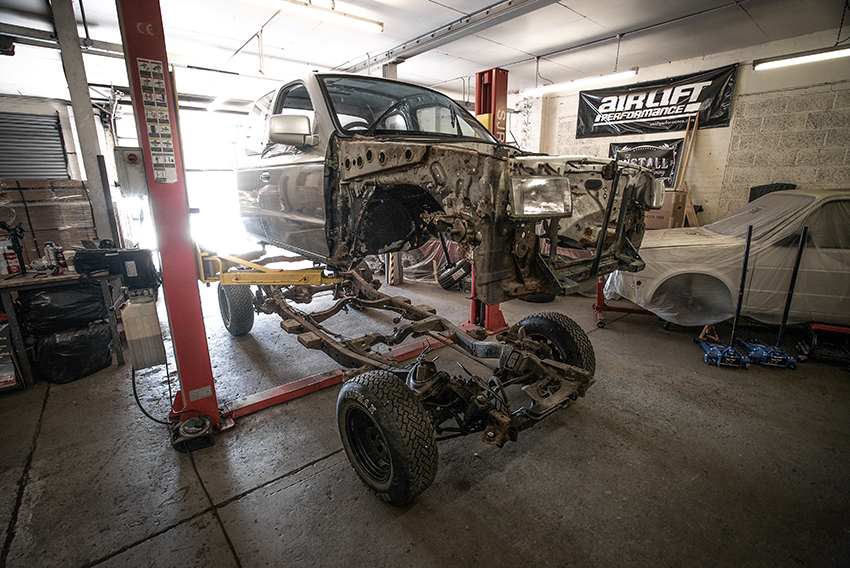
We’re not saying Matt and John Leggett at Reflex were glad to see the back of the car, but it has taken up a load of their time, so they were pleased to pass the baton over to Jamie and the team at JTech for the final assembly. Thankfully, the JTech guys have been super busy, not only building up the race-spec 16v motor, but also painting and preparing all the new or refreshed chassis parts to bolt up once the shell arrives. We’re sure in their mind it’s just like one big jigsaw puzzle to reassemble, but looking at the photos, well, we literally wouldn’t know where to start.

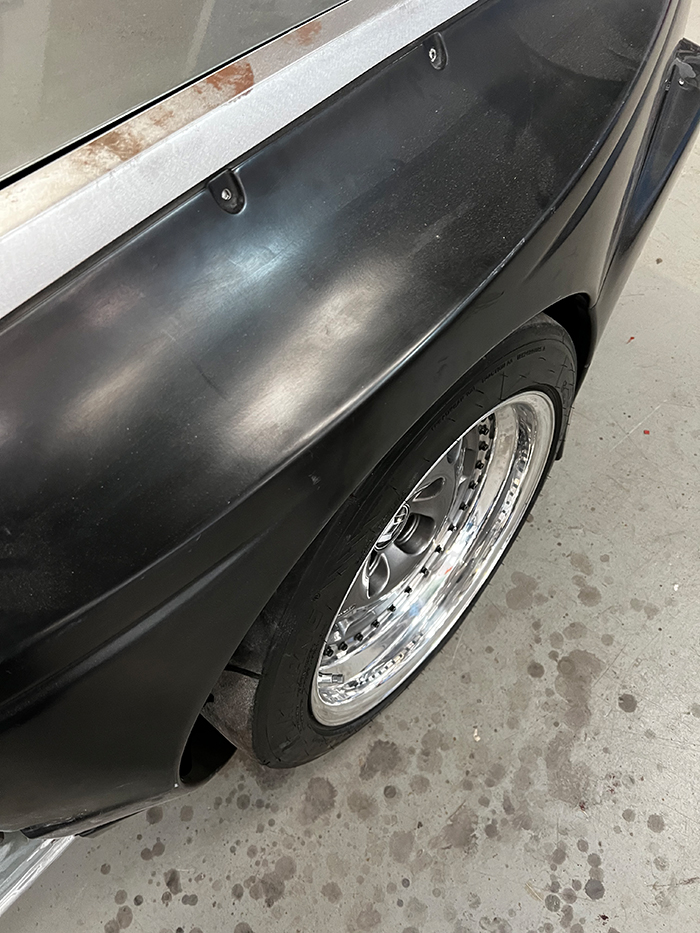
It sounds like the interior is almost sorted at Cobra and ready to be installed as well, plus Image have started making the wheels as well. “I’m going for a bit of a Euro fitment, running a staggered 8- and 10×16” fitment, Tom told us. The big question on our lips is, will he be brave enough to opt for body-colour centres, too? I guess we’ll hopefully find out in a few weeks.
So, the big question on everybody’s lips is will Tom (and his Mk2) make the ball/Ultimate Dubs deadline? Well, make sure you in Telford on March 12th to find out. According to Tom, you may be in for more than a couple of surprises, too
Part 11 – They See Me Rollin’
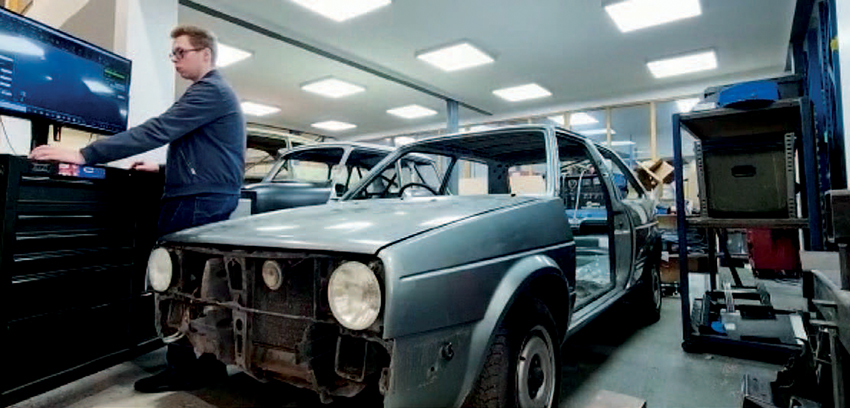
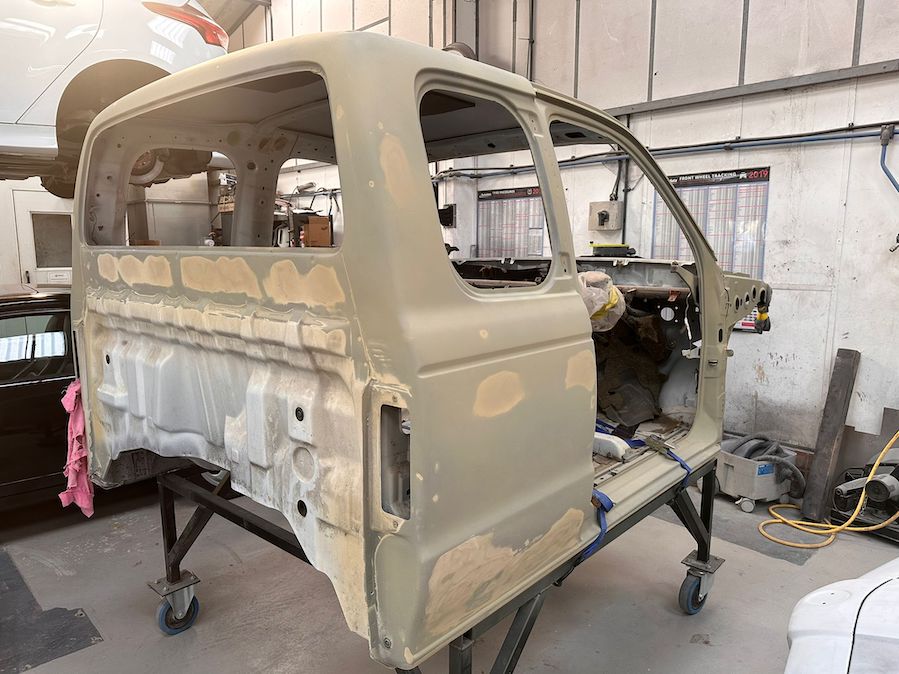
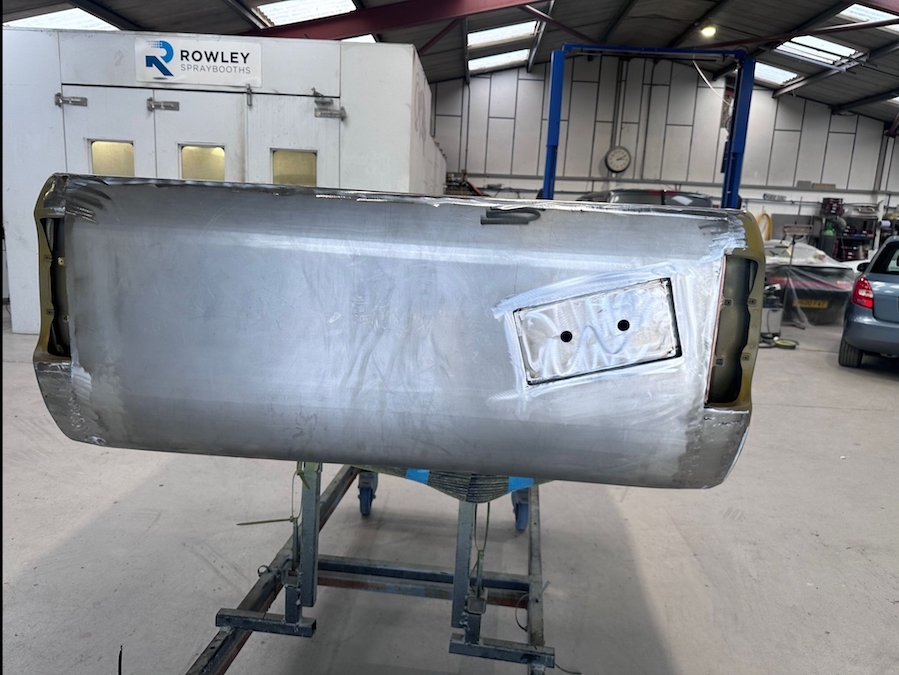
Things really stepped up a gear this month for Meguiar’s Mk2 as it received the final body mods and prep needed before it could finally get a coat of good old primer. “We’d done most of the donkey work, stripped the last bits of sound deadening and reinforced the mounting points for the bodykit,” Tom Clarke, the build’s project manager, was pleased to announce.
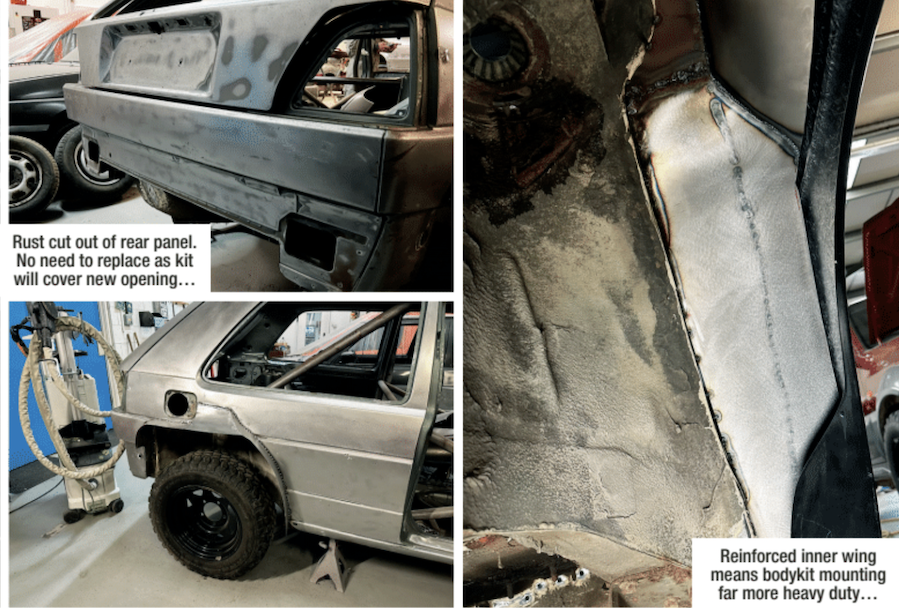
Apparently, Matt at Reflex Auto Design – who is taking care of the bodywork – didn’t like the gaping hole that was left in the rear arch extension of the bodykit for the fuel filler cap, though. “If I’m honest, it did look a bit messy, so Matt knocked up what is effectively a flap that follows the lines of the kit and hides the opening a treat. In future, I will now be able to open the flap before removing the cap to add fuel.” It’s these small custom touches that separates this (and all of Tom’s previous builds) apart from your average project car.
Remember, this series is called Tom V Dale for a reason. While Tom is revealing all in these very pages, showing exactly what’s going into his Golf build, Dale (his partner in crime) is keeping super quiet about his Ford Ranger low-rider build. Well, he’s certainly not sharing much info with Tom or us, although he’s apparently running similar updates to these in sister magazine, Fast Ford. We keep meaning to grab a copy to take a look, but we’re so far into this build now, the idea of Dale’s reveal being a total surprise actually seems more appealing.

As Tom keep reminding us, Dale has lost every previous Tom v Dale challenge, so he’s going to have to pull something really special out of the bag this time, especially given the fact that Tom’s Mk2 looks set to be his best creation yet.
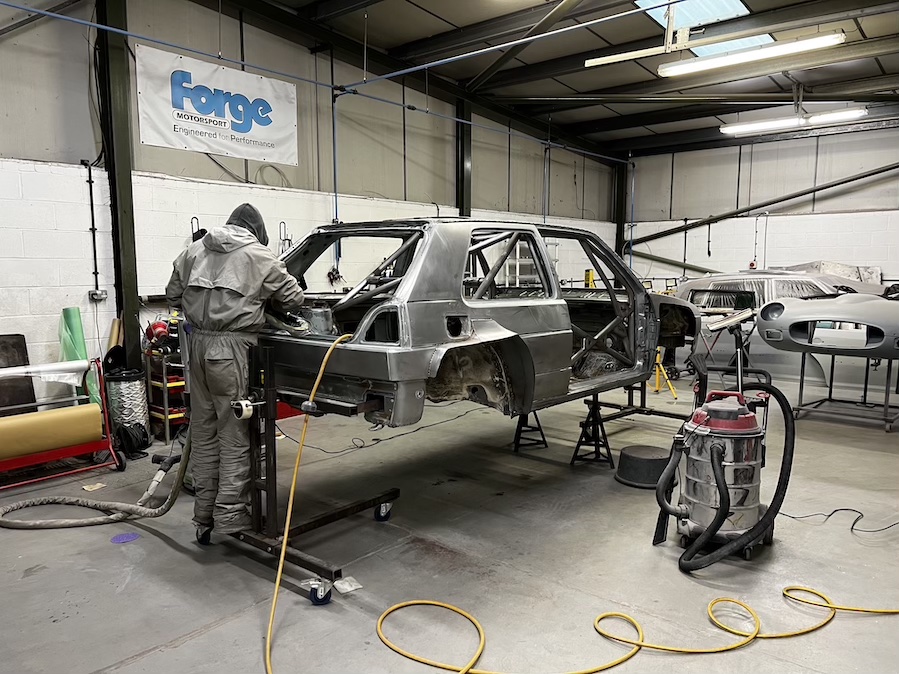
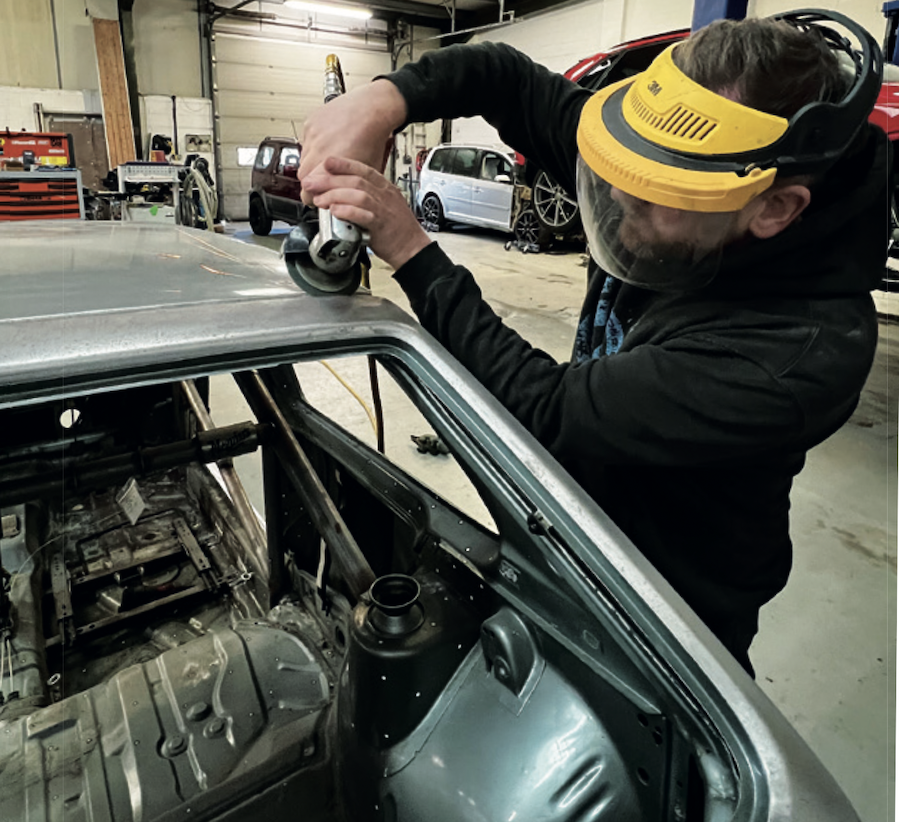
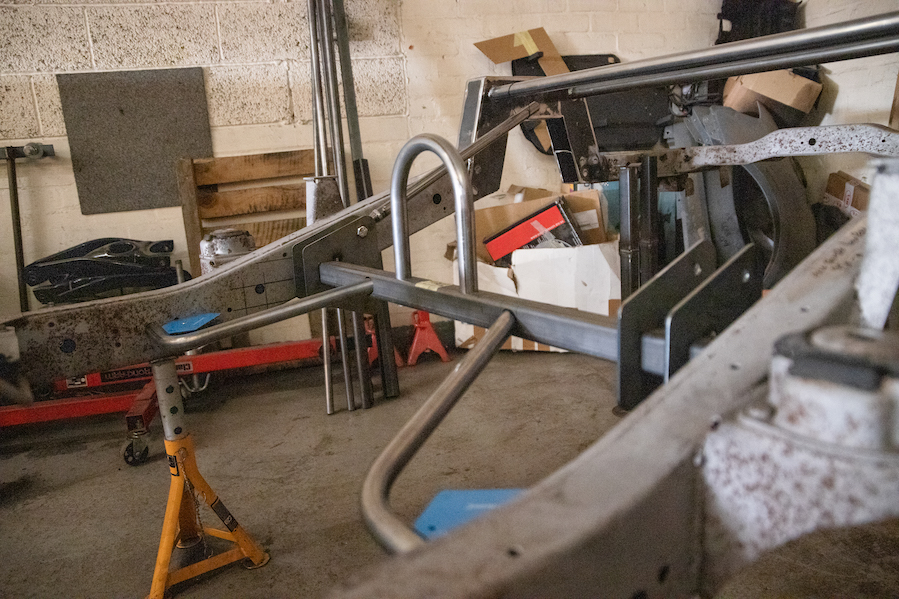
Anyway, back to the build. At this stage the car was bolted to a rotisserie jig which enabled the team (Tom reckons he did this next bit, but we have our doubts) to strip off all the remaining underseal from the floor before the last bits of paint were ground off and the new coats could be applied. It’s funny, because at this stage, despite all the man hours that have gone into prepping the shell, it actually looks a bit of a mess.
Then, in less than an hour, the first coat of black primer is applied and suddenly the shell totally comes together as one and you get to see the first glimpse of what looks like a proper motorsport bodyshell. “After just a twenty minute break, the second coat of primer was applied, which was actually bright pink.
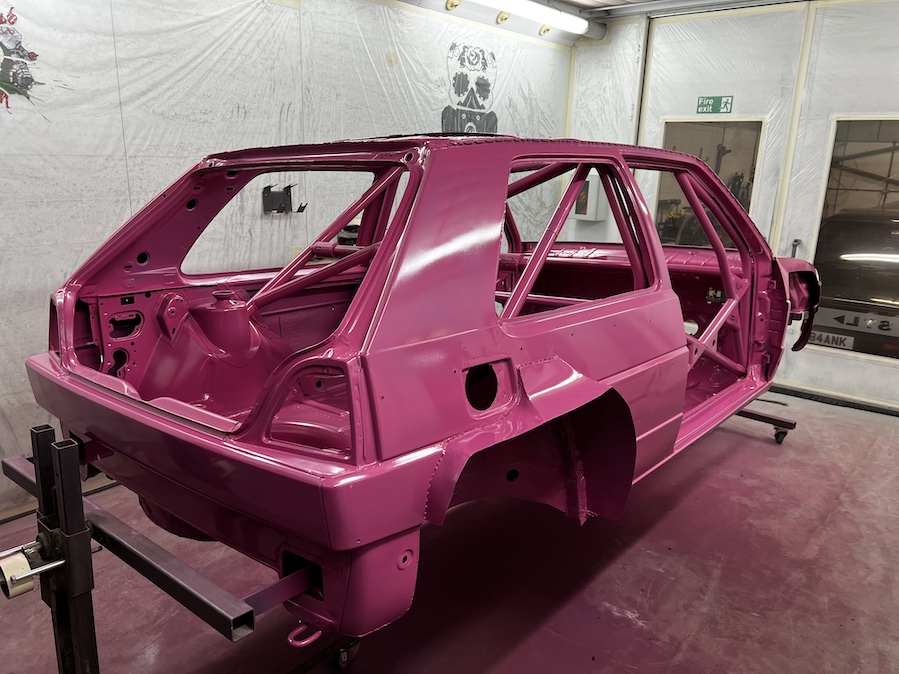
Don’t ask me why (Didn’t you think to ask – all), but it started giving me very bad ideas… it looked so cool.” Don’t worry, Tom assures us the car isn’t being painted pink (or Rubystone red – Ed), but you know what, we wouldn’t put it past him.
Elsewhere, the new Forge six-pot big brake kit has just arrived, along with a set of cut slicks from Nankang. Also, the seats are almost done at Cobra, although Tom would only give us a little taster of what they’re going to look like. All we can say is, we like what we see. Hang on, are those inserts pink as well? Tom, explain yourself…
Part 10 – Thread or Dead
This month it really has been a team effort to try and get Tom’s car ready for the Ultimate Dubs deadline in March. Ultimately, having lost a few weeks on the build for reasons out of Tom’s control, it feels like that date is slowly slipping away but everybody is clearly going to do their best to meet that deadline.
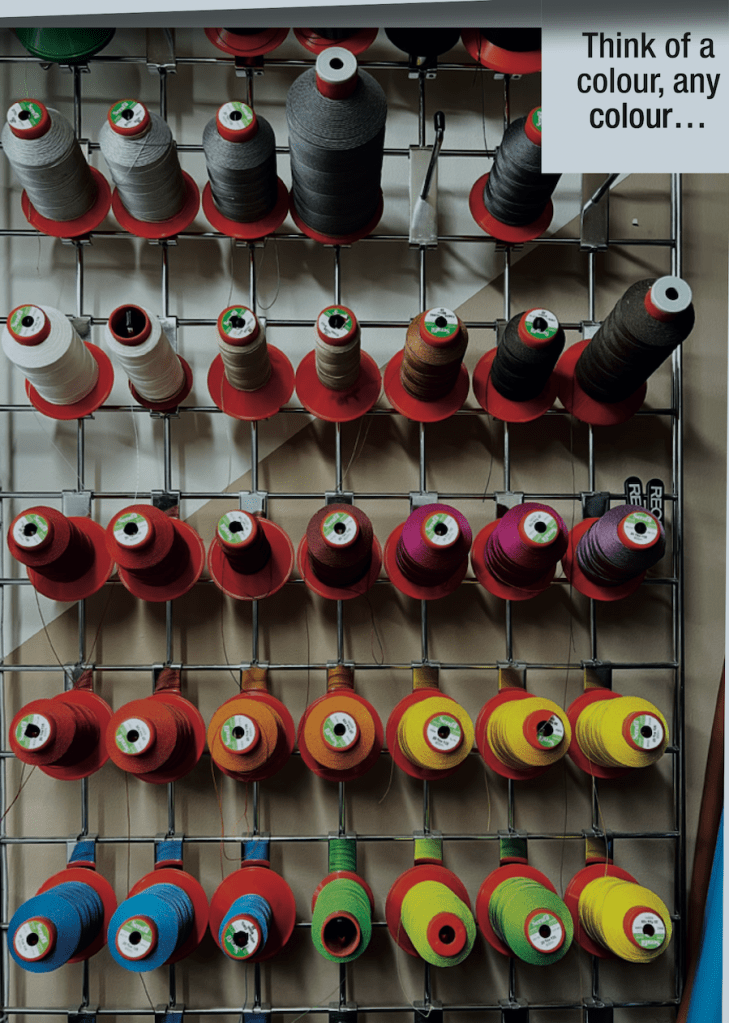
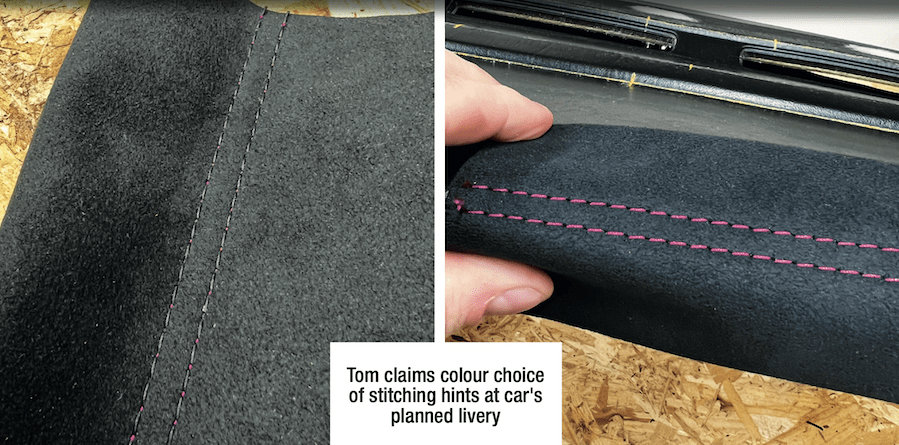
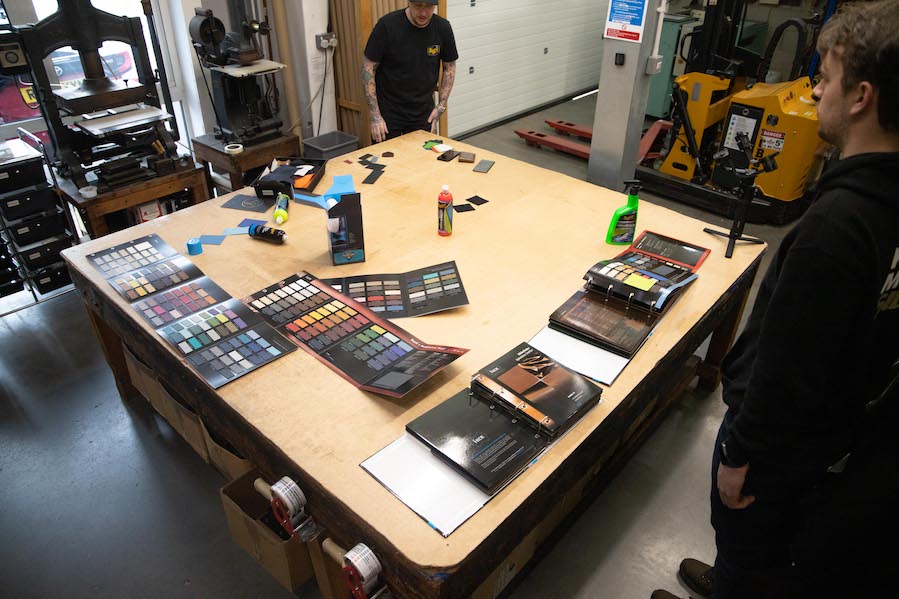
This month Hawkes Autoworks have already finished the template of the dashboard and the embroidery has started for some of the sponsors logos that need to appear there. We’re loving Tom’s choice for the colour of stitching being used, too. He did imply that the colour hints at what the car’s body work/livery will look like, although we think it’s too subtle to guess just by what shade has been used for the stitching. Any ideas? Tom informed us UK Hide Co have come on board to supply all the Dynamica material for the project: “This is basically an alternative material to Alcantara and will cover the outside parts of the seats and the dashboard. We have something extra special for the seat centres, but I’ll save that info for another day,” Tom teased.
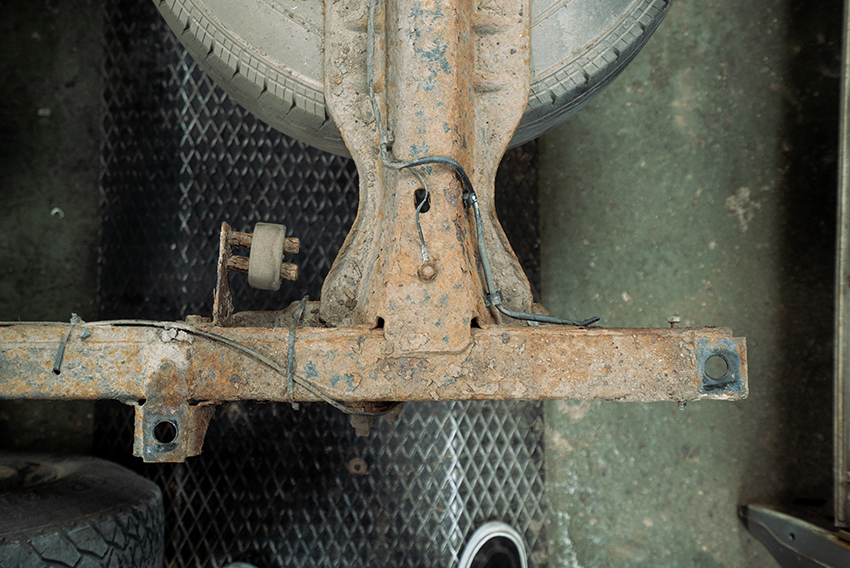
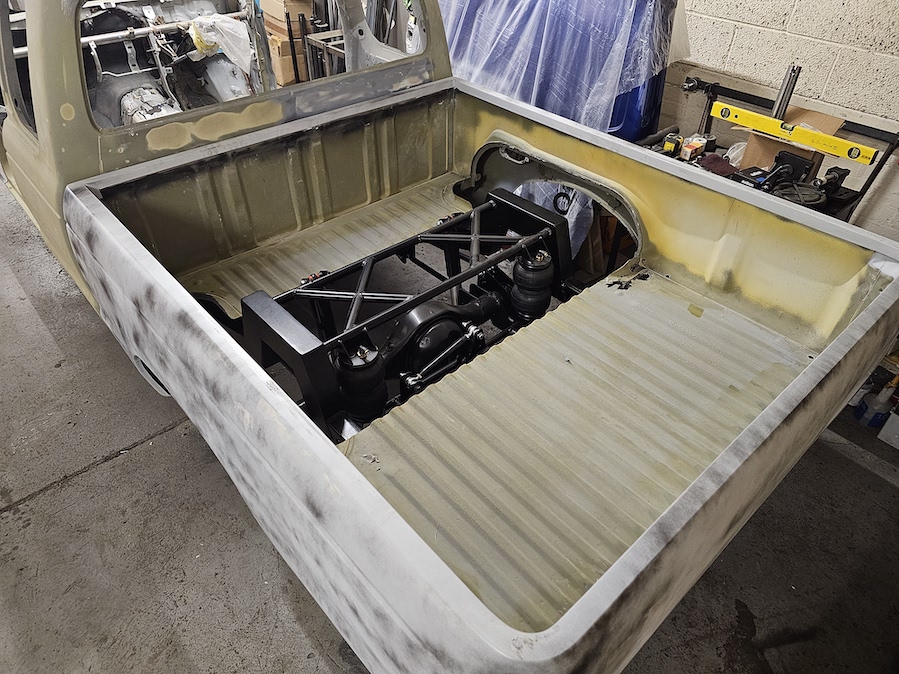
While work on the dashboard and seats was beginning, Tom paid Milltek a visit up in Derby to check out their UK manufacturing facility and also collect the full system and manifold the company was supplying. This will later be delivered to J-Tech for the assembly stage. As we mentioned last month, Jamie and his team are currently working on the car’s rear beam, blasting it ready for powder coating and the fitment of a disc rear brake set-up.
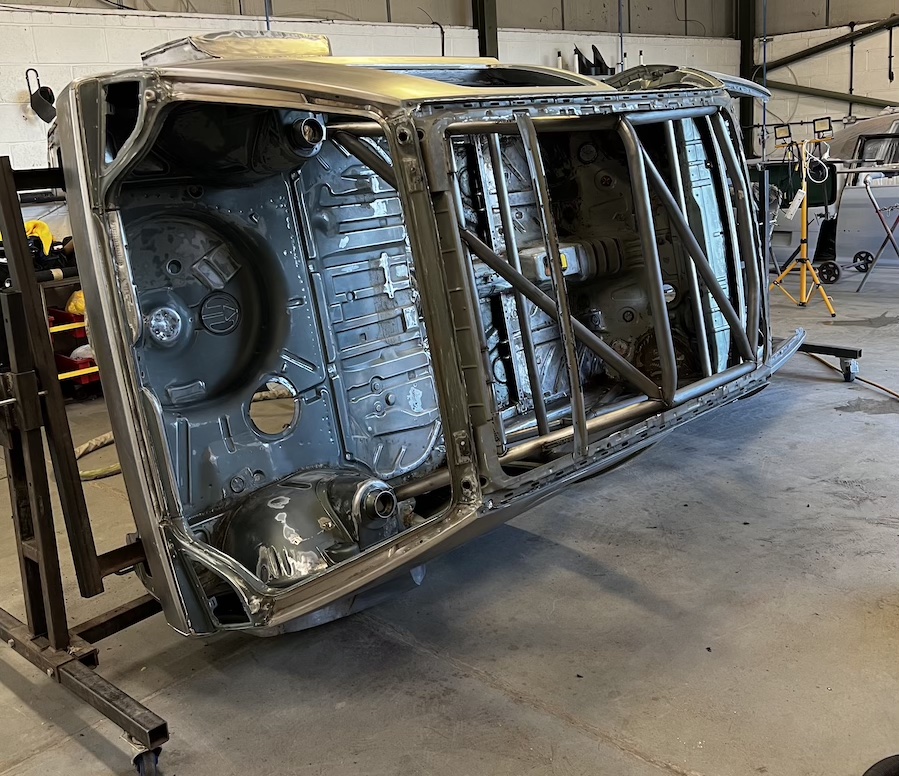
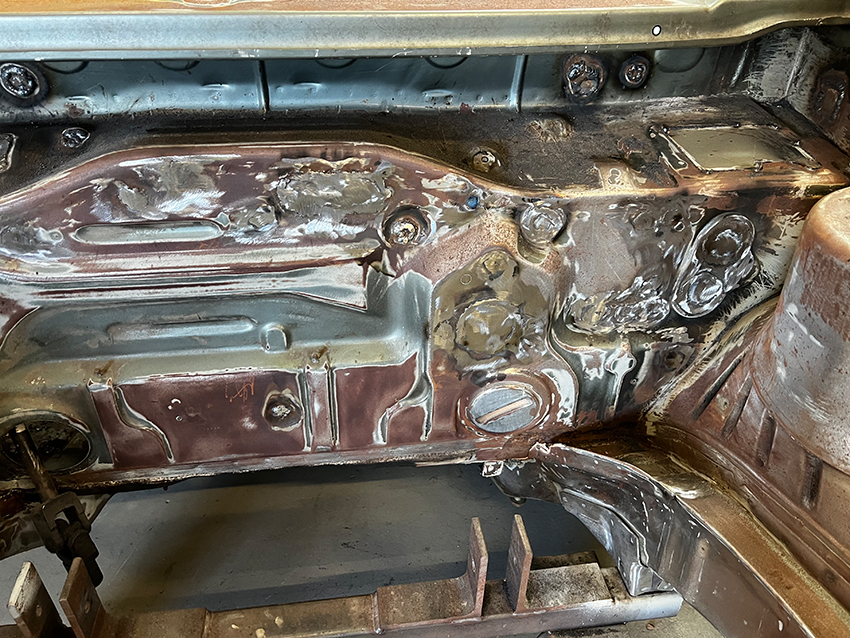
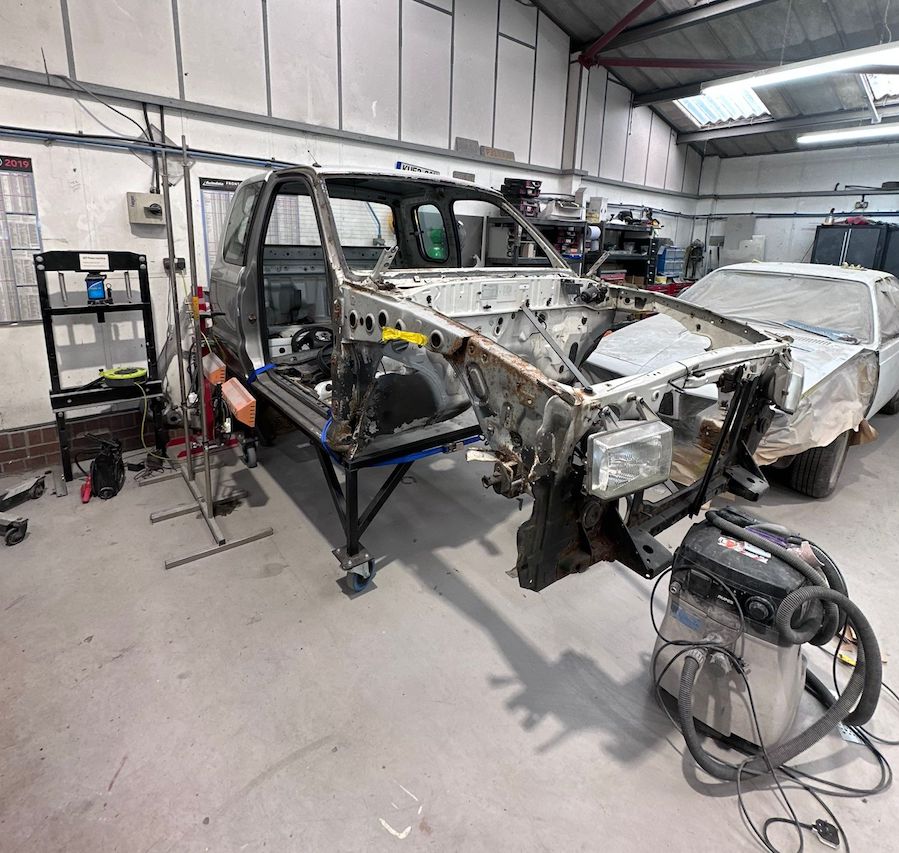
Back at base (no, not Meguiar’s HQ but Reflex bodyshop where Tom seems to be spending most of his time these days) Tom was pleased to discover not only have the guys welded up all 55 holes in the smooth engine bay, but they’ve also finished fabricating those amazing extended inner wing sections which will support the wide body kit when it finally goes on.
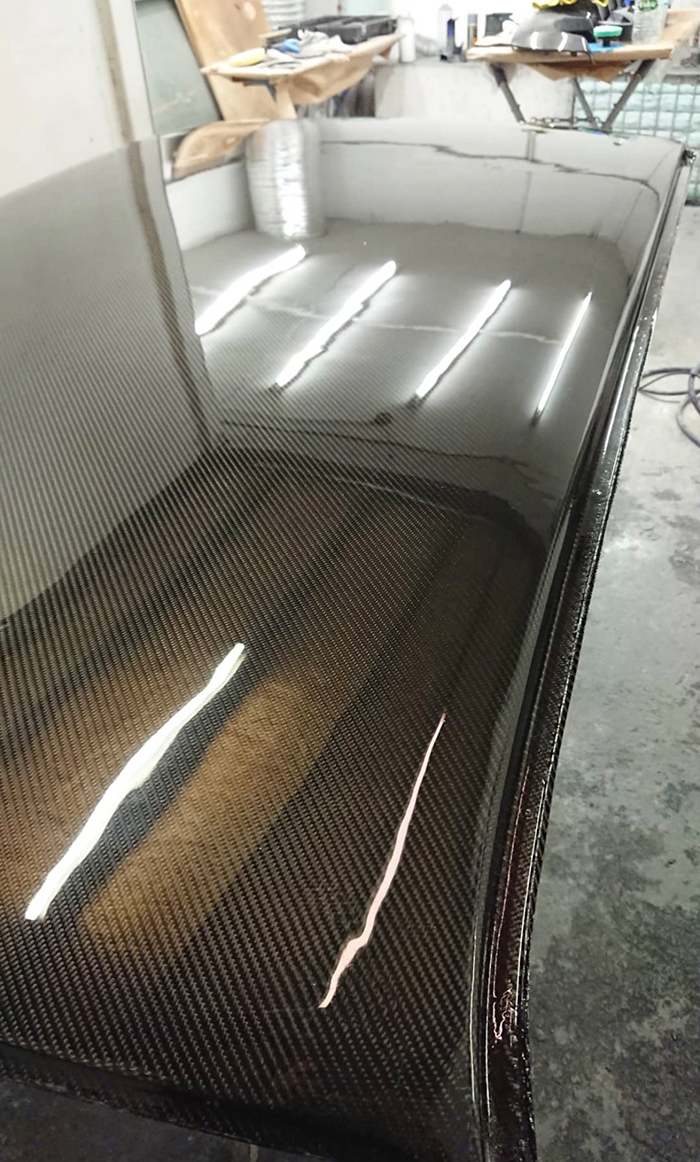
Oh, there was another big addition at the body shop, too. Well, we say addition, it was actually a removal as the team has finally got the courage up to chop the roof off in order to make way for the full carbon-fibre skin Tom had sourced previously. “You’ve got to break some eggs to make an omelette, right?” If you say so, Tom. If you say so…
A far more subtle addition that Matt at Reflex has taken the time to do is build out the inside rear quarters, below the glass, as they have a curve from factory and Tom wants to install carbon cards, which are a flat panel. “We need the mounting point to be flat, so Matt took on this pretty massive task to achieve something that most people won’t even notice once the car is finished,” said Tom. We’ll all know, though, and that’s the most important thing, right?
We decided it was about time we enquired about Dale’s build on his Ford Ranger project. After all, this is meant to be a competition. All Tom said was that nobody said the cars need to be able to drive into the show at Ultimate Dubs, did they? We’ll leave you to work out what he means with that one… Until next time
Part 9 – Holy Moly
Is it bad it made us feel quite happy when Tom admitted progress had been a bit slower this month with his Mk2 Golf project? It’s not that we don’t like to see the car progressing or wish for Tom to not reach his debut deadline of Ultimate Dubs in March, but it just makes us feel a little bit inferior seeing the car come on so well each month when our own projects are all currently standing still.
While Tom isn’t exactly getting his hands dirty with the build, he is project managing the whole thing pretty damn well. This month, Matt at Reflex has finally finished welding up all the unwanted holes in the engine bay and bulkhead. Yes, all 55 of them (not that he was counting – Ed). Tom did joke that 55 wasn’t quite enough and that he might go and cut a few more holes in the shell, but thankfully he came to his senses and left the thing alone. In terms of restoration or repairs to the shell, as we said before, Tom managed to source a pretty damn straight car here: “The lower rear panel did have some scabby bits on it so, we (the Royal ‘we’ – All) have trimmed them off completely,” Tom admitted. They decided that basically it no longer needs to be there as the bodykit actually covers that area any way. Let’s call it a weight saving mod, yeah?
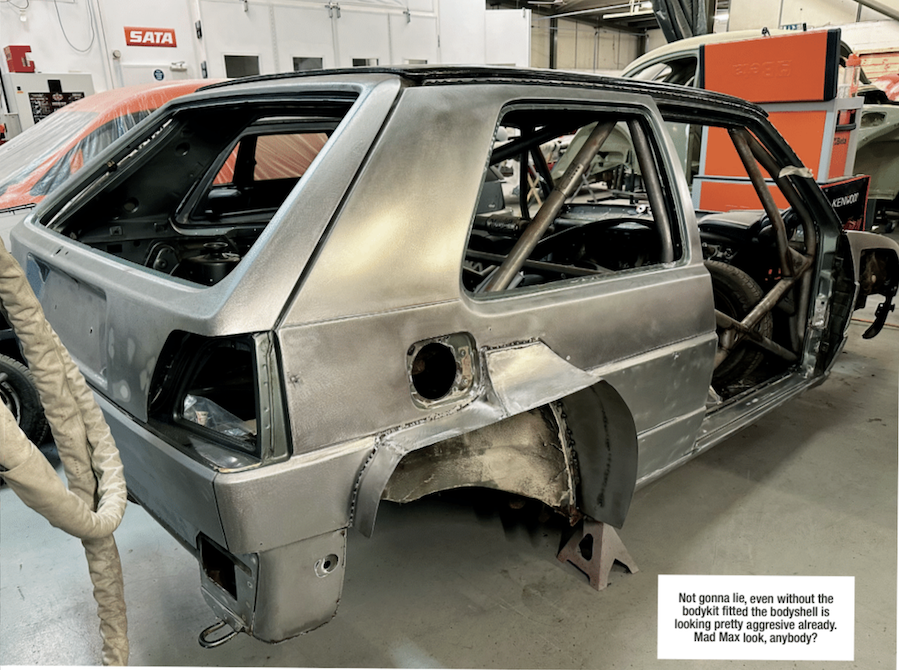
While at the bodyshop, Matt then set about building the inner arch extensions for the rear arch to sit on properly, rather than simply fixing the kit to the car and leaving it unsupported. It’s okay to fit the kit this way for a regular application, but as Tom intended to use the car on track, in anger, then it made sense to make a more heavy duty job of it in this case. As you can see for the photos, one side is complete and the other is almost there.

Once Matt has finished here it will be time to work out how the new carbon roof will be grafted into place, but for now (and your viewing pleasure) Tom had Matt drop the new panel in place. All we can say is, wow! Obviously there’s a sizeable weight saving gain to be made here, but visually, too, it just looks so good. Let’s hope Tom intends to keep the panel bare carbon. We’re sure he does…
Next up the rear beam was sent off to J-Tech for the guys there to work their magic on before it can be reinstalled. We’re presuming this will be blasted, powder coated and a rear disc set-up installed for good measure.

Finally, Tom was pleased to get an update from Kawkes Autoworks to say the trimming had started on the dash. Well, the filling… “Max has filled some of the vents that aren’t needed across the top and also where the choke mount normally sits. This will make it nice and smooth. The pattern for the dash has started to take shape, but more on that next month!” We’ll also have details on the plus sized bucket that Cobra have prepared for Tom and sent across to Max for trimming.
Part 8 – The Wheel Thing
After some pretty major cutting and shutting in the last instalment, Tom Clarke and friends begin to slowly start piecing the puzzle back together. Slowly, we said…
It may not look like it but loads has been done to my Mk2 project this month! Honestly.
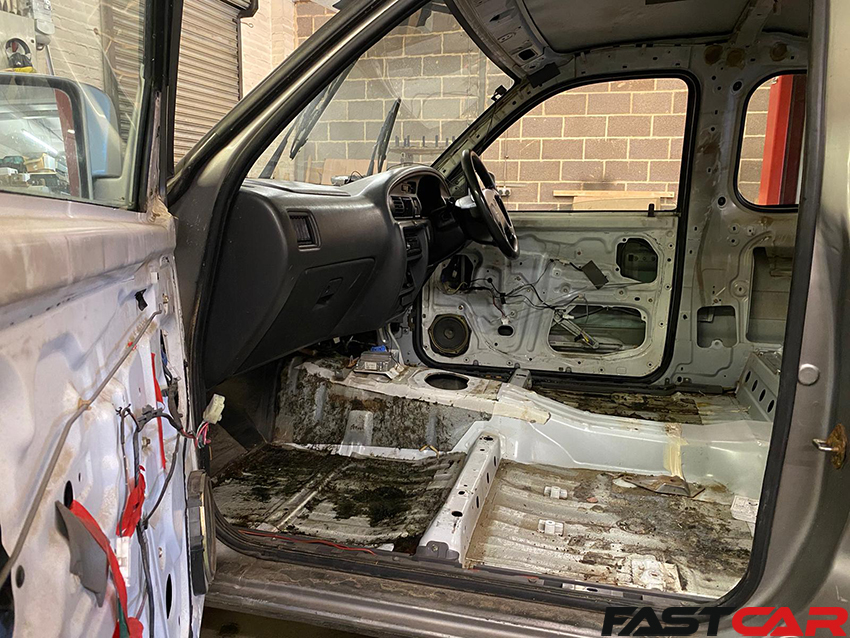
Firstly, the lads at Reflex (who are taking care of the body) have been doing the thankless task of welding up the Mk2’s engine bay. Yep, you guessed it, every hole (apart from the steering column) is going. And I have been called literally every name under the sun this month by the team there; some of the words I haven’t ever been called before, which is nice!

On the plus side, the fire wall and engine bay in general is much nicer to look at, and will only get better once it’s all painted the same colour. But let’s not get too ahead of ourselves, shall we? I don’t want to give too much away just yet.
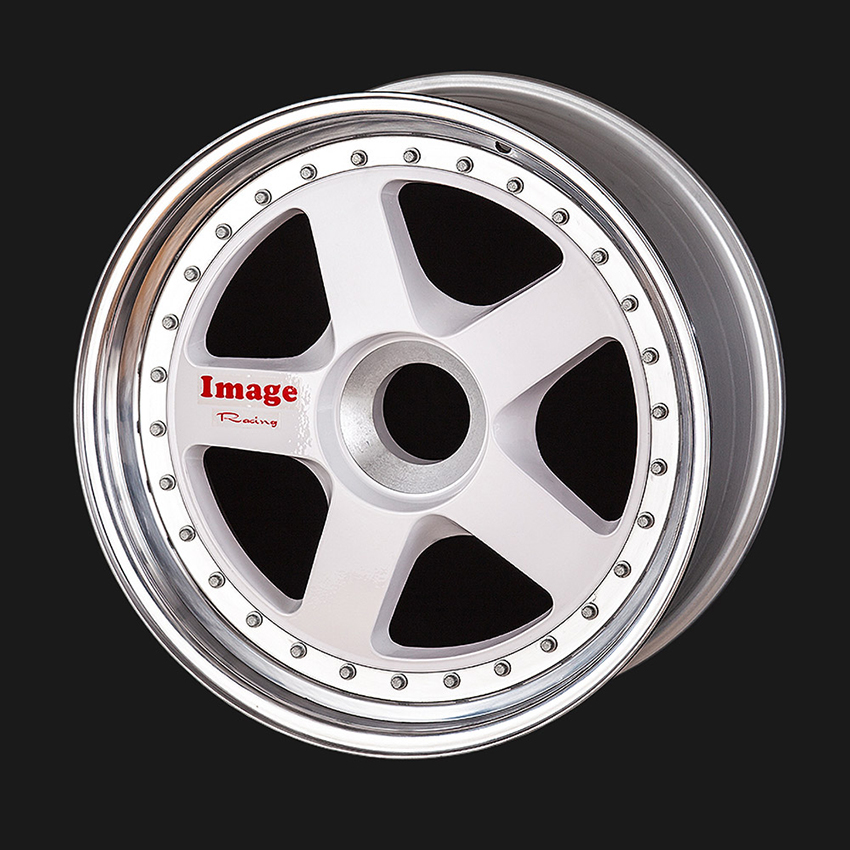
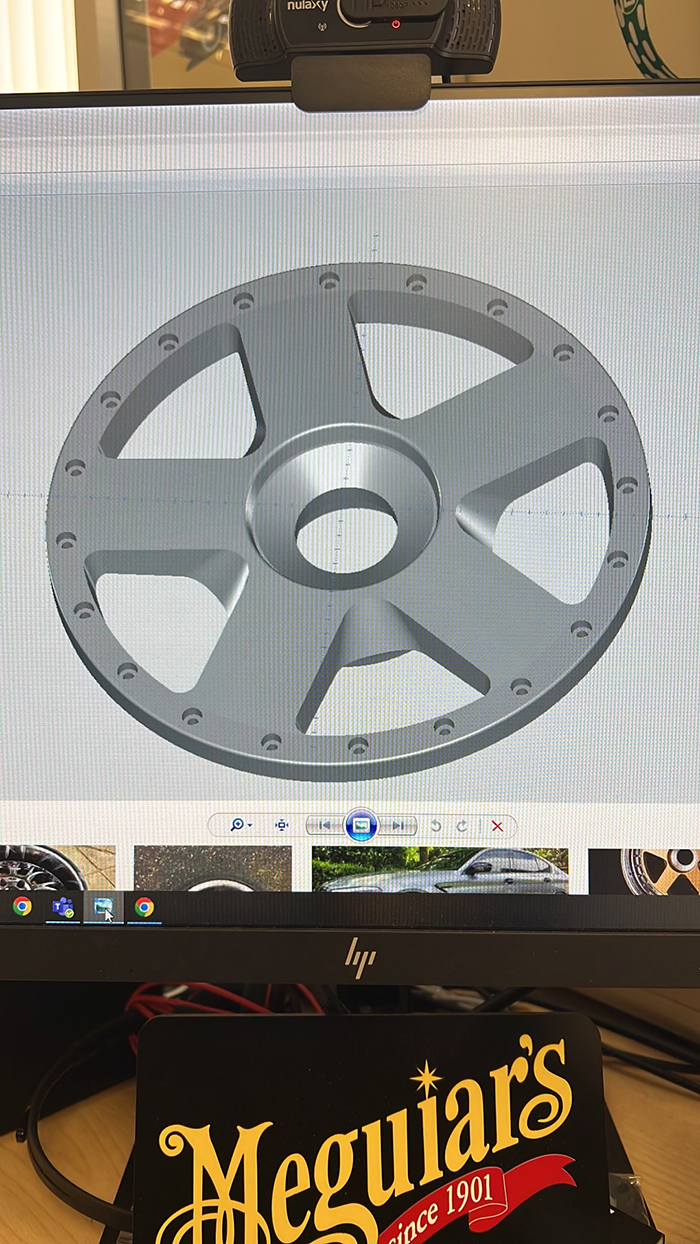
On the chassis front, I got a first look at a CAD design for the new wheel I’m going to use from Image Wheels. We’re basically reworking a design that they currently only offer in 18in, called the VR5. There was some concern that the same design wouldn’t work when adapted to 16in diameter – making sure it can have the structural strength, as well as the desired look, was vital.

Apparently, it’s not always form-over-function, who knew? The wheel is a simple, classic five-spoke design that should look great in the desired 8x16in and 10x16in dimensions. It’s got a bit of a JDM vibe to it, which will tie in with the bodykit we’re using and the livery I have planned. There I go again, getting ahead of myself.
We actually worked out the desired dimensions after offering up the Image splits we used on my previous wide-body Renault 5. That really helped the process.

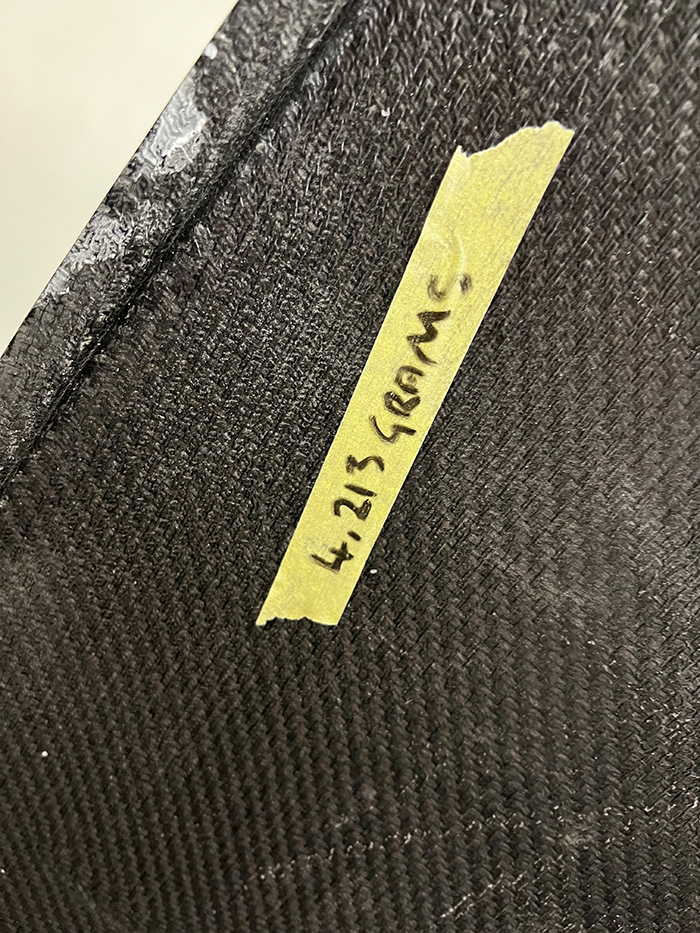
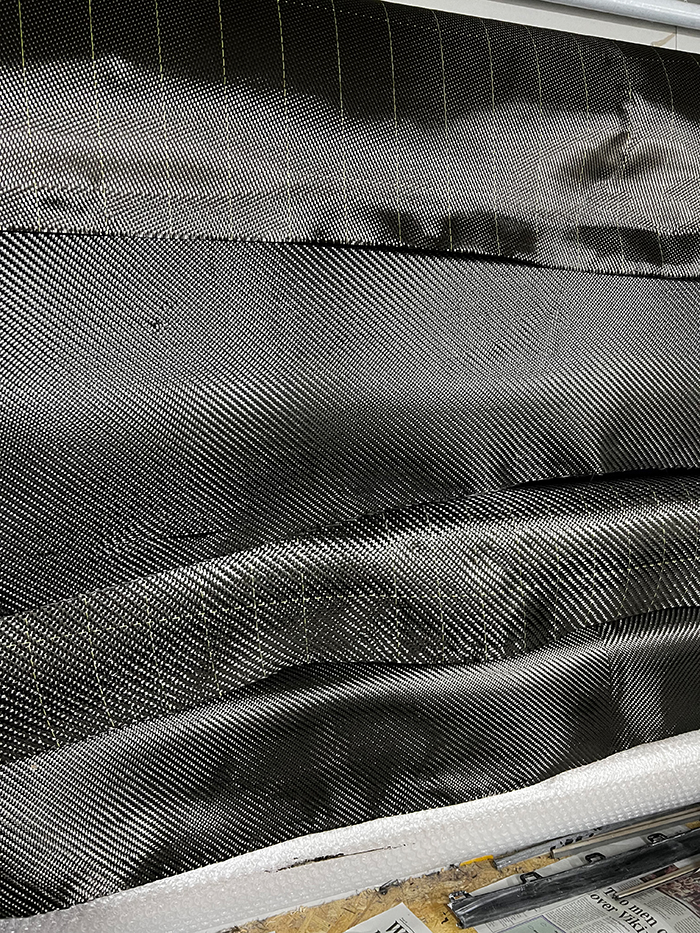
Also, I have been working with Paul at C6 Carbon (aka Mr Carbon) who has supplied parts for many a PVW feature car in the past. We’ve developed something a little special for the project in the shape of a full replacement carbon roof. And before you ask, this isn’t just a cap or skin, it’s a full roof, integrated into the gutters with all the original steel roof removed. I could tell you about the structural properties it will have, plus the fact it only weighs 4.2kg but I’m a magpie… look at it yourself!
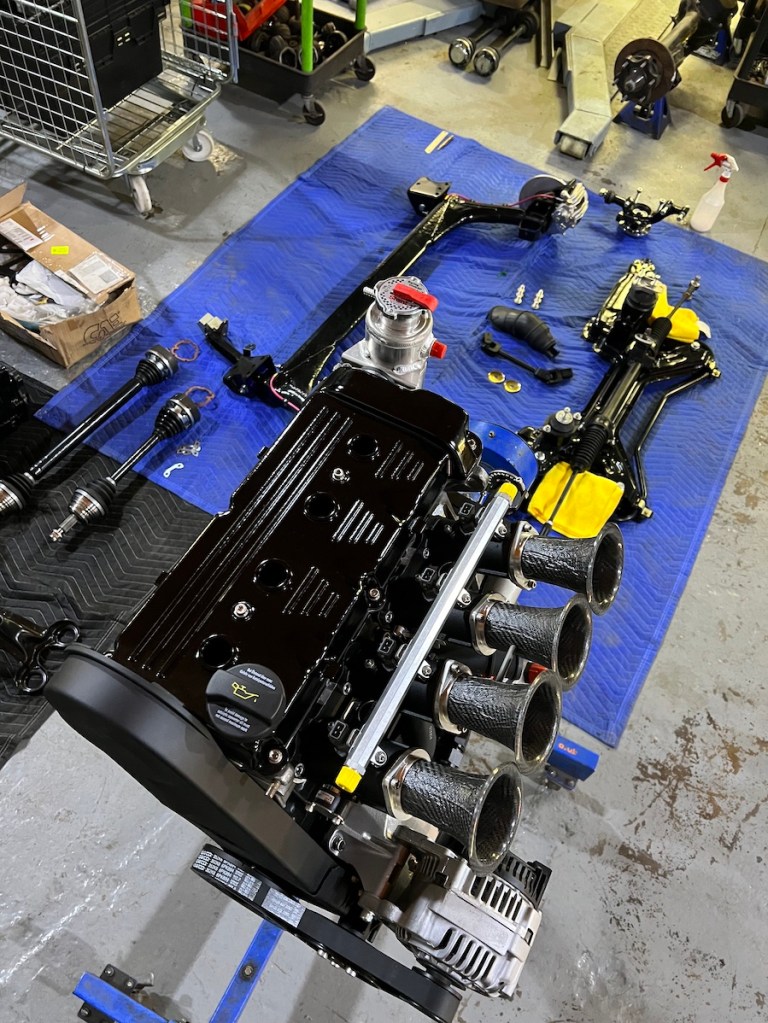
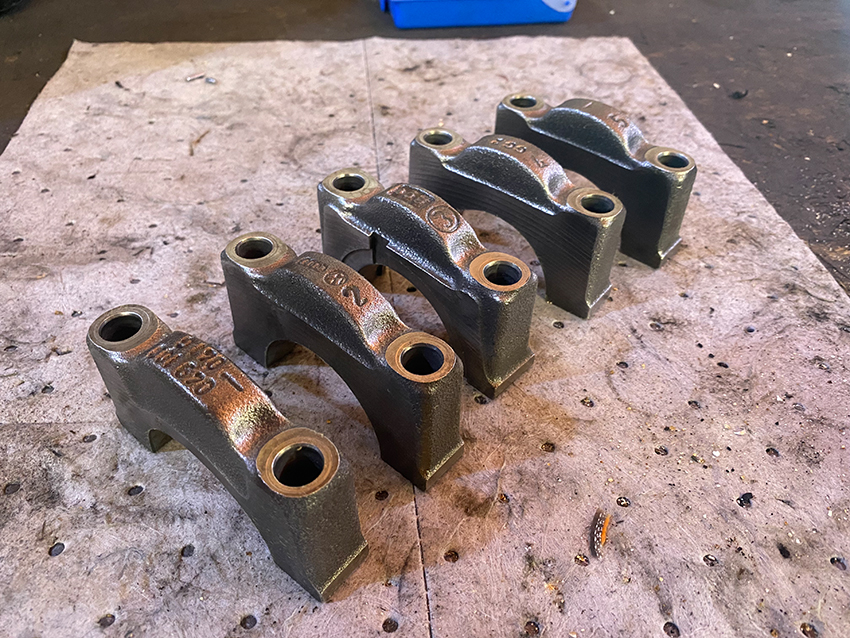
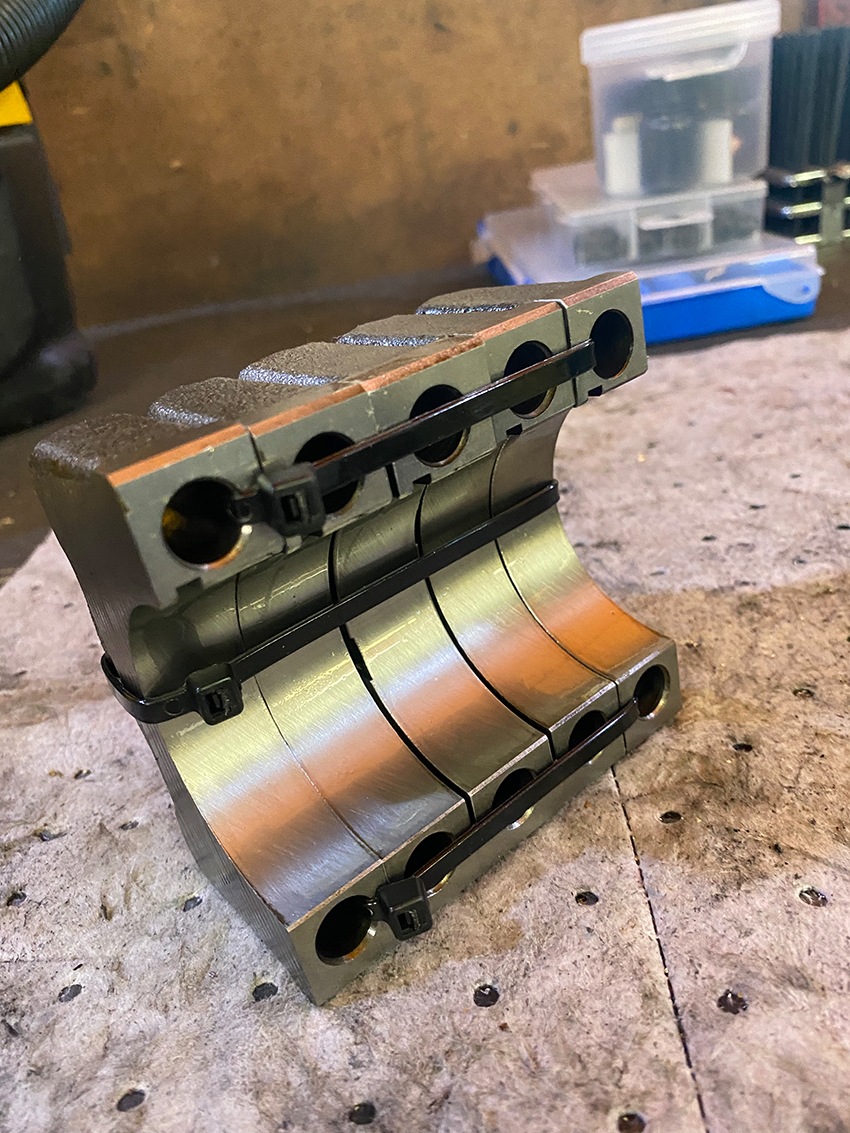
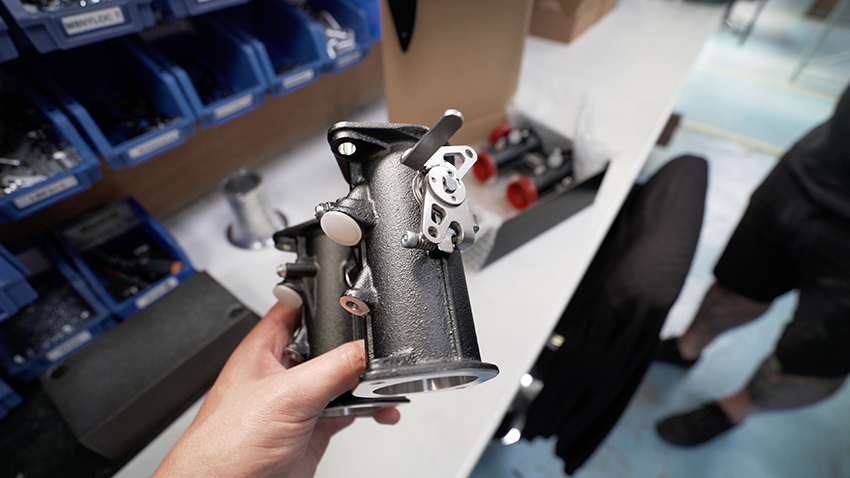
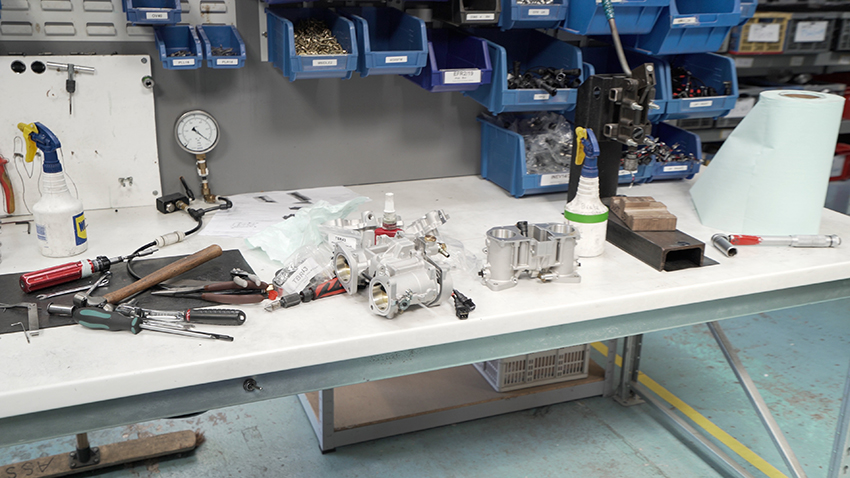
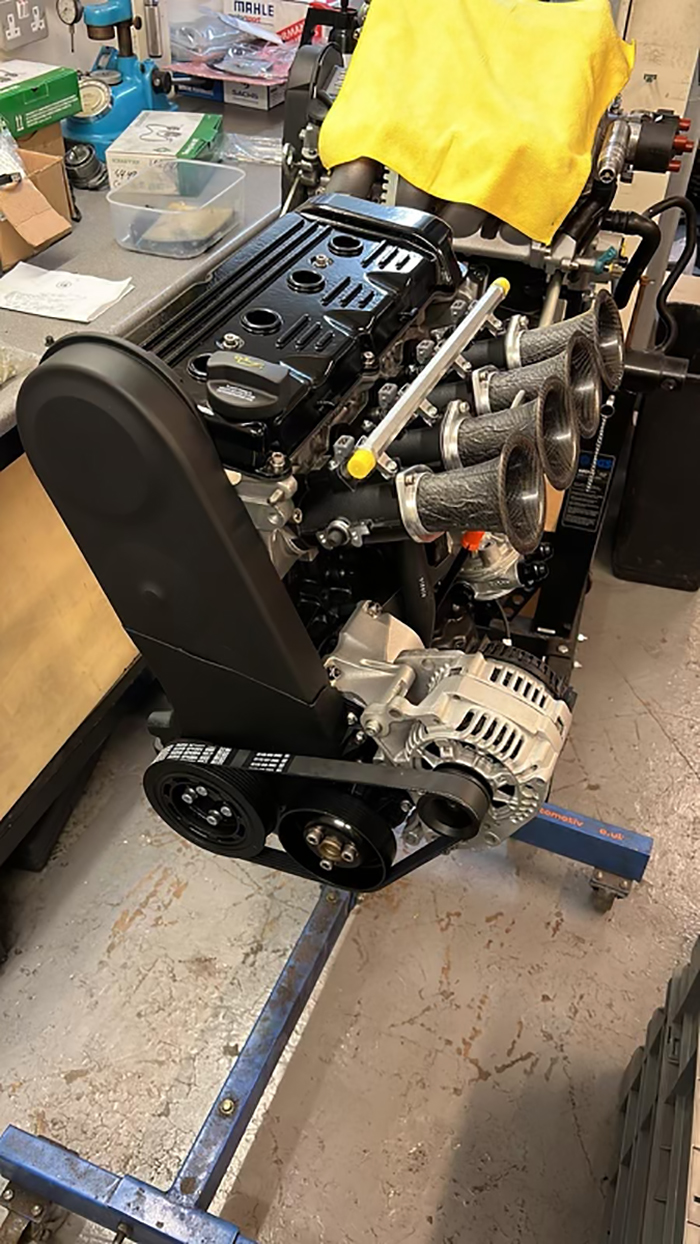
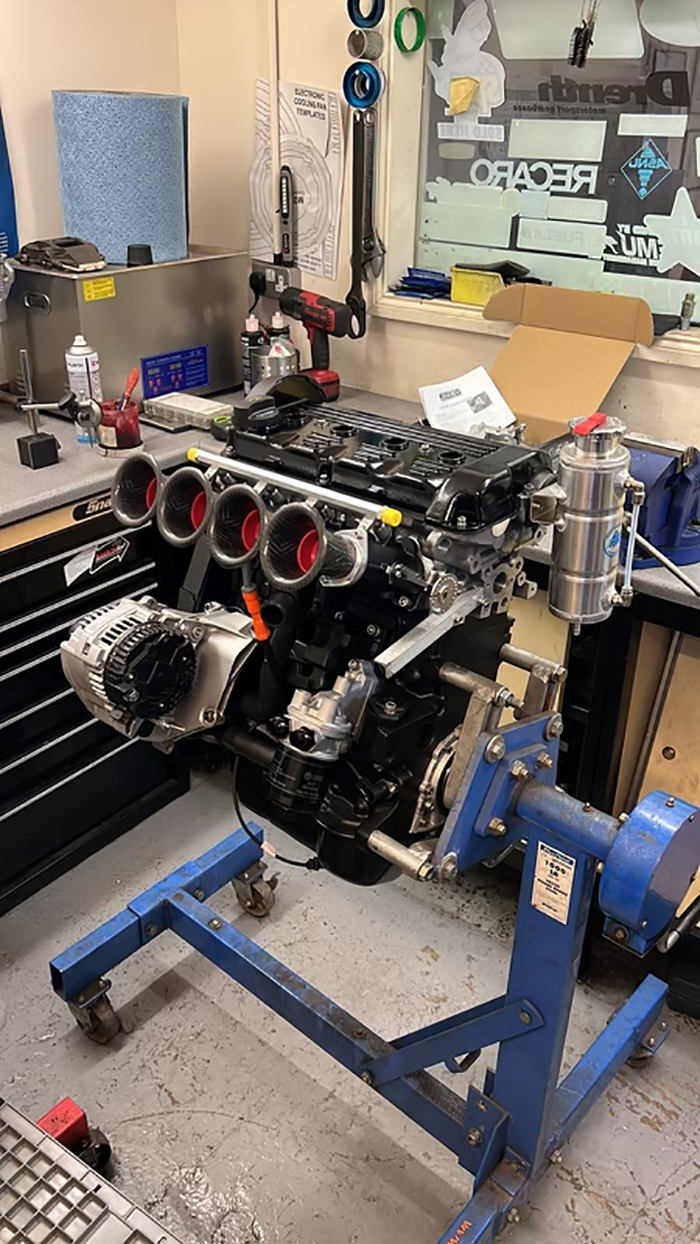
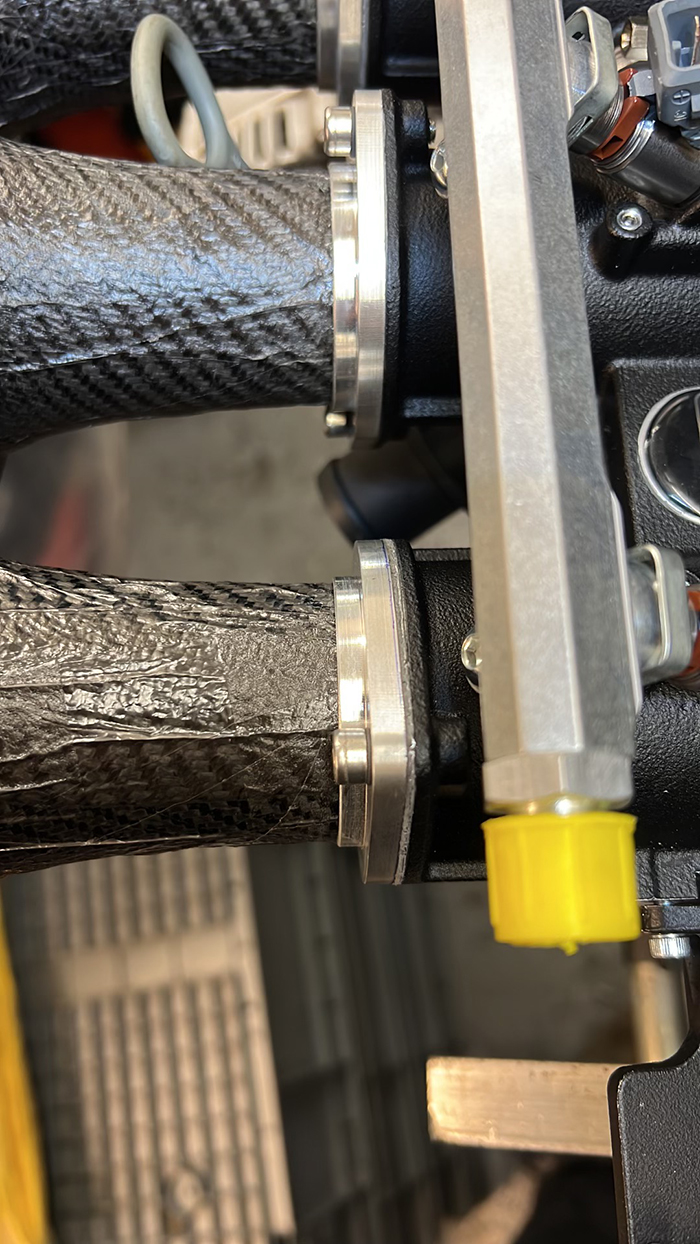
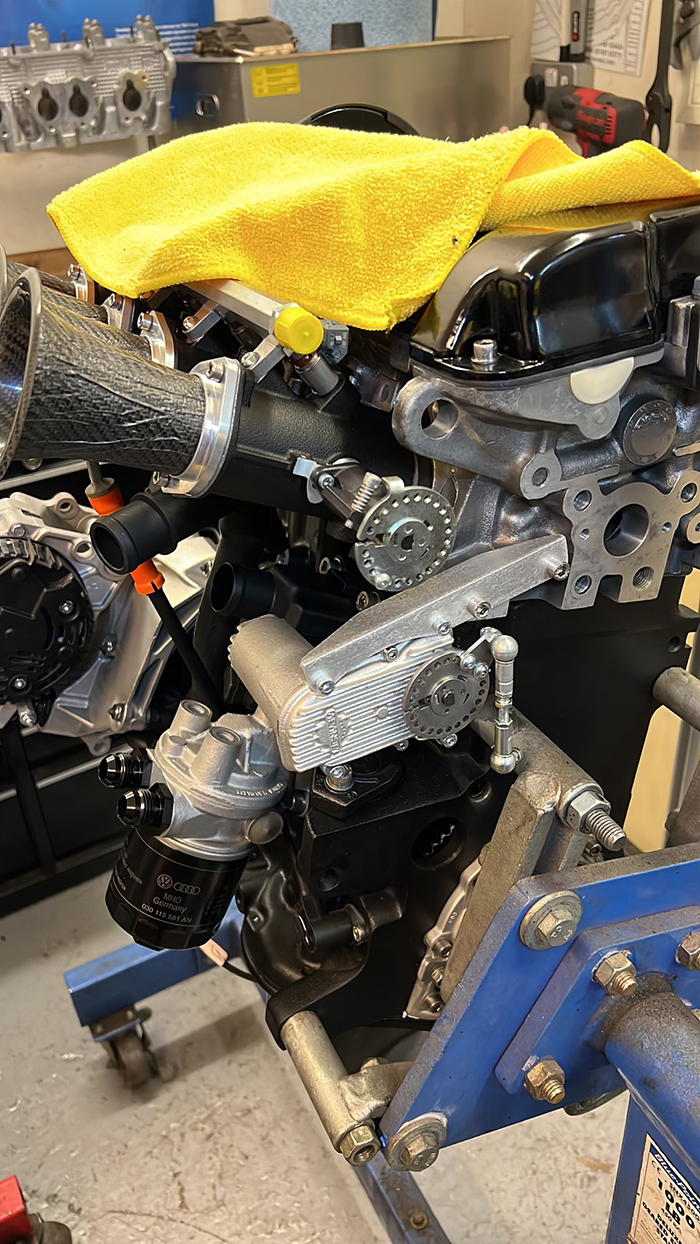
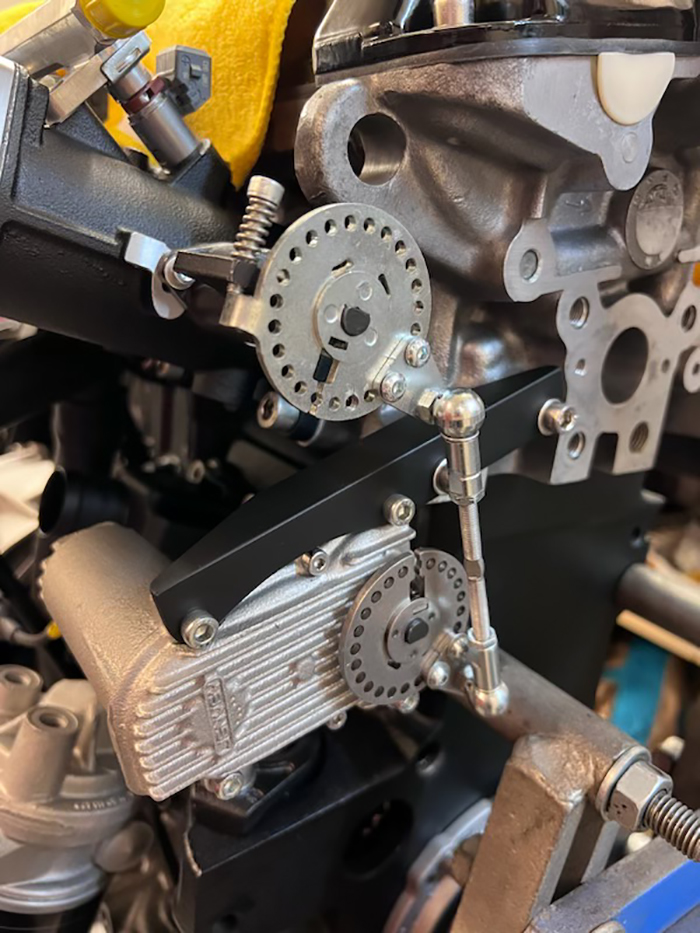
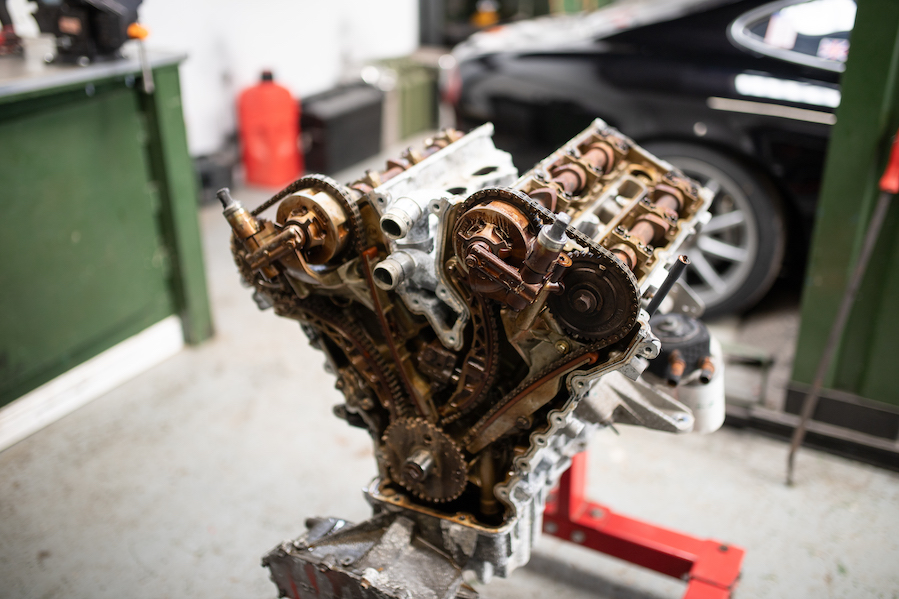
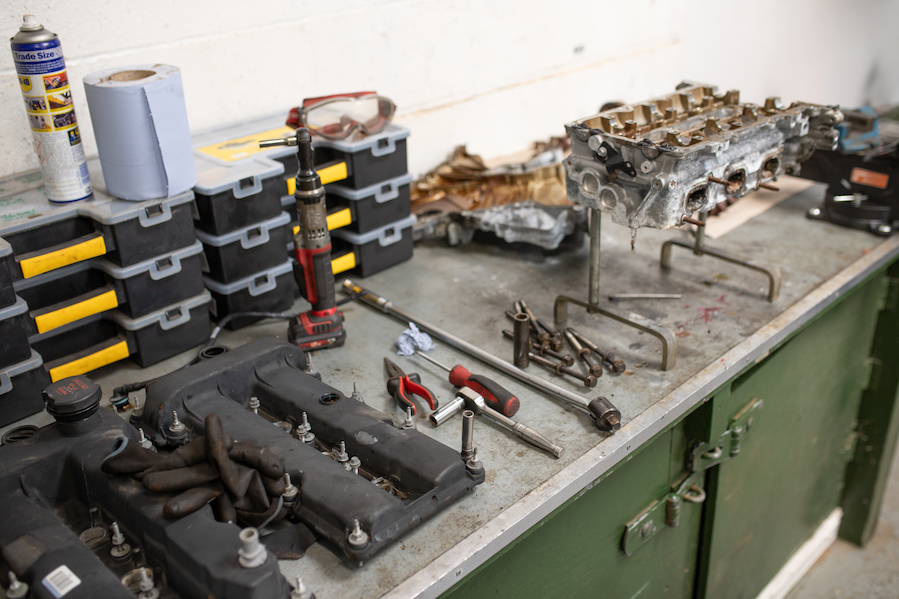
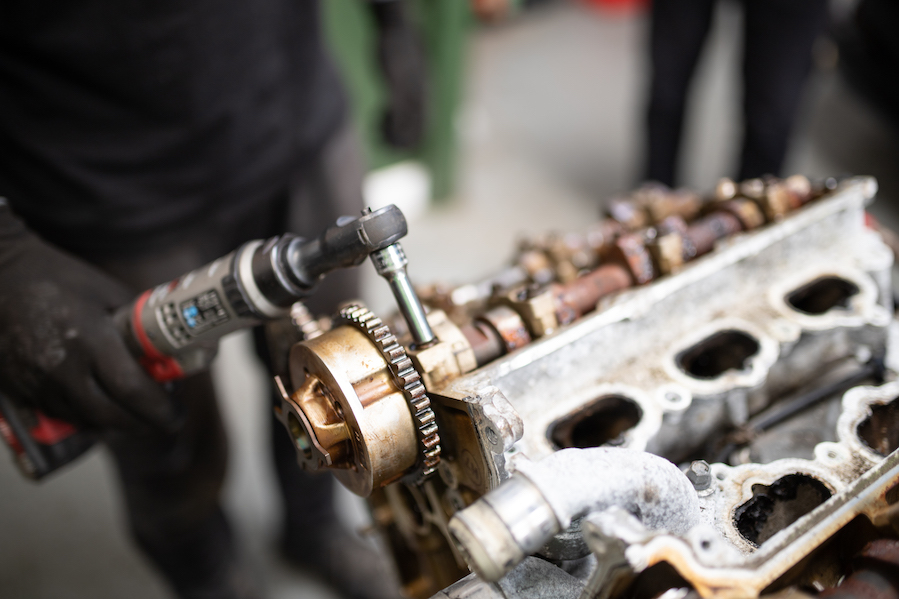
Finally, we had more updates from J-Tech who are wrapping up the engine build. Leo has been working his magic on the 2.0-litre 16v with ITBs to pull together some lovely finishing touches that keep the bay tidy and really make the engine pop. The header tank, for example, will be nicely mounted on the side of the engine, as well as the FBW actuator, so that it’s nice and tidy and kept out of the way. Oh, and the carbon trumpets are finally on, too. I love it when a plan comes together.
Part 7 – Interior trimming
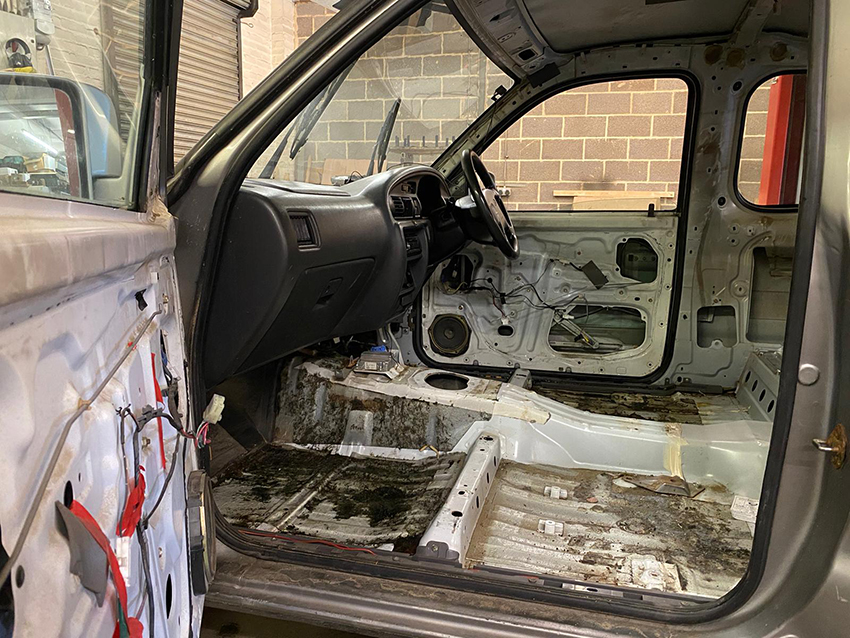
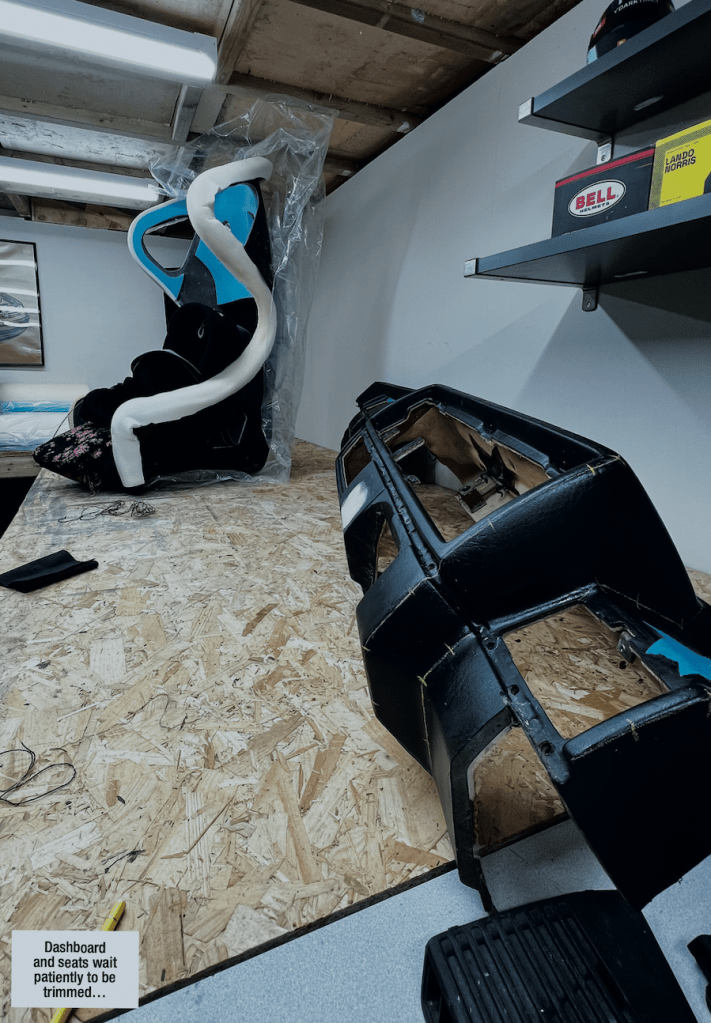
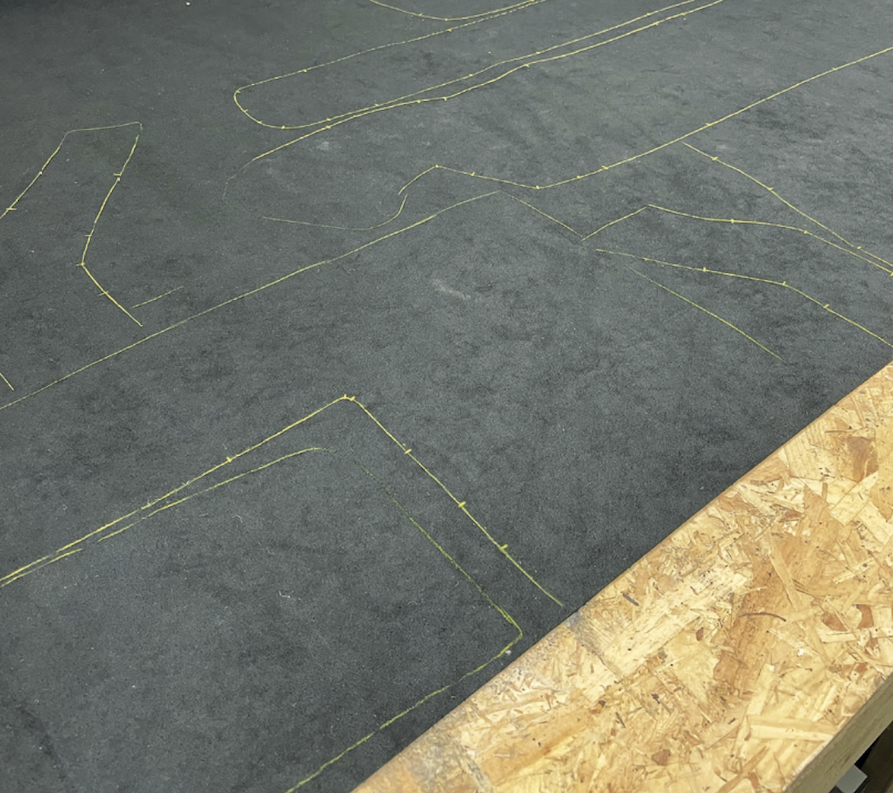
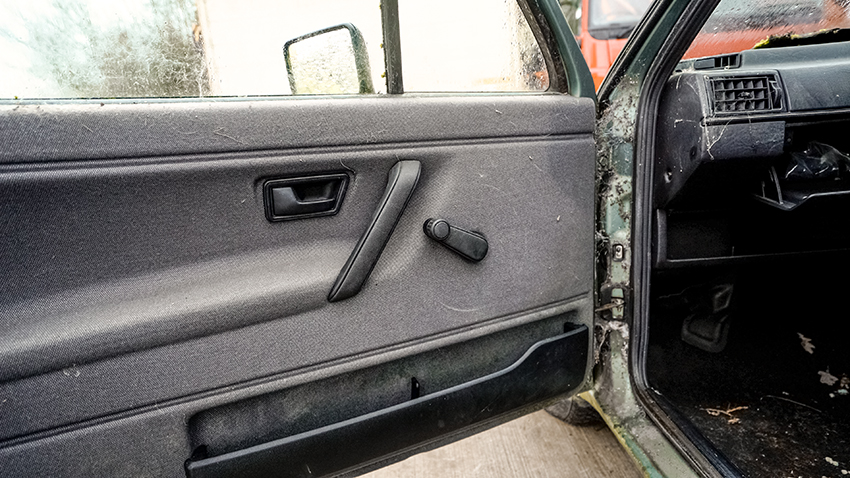
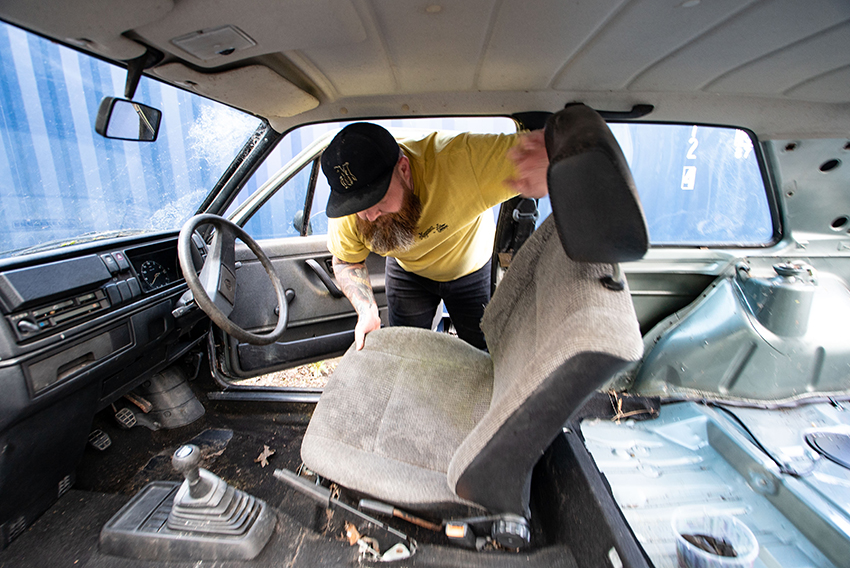
Having wrapped up the cage fitment last month, next we needed to trial fit the dash to make sure it would clear all the bits of the cage that had been added, then to trim out the bits that needed a fettle. We decided to do this early on because the whole dash is going to be trimmed at Hawkes Autoworks, so we wanted to give the team there plenty of time to do the job.
You’ll notice that I have masked up the dash so the trim can come right up to the cage – as close as possible – to give a really tidy finish. By the time the leather has been applied, there shouldn’t be any gaps at all. Well, that’s the plan at least. As soon as the seats arrive from Cobra we can then get them and the dash sent off to Max at Hawkes so he can start working his magic.
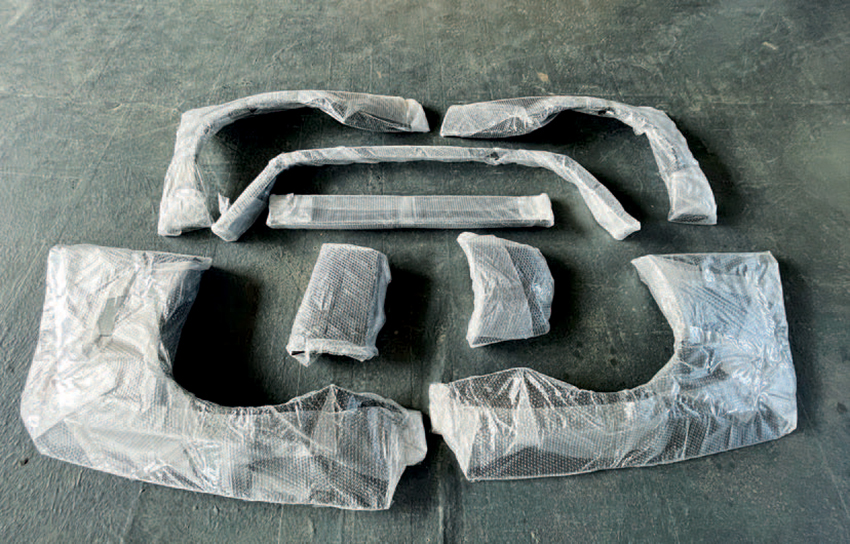
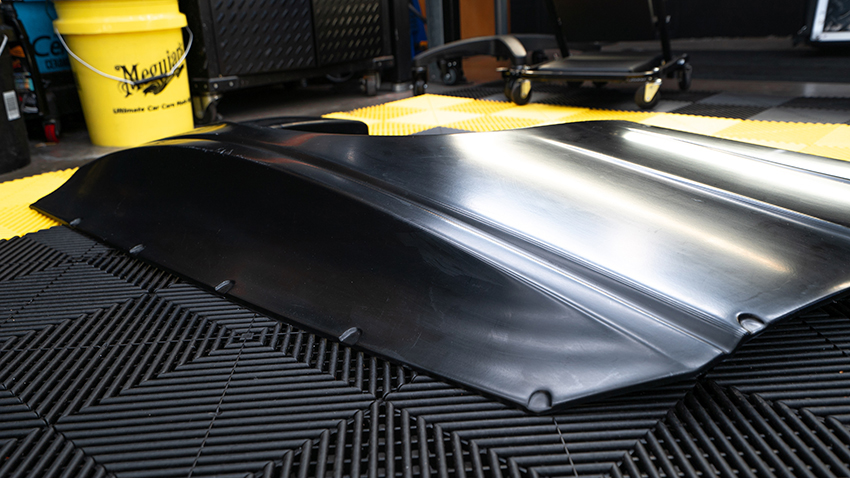
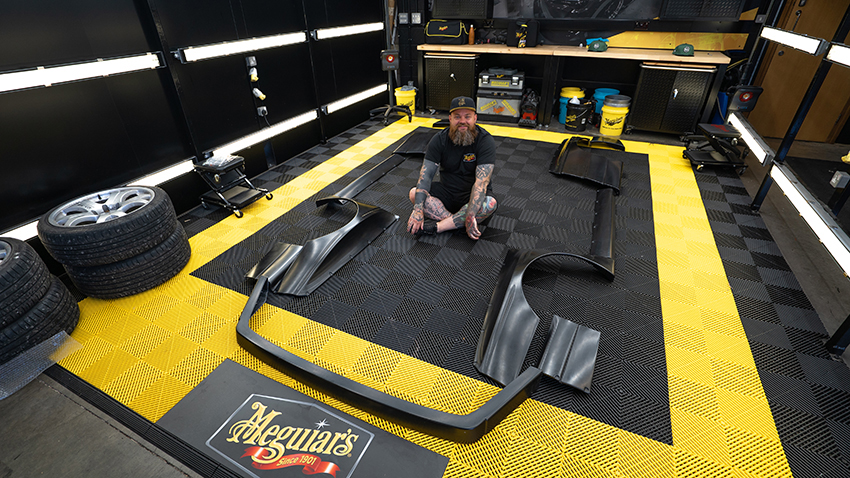
Next up it was time to take a closer look at the Rocket Bunny Kit which arrived at Meguiar’s HQ from Tofu Garage and on first impressions the kit appears to be of great quality, I can’t wait to see it on the car as it certainly looked the part spread out on the workshop floor!
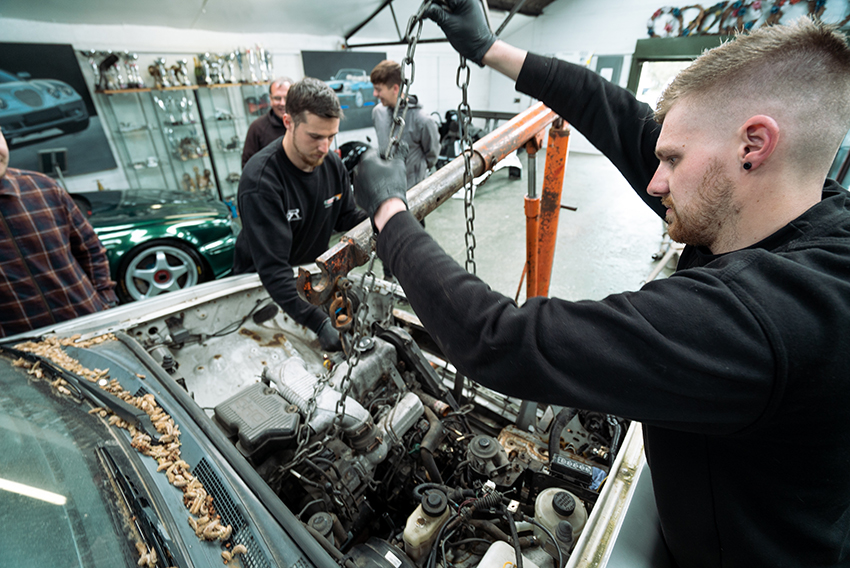
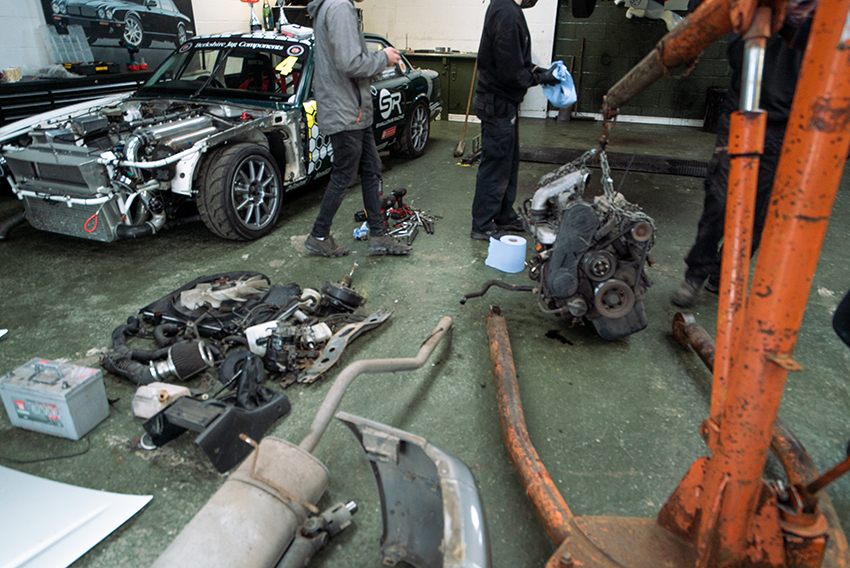
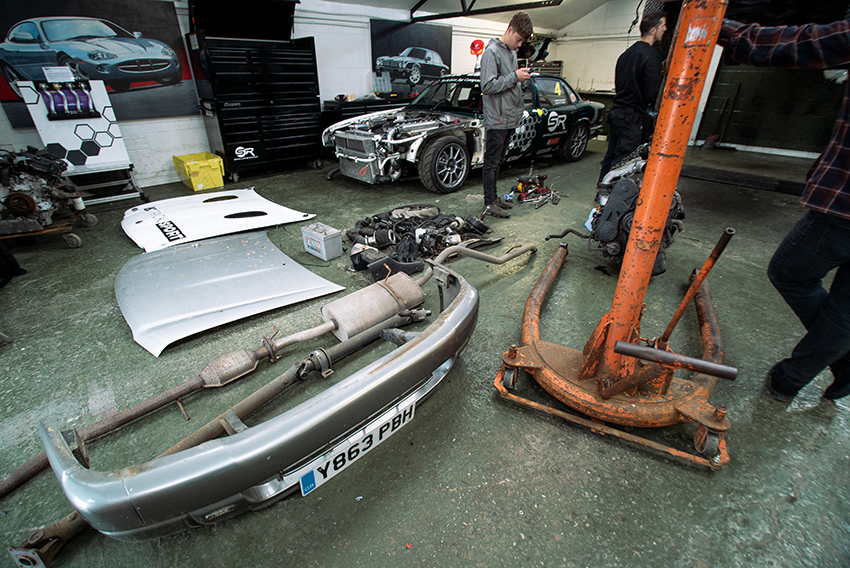
Meanwhile, when it comes to the shell, Matt has started to prep/cut the body work so we can offer the kit up and start to get some measurements to order the Image Wheels. There’s no point fitting a wide body kit if you don’t do the job properly and cut the car’s original arches out first, although you’ll be surprised how many people don’t bother. Also, Matt will be setting about welding all the holes up in the firewall, plus the old engine is now ready to come.

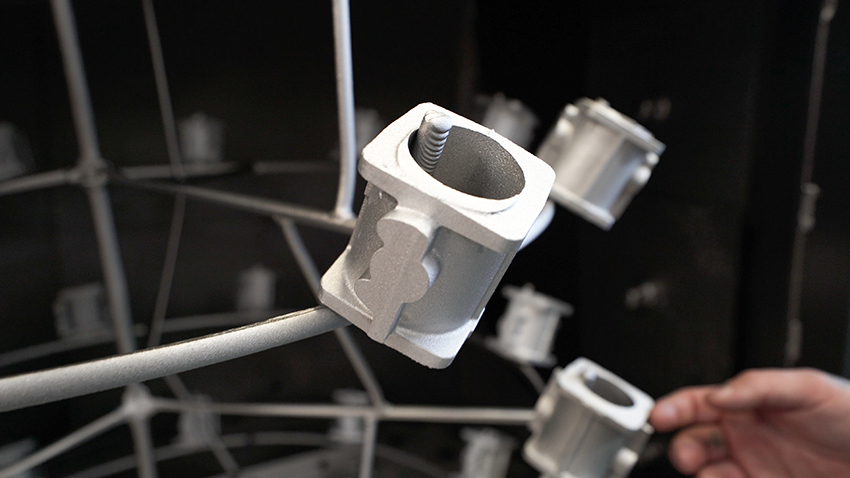
Up until now it’s been pretty handy storing the old engine out of the way in the bay, but it’ll have to find a new home, for now. Probably the most exciting part of the month was taking a trip up to Jenvey Developments who are kindly helping with the build. At their HQ we got to see the whole production process, which is really interesting to witness an all British made product being produced and shipped all over the world!

We will be producing a whole episode on our YouTube channel to cover this visit, but for now, we have a direct-to-head ITB kit (no inlet manifold needed as the bodies incorporate the mounting system) in black, along with carbon fibre horns and all the accessories for them.
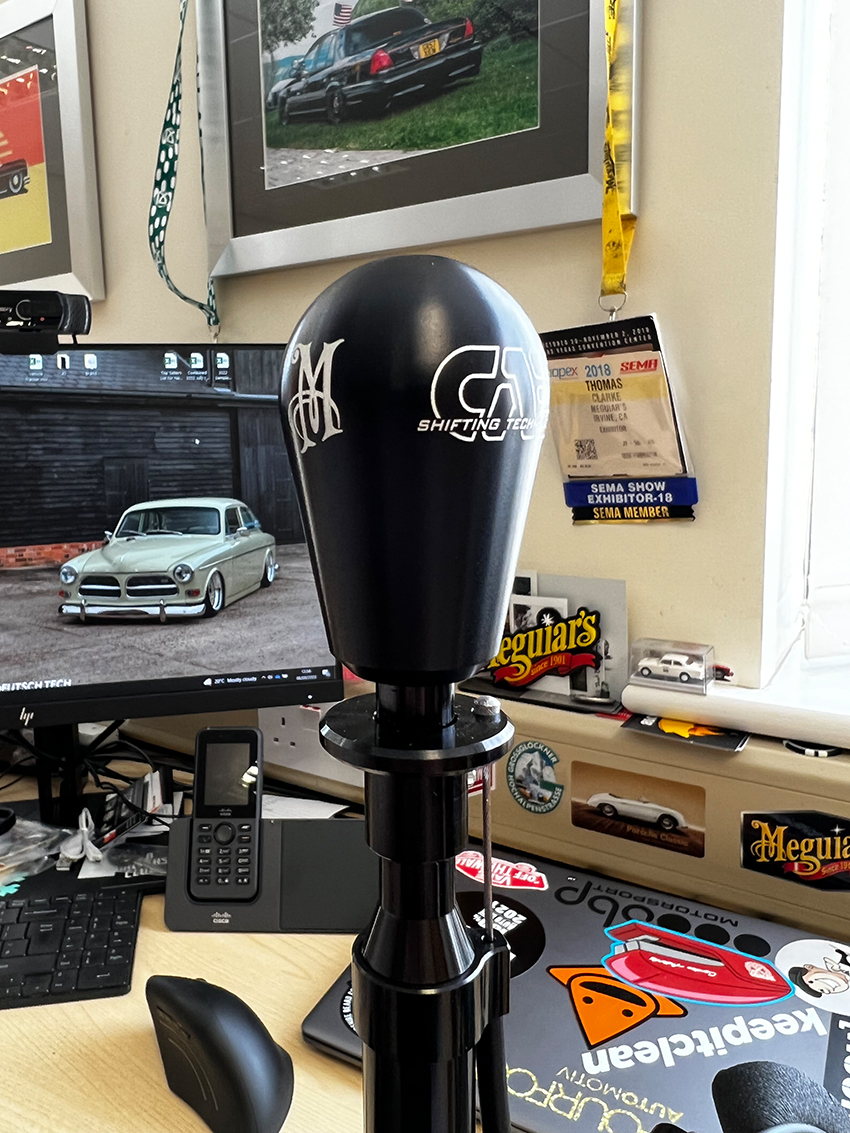
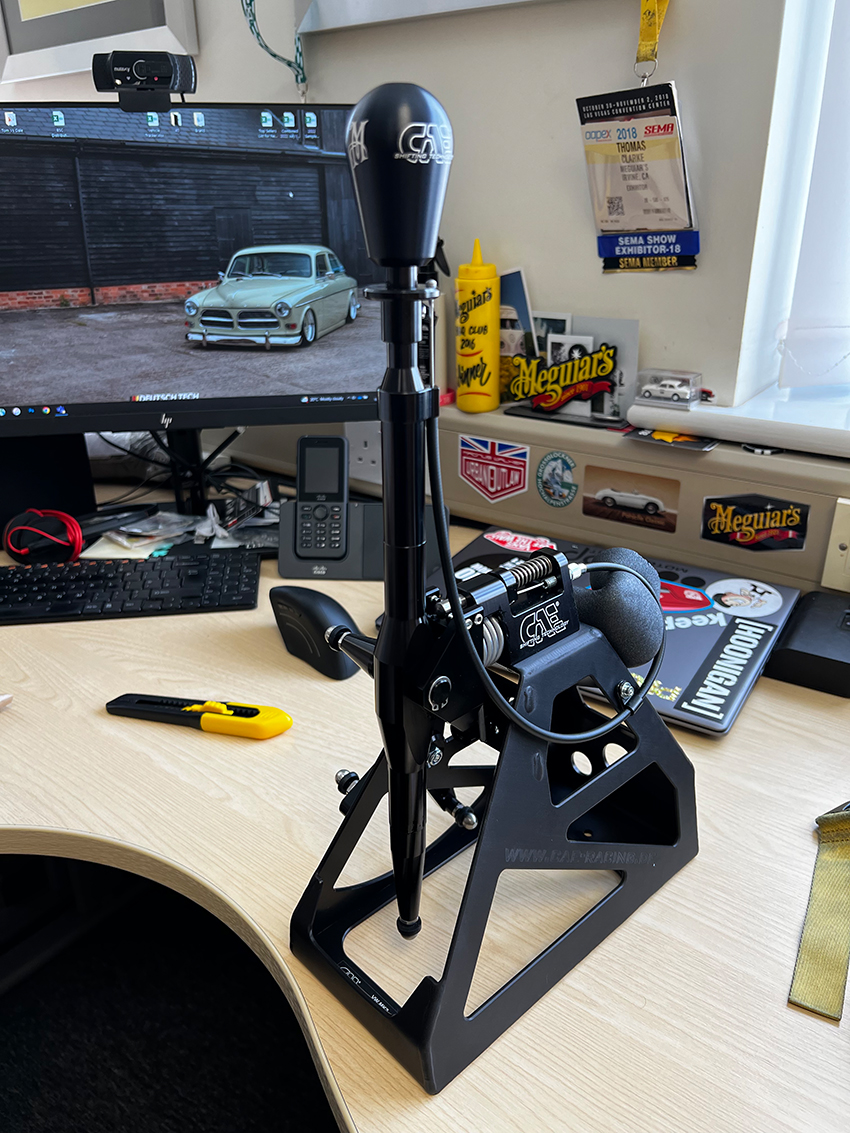
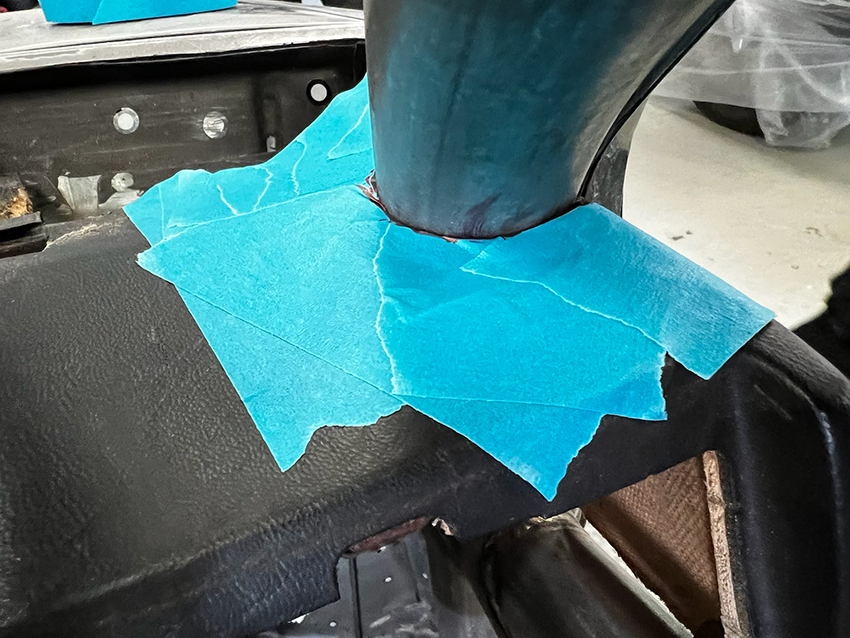
Finally, another rather sexy piece of the jigsaw arrived in the post in my all-singing all-dancing CAE shifter. This all-black item looks incredible and has been customised with the Meguiar’s logo being laser etched into the knob.
Part 6 – Caged up
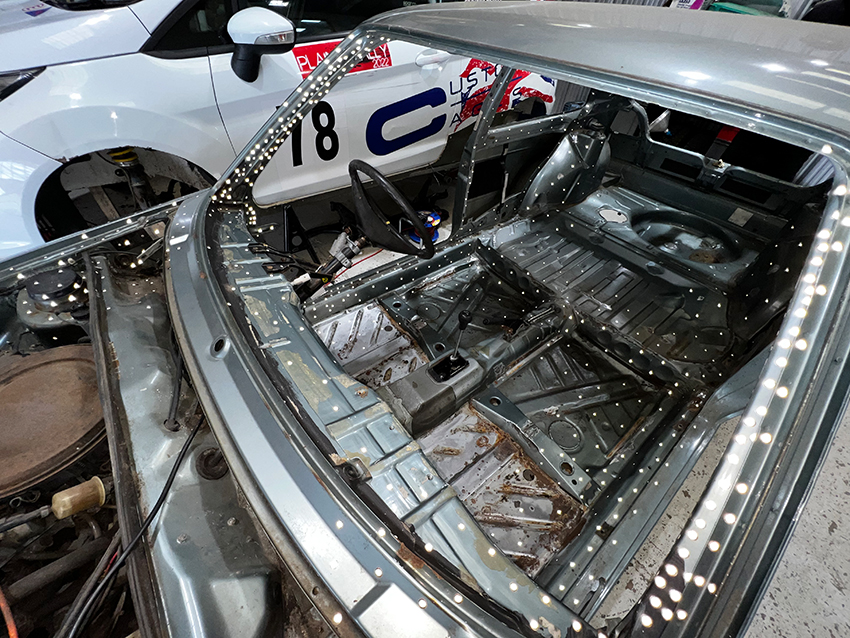
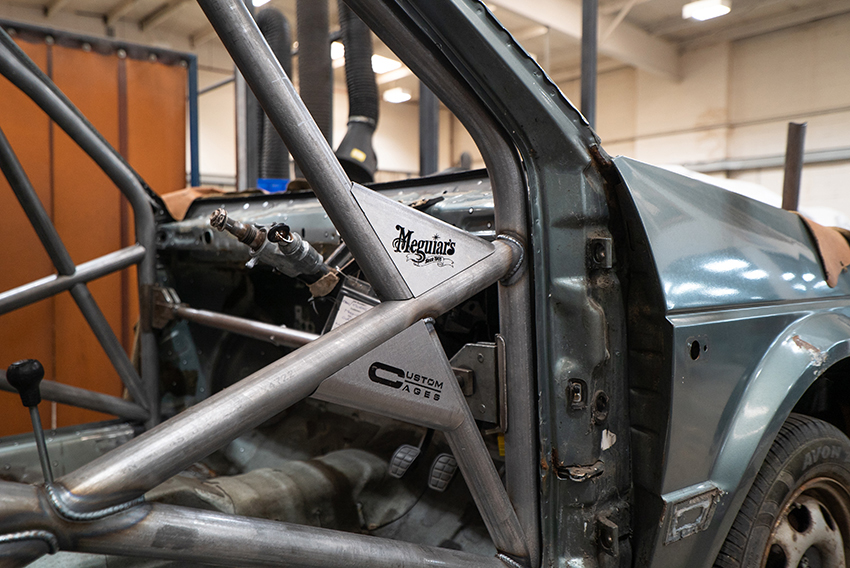
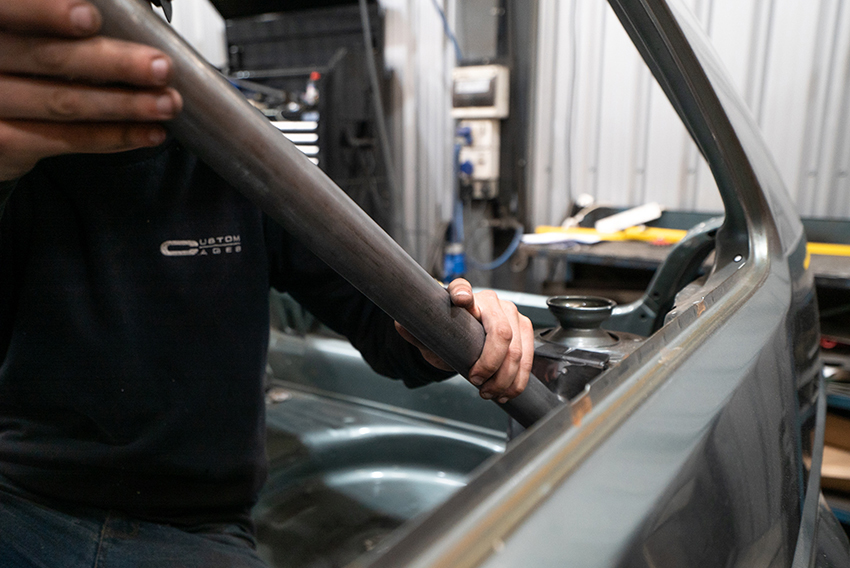
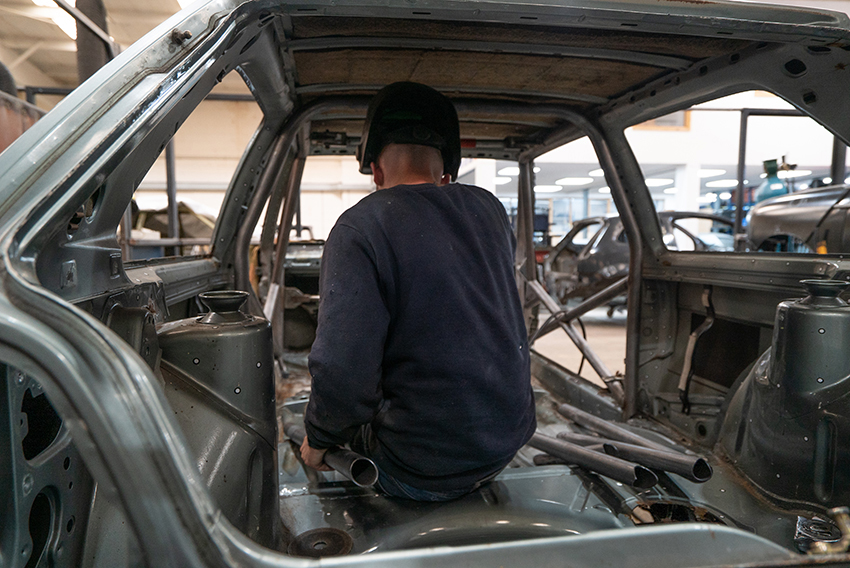
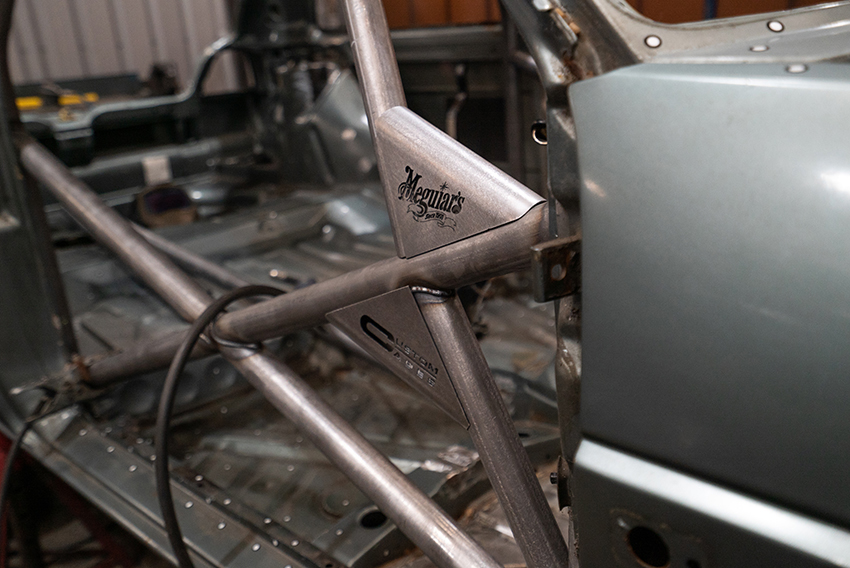
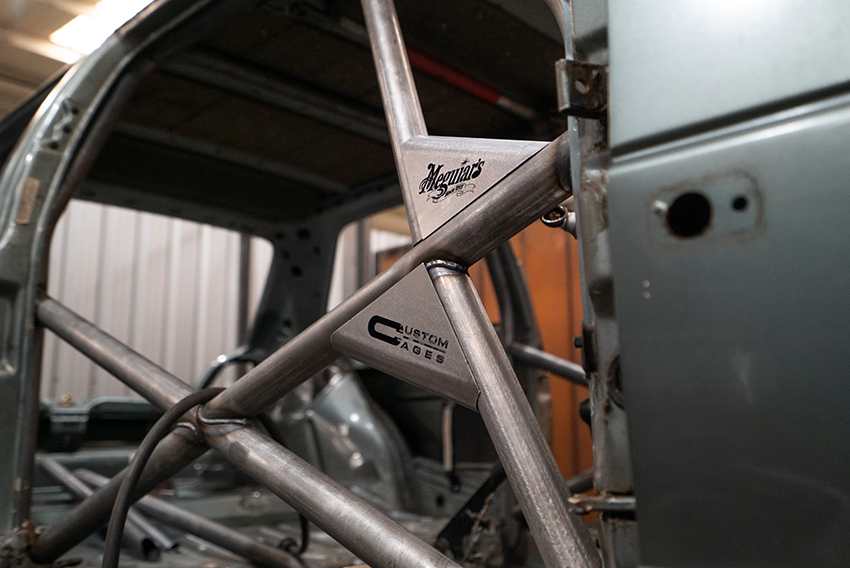
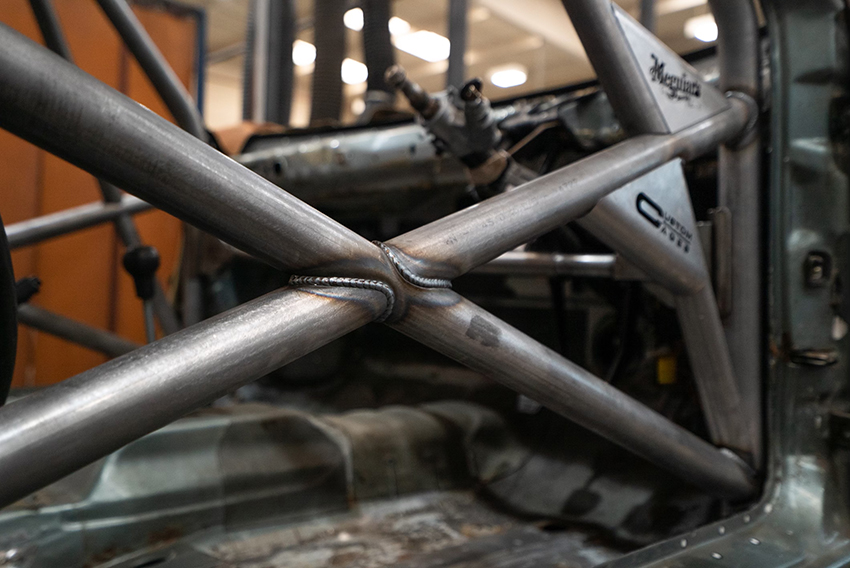
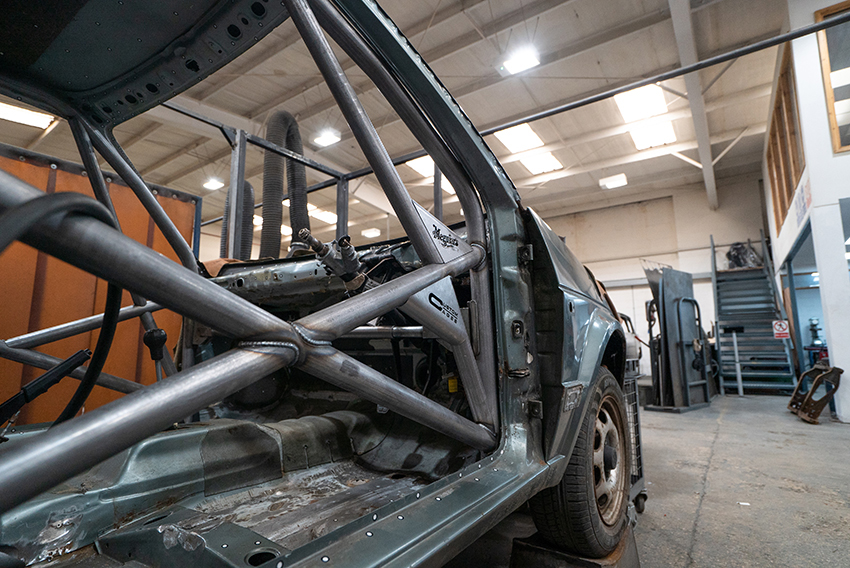
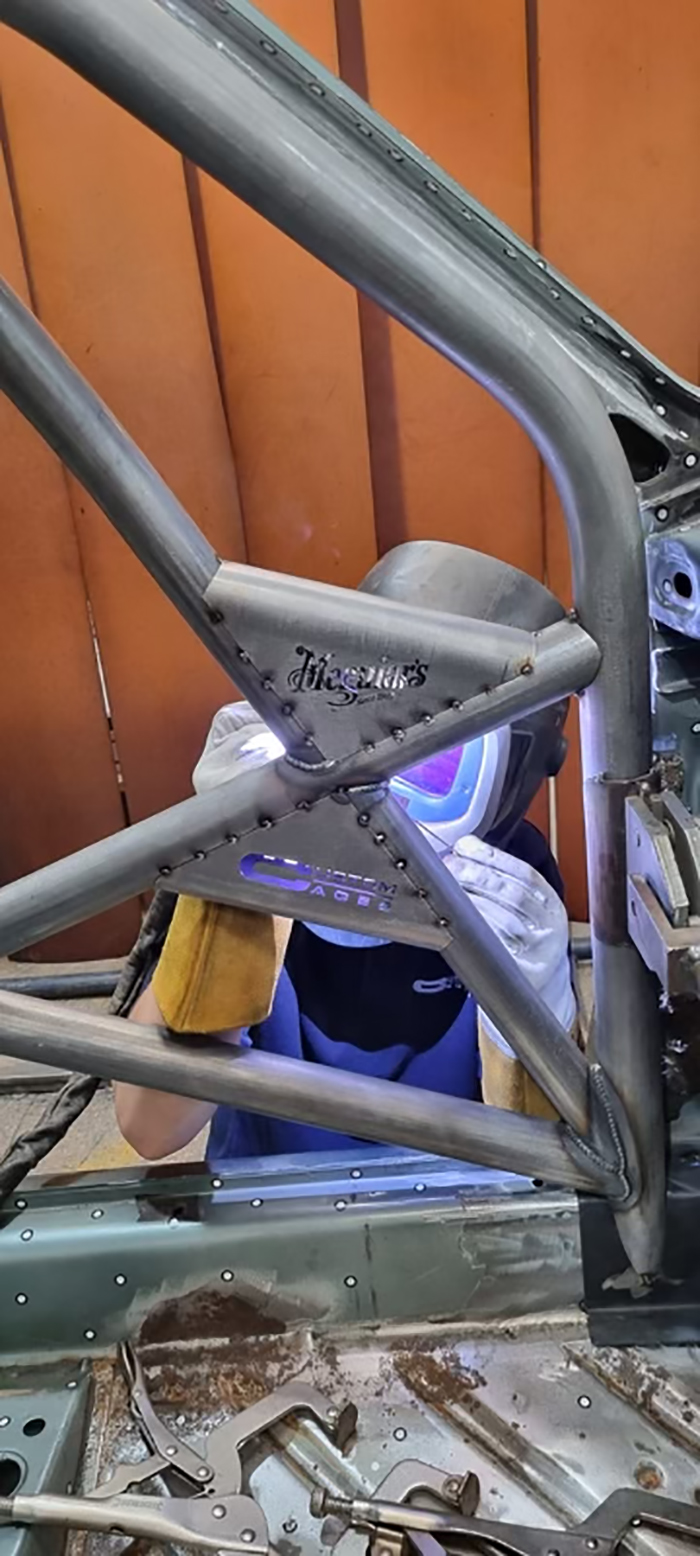
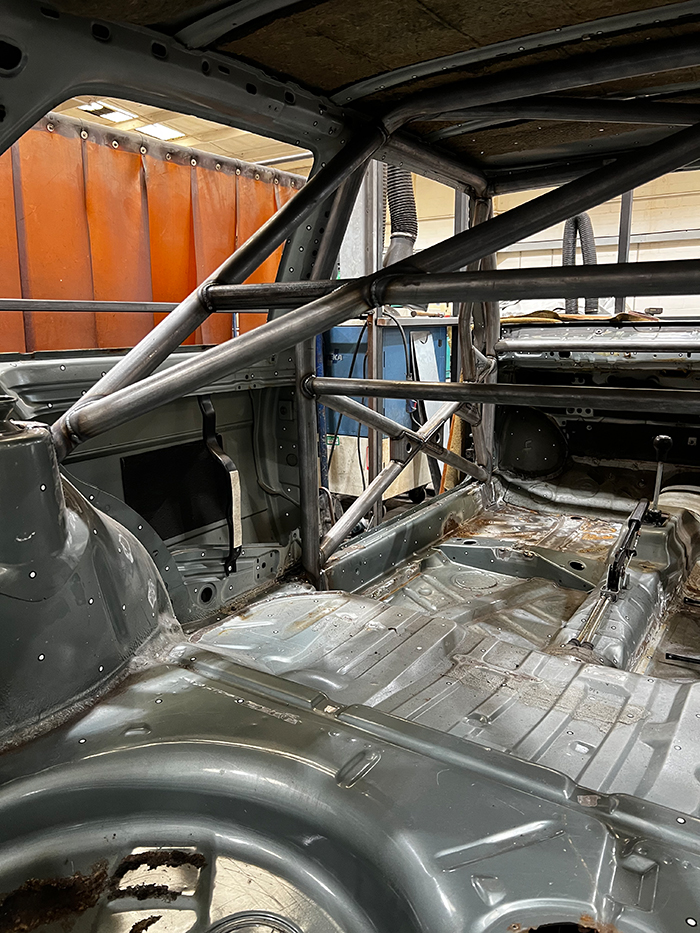
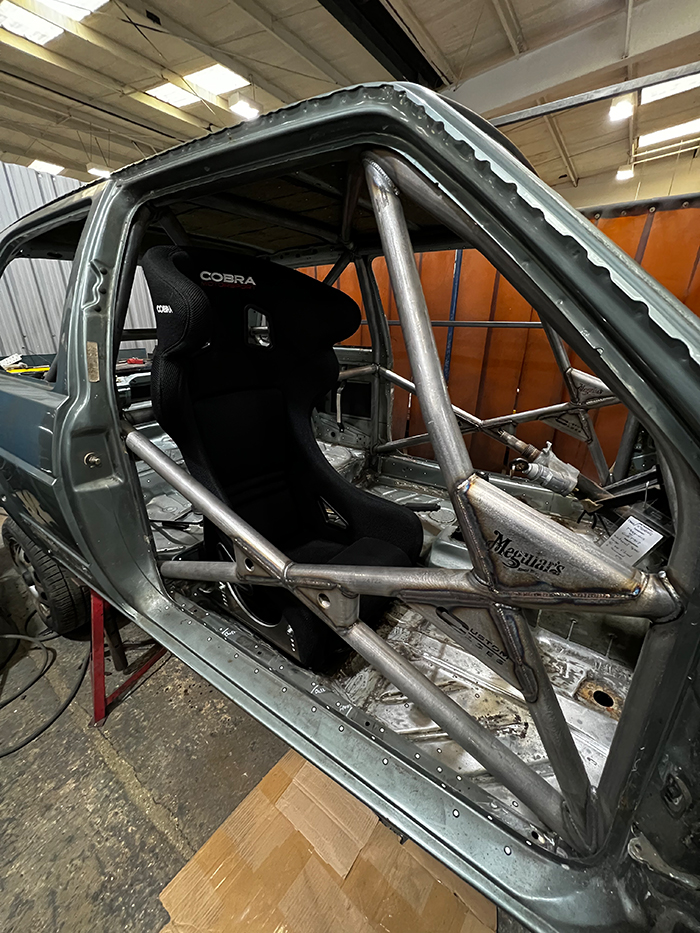
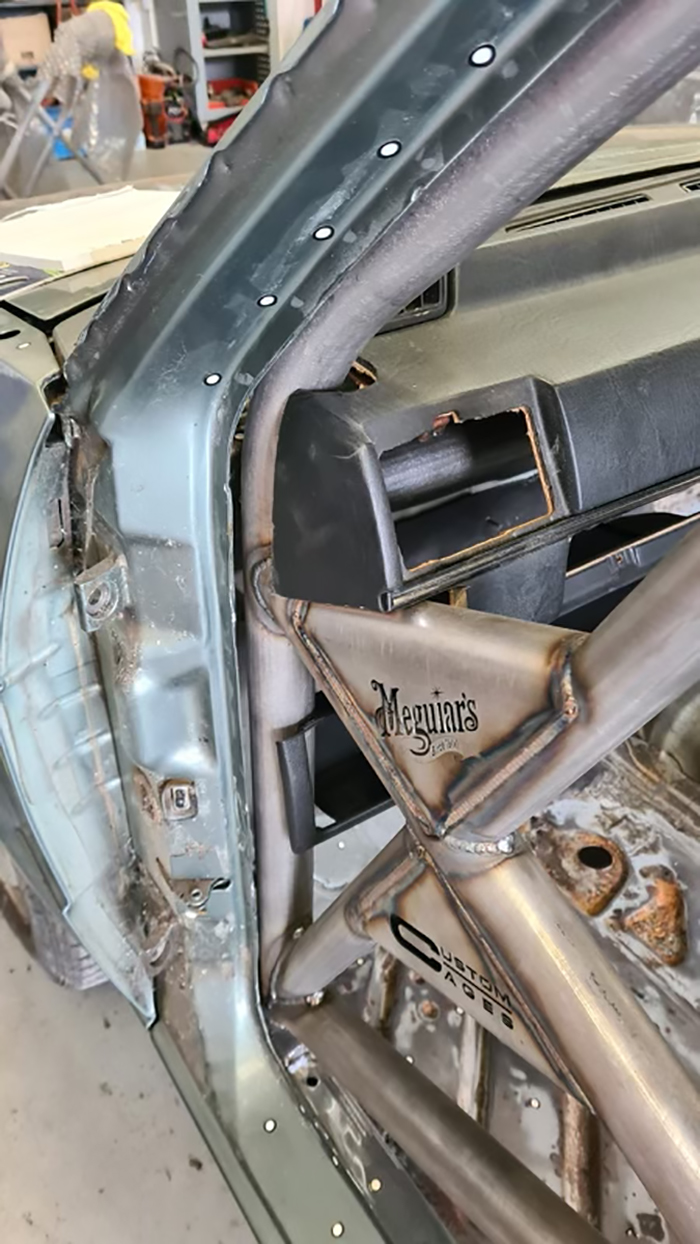
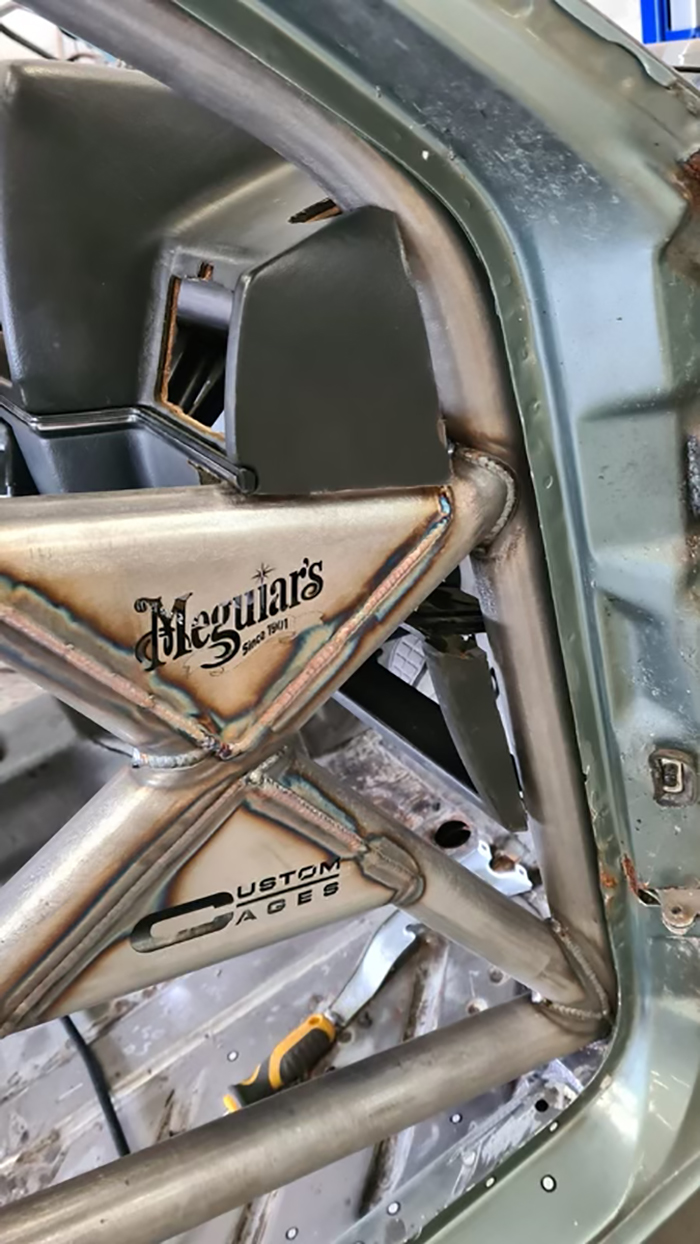
Things are hotting up over at Meguiar’s as the Tom v Dale battle continues. While we’re still very much in the dark about what young Dale is up to with his Ford pick-up truck (yep, a pick-up truck), Tom is sending us regular updates on what’s happening with his Mk2 build. This month, all (or the majority of) progress has been made inside thanks to the installation of the weld-in roll cage, plus he’s had a seat fitting, too.
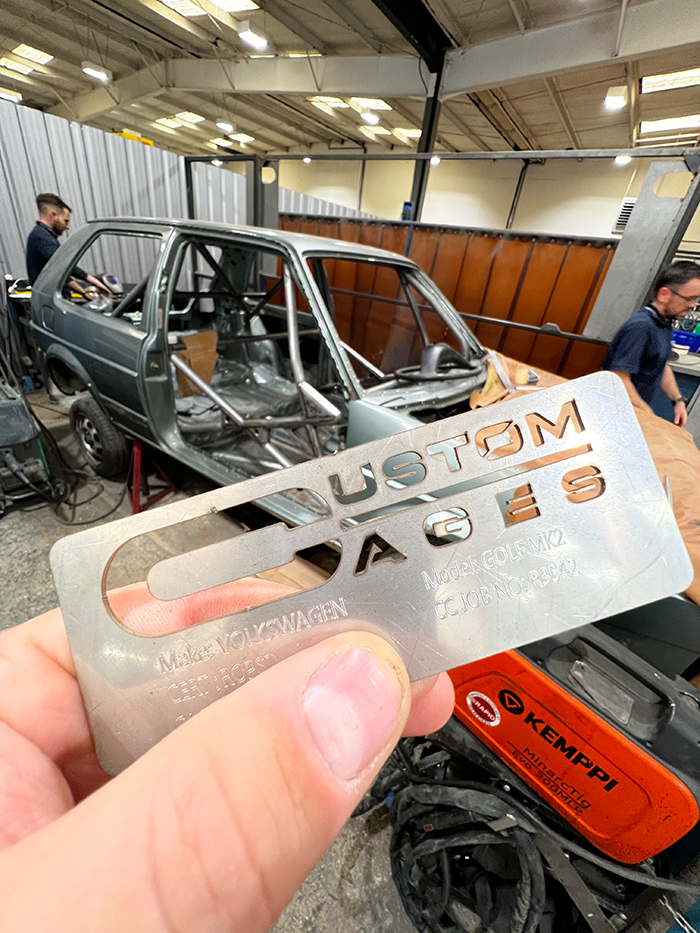
Now, if you choose to purchase a roll cage through Custom Cages then you can either opt to purchase your roll bars in kit form and weld them in at home, or the guys will happily supply and fi t should you so wish. While Tom might be a bit of a dab hand with tub of polish and a microfibre, when it comes to welding, well, let’s just say thankfully he knows when’s out of his depth.
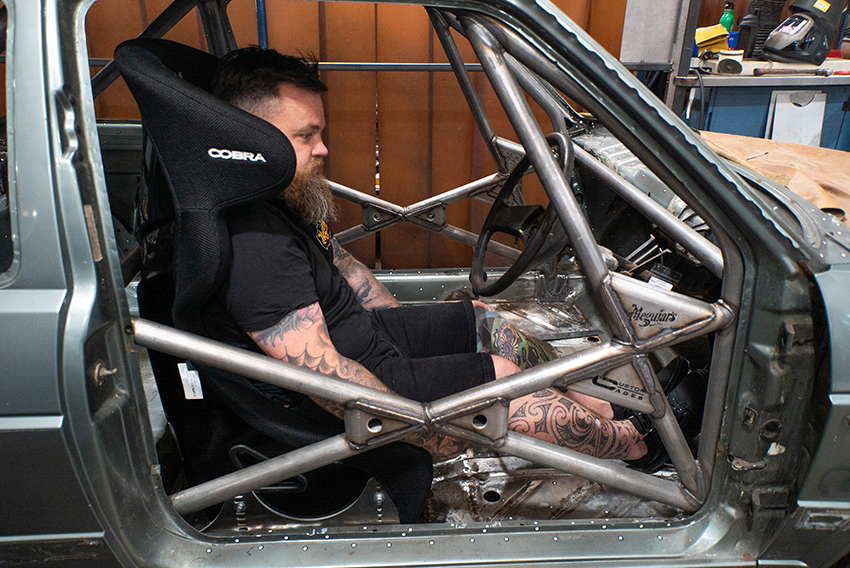
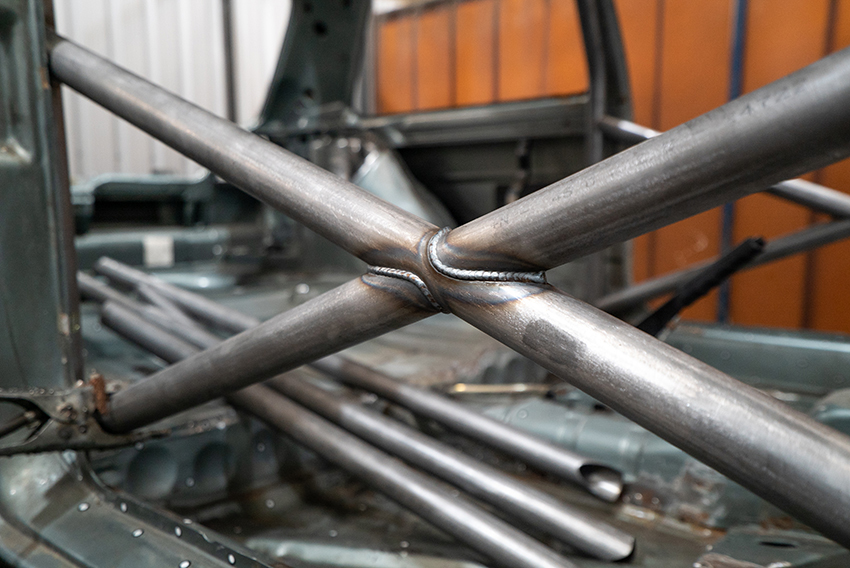
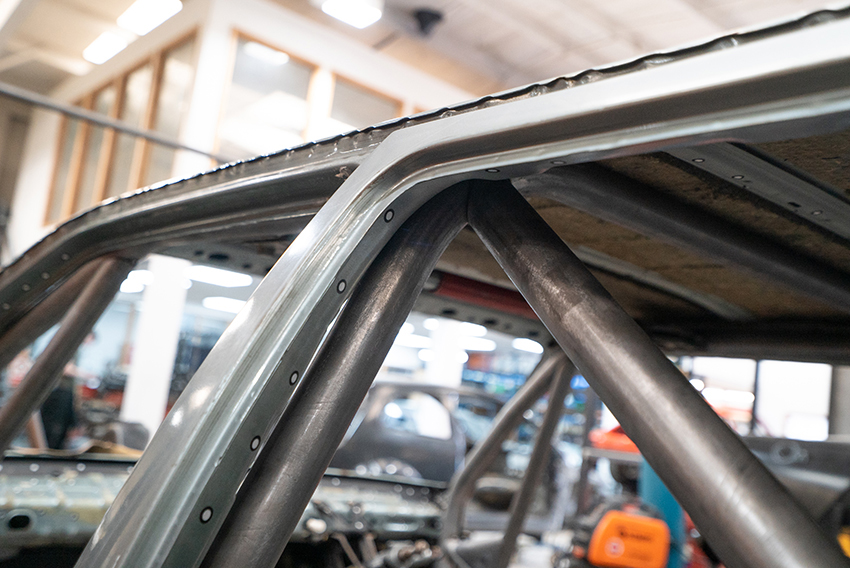
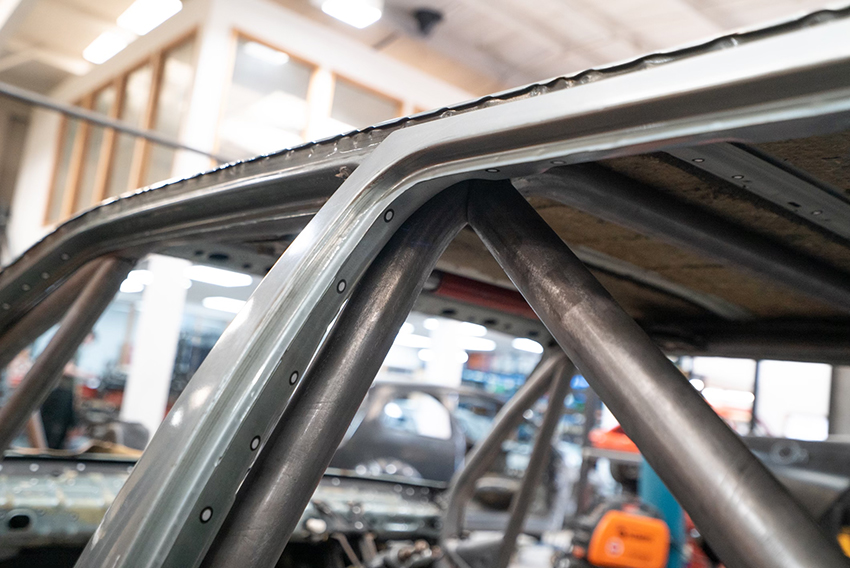
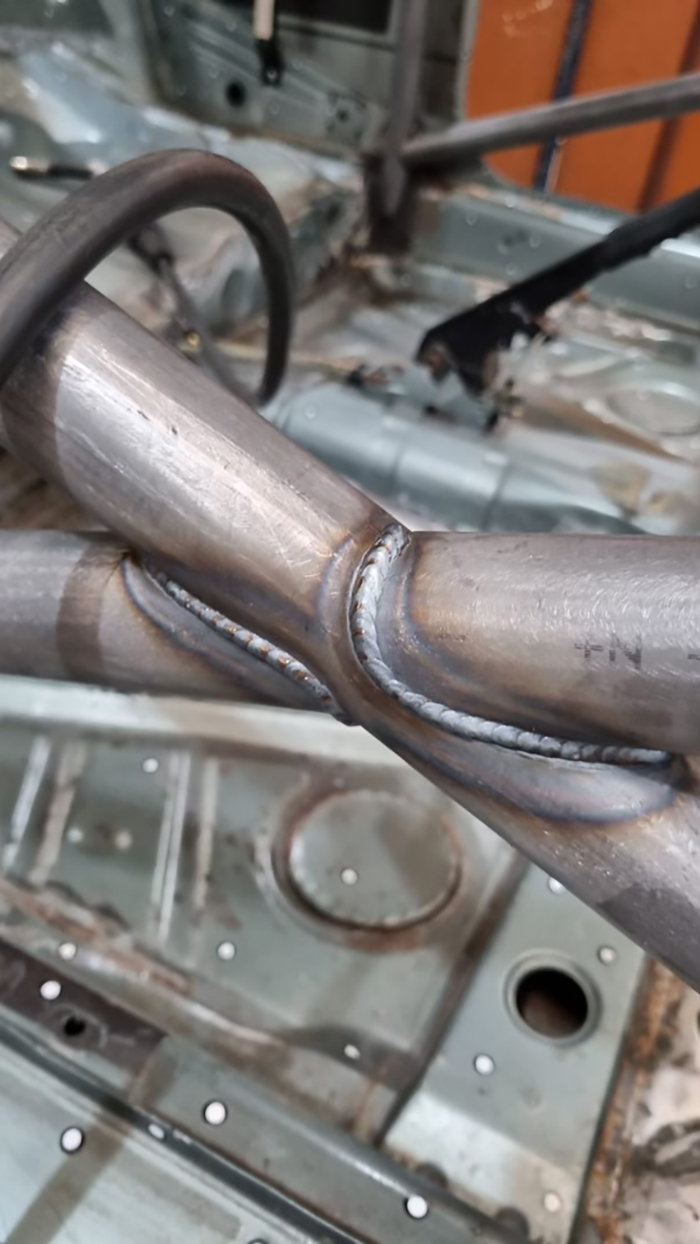
“The cage I chose meet CC’s National Spec and CDS tube was used. The cage is MIG welded in and the gussets are then TIG welded in. Everything they use is data logged and weld checked to comply with the FIA compliancy, so they know where the tube came from, on what date it was produced and loads more info,” Tom told us. “They have templates for most cars and you can buy a kit and weld it in yourself, but if you wanted to have the FIA certification then you need to send in a triangulated weld test, to strength test your welds. These kits all come pre cut and ready to go in,” he continued.
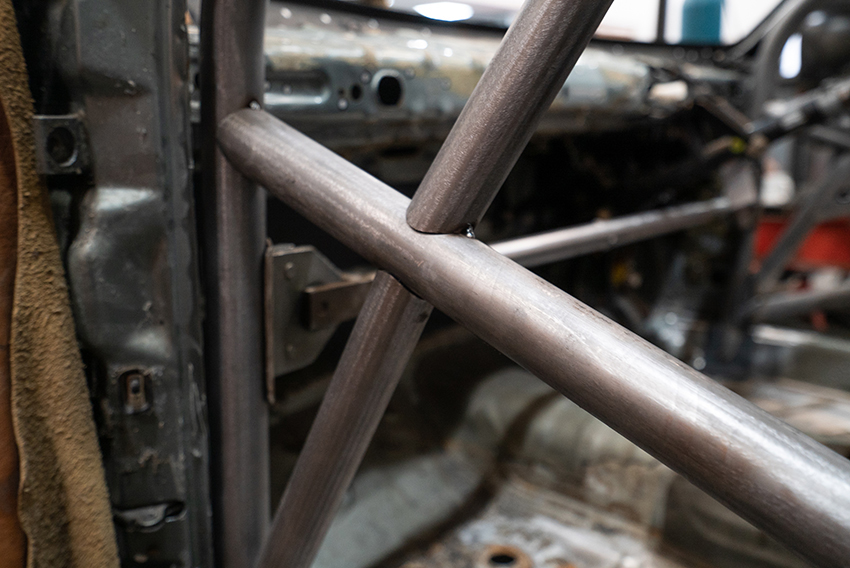
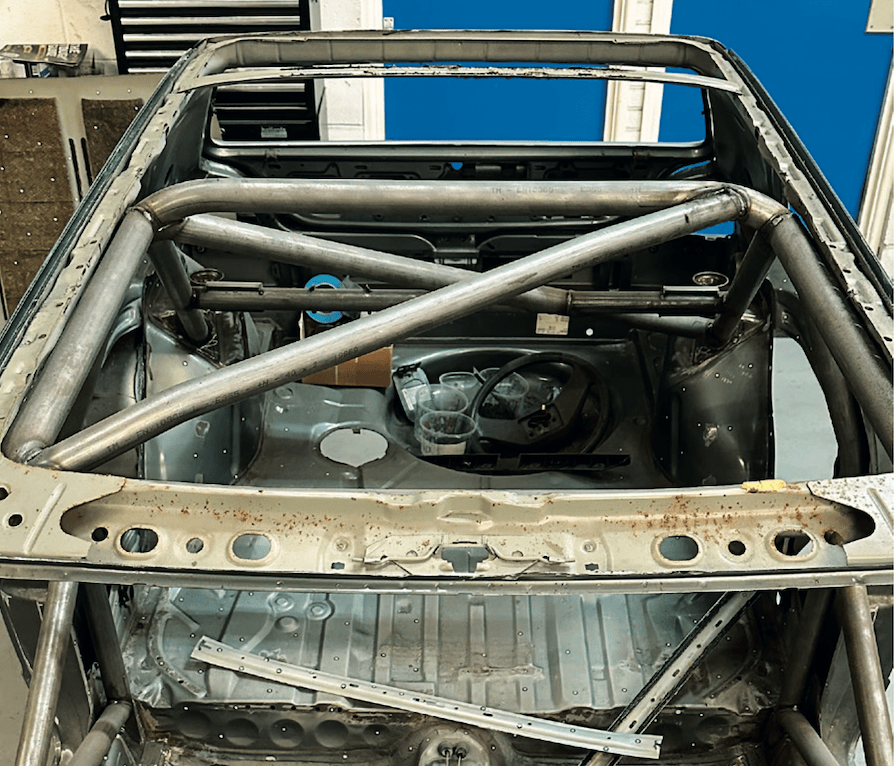
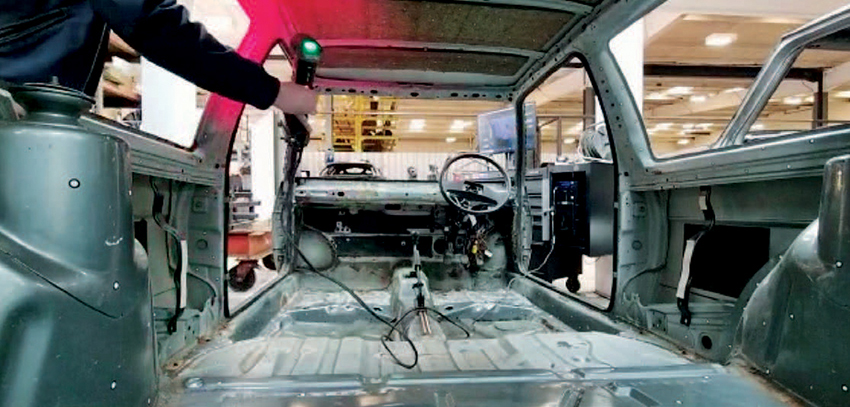
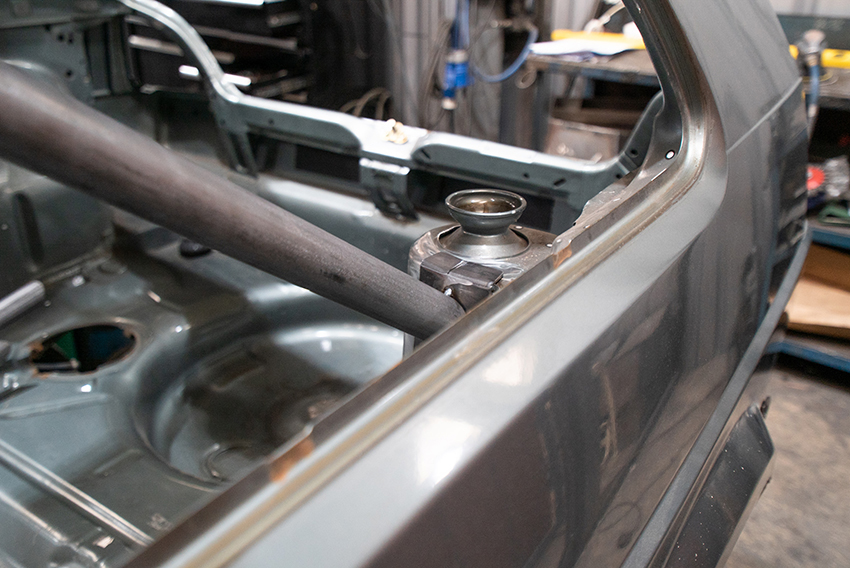
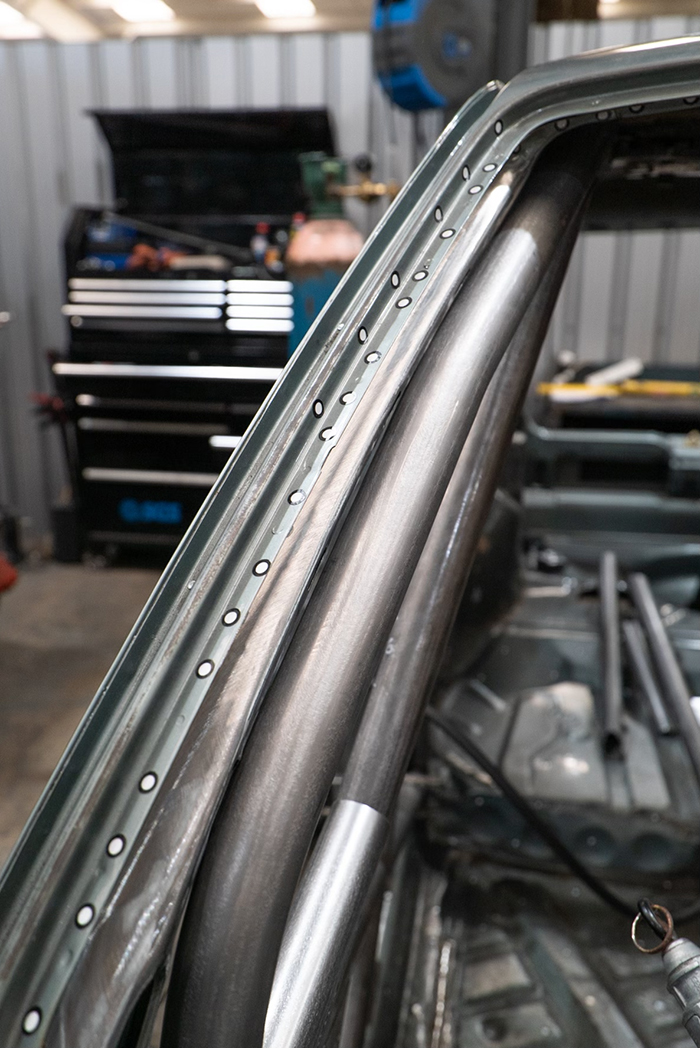
Should, like Tom, you choose to have the cage fitted in house at Custom Cages, the main thing they strive to achieve is getting the cage as tight as possible to the shell you provide them, to give maximum strength. You can see in one of the images of the A pillar that the cage is right up against it, this comes from the scanning process which we looked at last month. The cage is then stitch welded to the shell for added strength – they don’t need to use gusseting for strength as the cage is literally so close to the shell already.

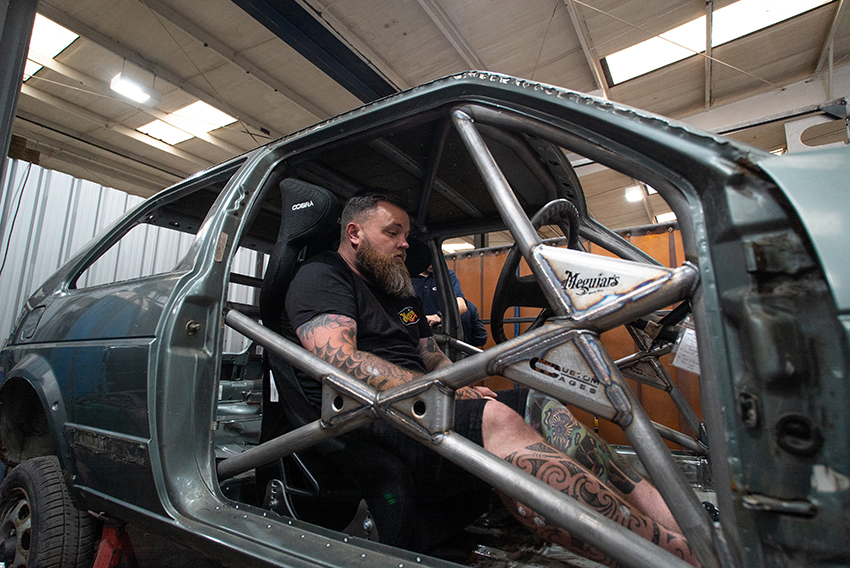
The roll cage itself has been made to the FIA prescribed tube sizes. This means the cage was made to comply with all the current regulations and is eligible for all FIA sanctioned events. Custom Cages have also installed FIA approved seat rails and harness clamp points. “We took a Cobra seat up with us along with their mount kit to work out the best position for the seat. Because there will be a few people that will drive this car (all ranging in height), we mounted the driver’s seat on a runner rather than fitted in one position. And, because I am short, we wanted to make sure we had enough space in the cockpit for the seat to adjust for other (normal height) drivers. Once that position was agreed the CC team actually decided the seat was too high, so they cut into the floor and they got the rails as low as possible in the shell,” says Tom.

There are literally hundreds of applications to choose from on the Custom Cages website (www.customcages.co.uk/roll-cage-kits), but if you’re after something similar to Tom’s, then National Spec cages start at £954.00 and go up to £1674.00 depending on car and your final specification. That’s for the kit itself, but if you wish for Custom Cages to install it as well, then there is obviously an additional cost.

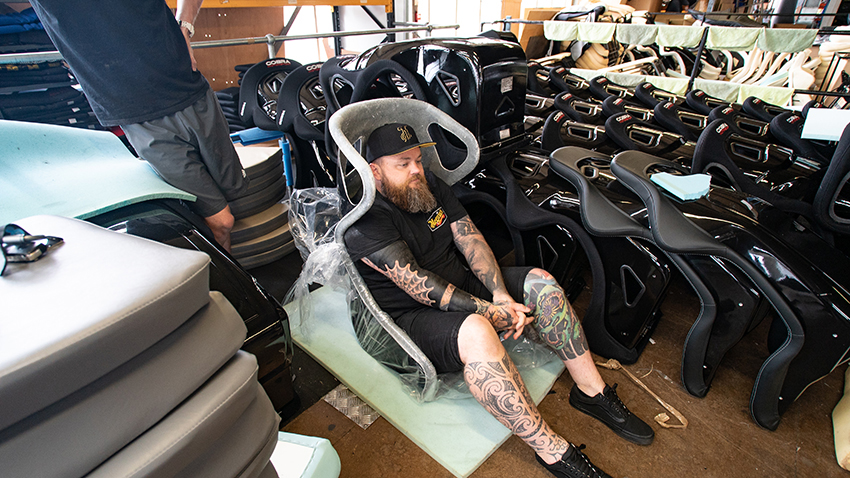
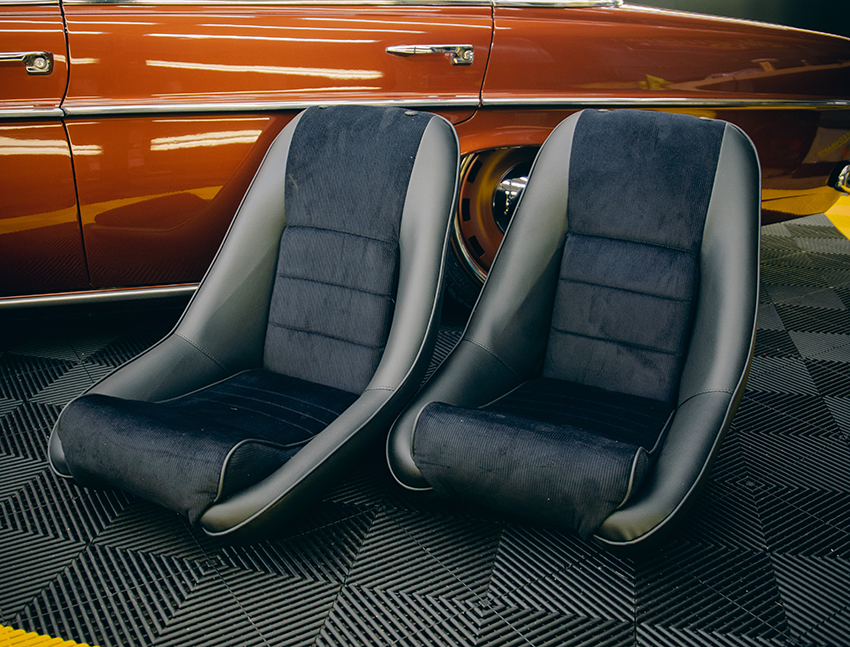
When it came to seats there was obviously only one place Tom was heading: “Cobra have supported us pretty much on all our previous builds. We always try to do something a little out of the box if possible and Cobra are usually only to happy to help. For my previous Volvo seats, for instance, I wanted to keep the same eyeline as the original seats so we worked together and modified their Negaro seat and removed the headrest area from it.”

This time around, Tom knew the seat he wanted, the Evolution T, but off the shelf the concern was that his shoulders would be too tight in the shell. “After me pestering the heck out of Adam and Mark at Cobra to let me try one, I decided to head up there and try out some seats. Thankfully, Cobra offer ‘GT’ sizing, which is suitable for my child baring hips,” Tom laughed. “We actually tested out a seat shell with no foam and the seat fitted well, so, we have agreed to put less foam in some areas around the shoulders and then the boys will supply the seats and we can get them trimmed, because nothing stays standard around here for long.” More on the seats and Tom’s choice of ECU next month.
Part 5 – In good hands
It’s been a manic few weeks for Tom and Dale, not only on the project car front, but also because Meguiar’s exhibited at the Players Classic and the Festival of Speed events pretty much back to back. While both events may have been in and around the Goodwood estate, Players is actually held at the circuit, while the FOS is run outside the main Goodwood house just across the road. Regardless of that, being held on different weekends meant the team needed to pack up after Players and drag everything back to Meguiar’s HQ in Daventry before the FOS took place anyway, so it was a lot of racing around.
Thankfully, while Tom had been off on the jolly at the shows (he reckons it’s hard work but how hard can it be just chatting about detailing products all day? – All) his Mk2 shell and the engine he sourced for it have been in very good hands indeed.
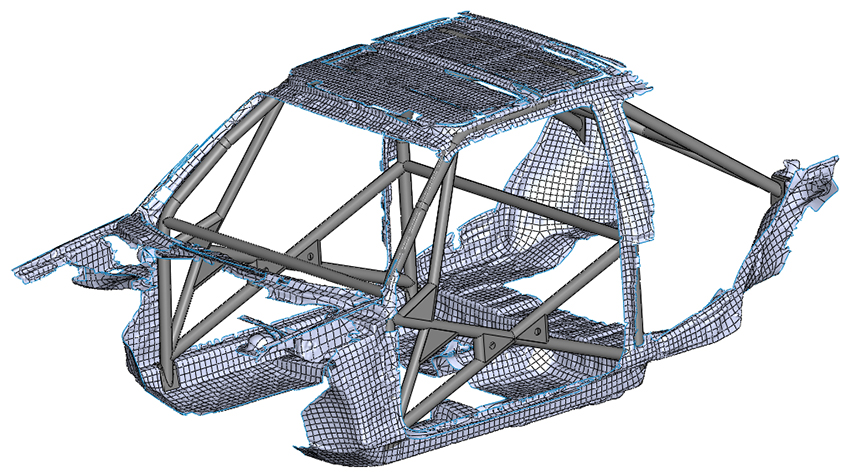
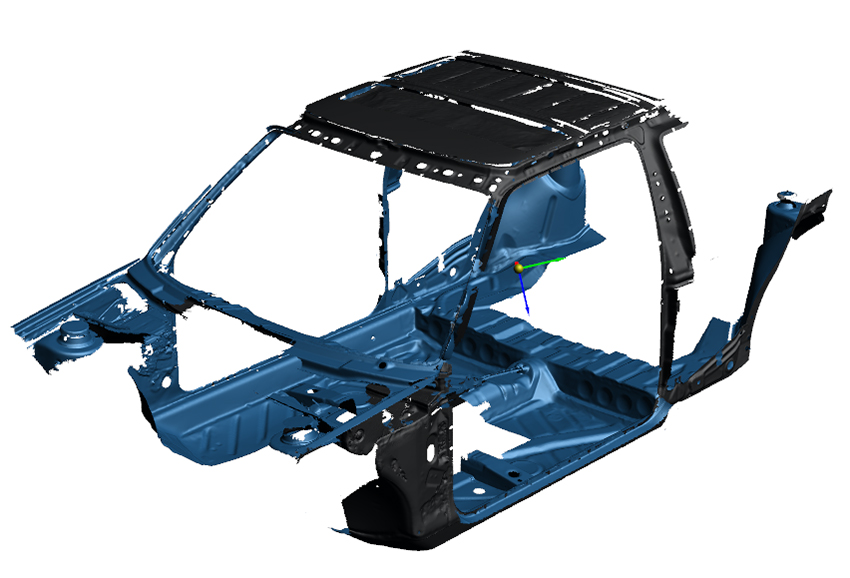
You may remember Custom Cages collected Tom’s three-door shell last month. Well, no sooner was it back at their premises and the scanning process could begin. “So that every cage fits a shell perfectly, the process involves the guys applying a bunch of reflective dots around the inside of the shell which allows the scanner to pick up key points that the computer can register and thus produce an exact replica of,” Tom informed us. When we first saw the images we just thought they’d got a bit carried away with the weight saving, drilling a bunch of holes through the inside of the shell!

Apparently, Tom and the team at CC have decided to use a National Spec six-point weld-in cage, which meets FIA standards. “Each cage that does this goes through a number of weld and strength checks to pass and meet that type of standard.” What’s really cool is that the scan from every cage CC produce is data logged and installed with a serial number (on the rear upright), which can always be referred to when installed or for further use. “This tells you when the cage was originally installed, into which car, where the metal came from and a whole load of other complex info that sort of went over my head.” It certainly sounds impressive when you’re bragging down the pub, and hopefully next time we’ll get to see a few shots of the shell in the metal.

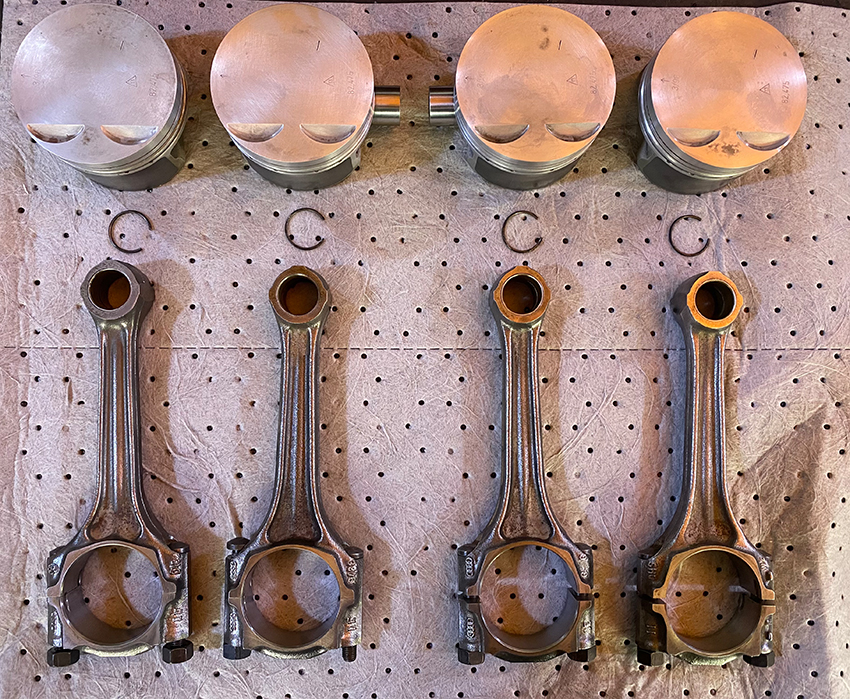
We also mentioned last month that the engine and gearbox, which Tom sourced from a friend, had been shipped off to Jtech for the team there to work their magic on. “I’m not too sure what the engine came out of, but it’s a trust two-litre ABF, which Jamie and the boys have some serious plans for.”
Tom told us the lads wanted to strip the motor down fully to inspect it and ensure the foundations were good before they went to town on it: “Good news is that there were no major issues discovered, so a full clean up was embarked upon, before parts were ordered in and the big build could commence.”
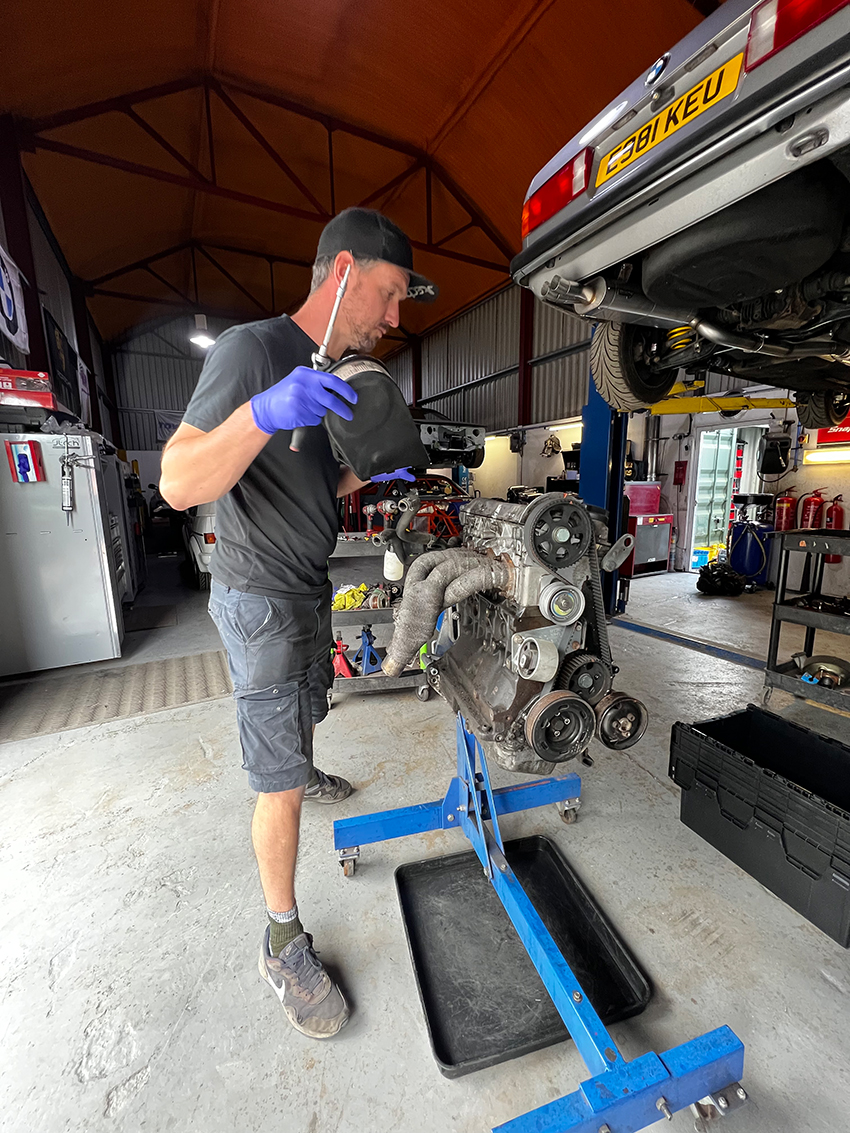
Apparently, the engine had already been fitted with a new clutch which seems up to the job, although an up rated flywheel has been ordered to ensure no issues on that front. The gearbox has also been blasted and cleaned, ready to be on show for all to see. We’ll reveal a bit more about the engine spec and Tom’s future plans next month. For now, enjoy the progress shots…
Part 4 – The upgrades begin
Last month, having stripped his interior, Tom was extremely pleased to report that his Mk2 shell – the base for his latest project – was just as solid inside as it was out. This meant that rather than any lengthy welding repair periods beforehand, he could ship (okay, trailer) the rolling shell straight off to Custom Cages for its, er, you guessed it, custom cage!
Once it arrived at CC the team there wasted no time in 3D scanning the shell in order to ensure a perfect fi t for Tom’s one-off cage once it had been fabricated. Most Mk2 Golfs might have come off the same production line in Wolfsburg, but no two are totally identical (especially after 30 odd years of wear and tear), so scanning the shell would ensure Tom got the perfect fit.

The lads at Cobra Seats, who would be supplying the (you guessed it, seats), sent a seat shell straight over to CC so the lads could fi x that in place during the scanning process and make sure the cage wouldn’t clash with the seat positioning.
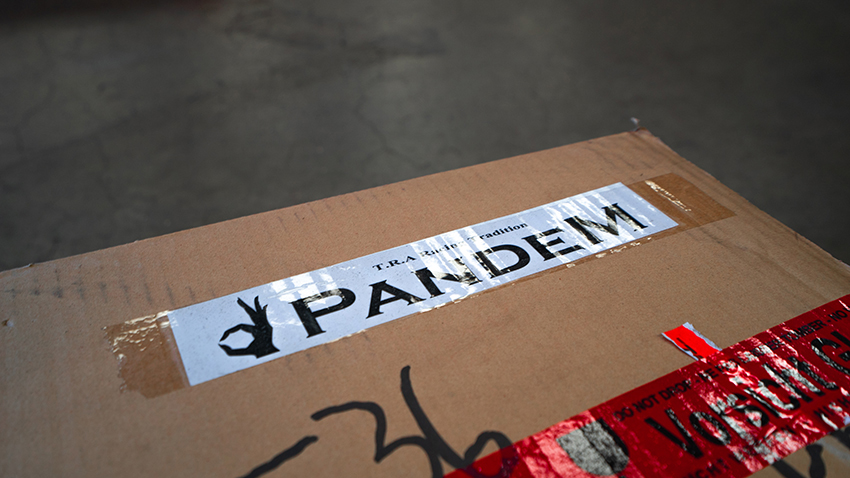
In other news, Tom was pleased to receive an email from TofuGarage in Germany (the European distributor for Rocket Bunny) to say his Pandem wide-body kit had dropped and was now on its to Meguiar’s UK HQ. Having seen a car in the States fitted with the same kit, Tom felt it would really work well with the theme he had for the car, more of which we’ll make you aware of next time.
Part 3 – Stripdown
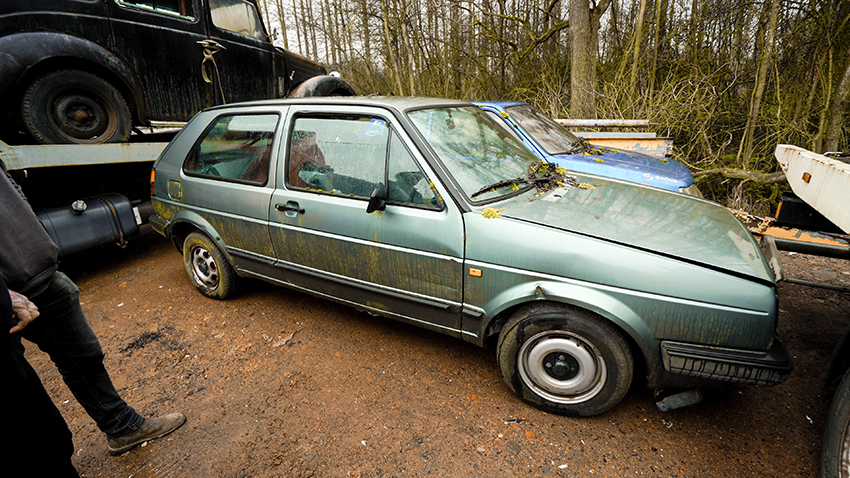
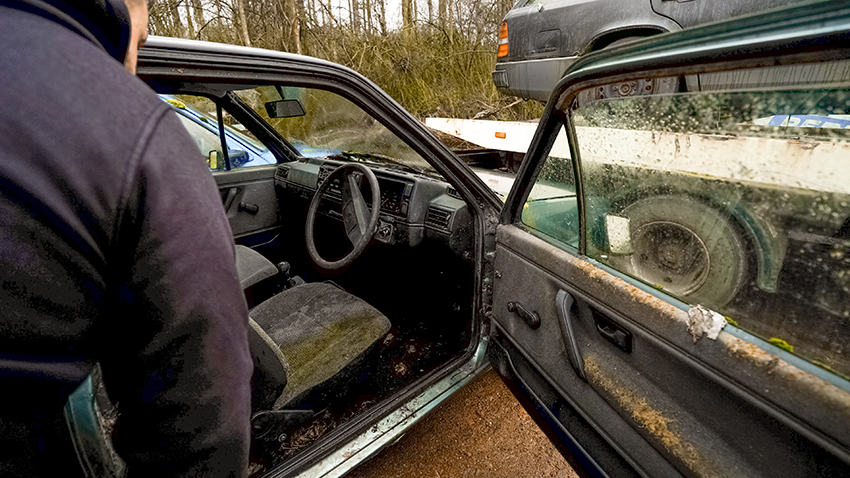
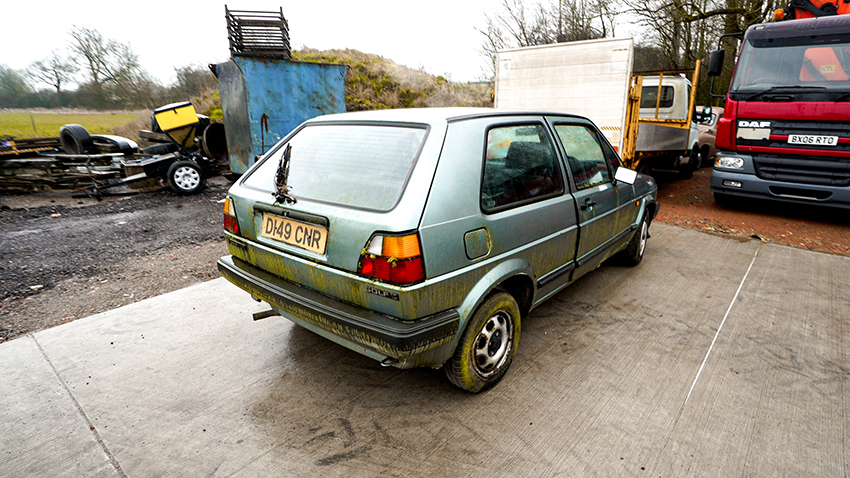
So, after last month’s deep clean we were initially pleased with what we found beneath all the dirt and grime that had built up after years sat outside with no cover. What would the major strip down reveal, though? Well, there was only one way to find out…
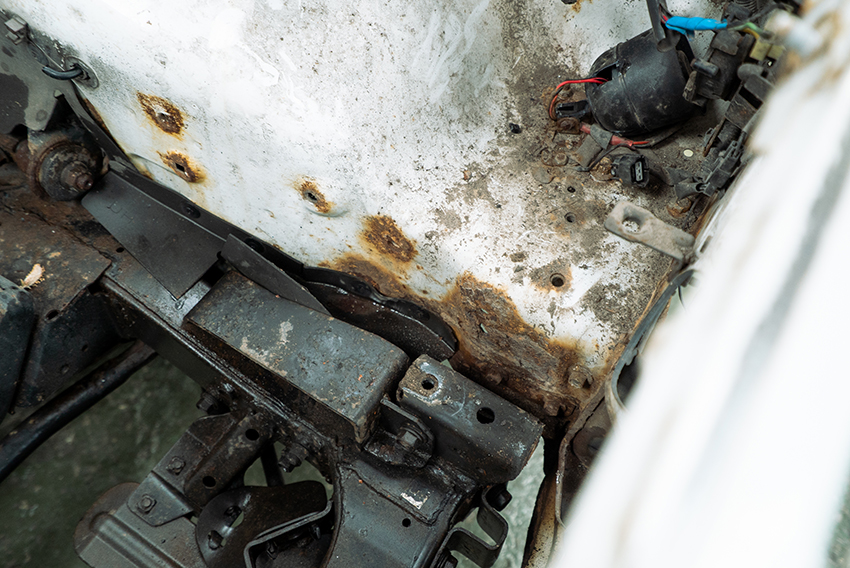
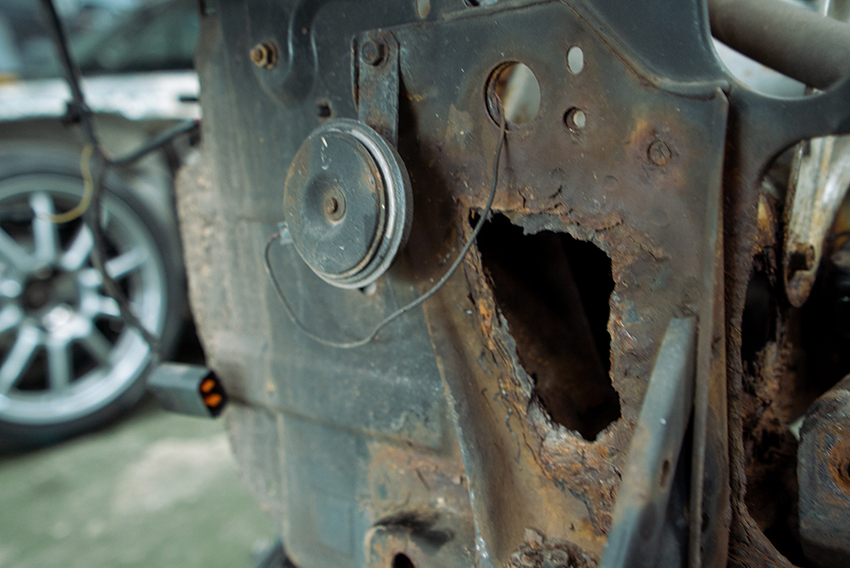
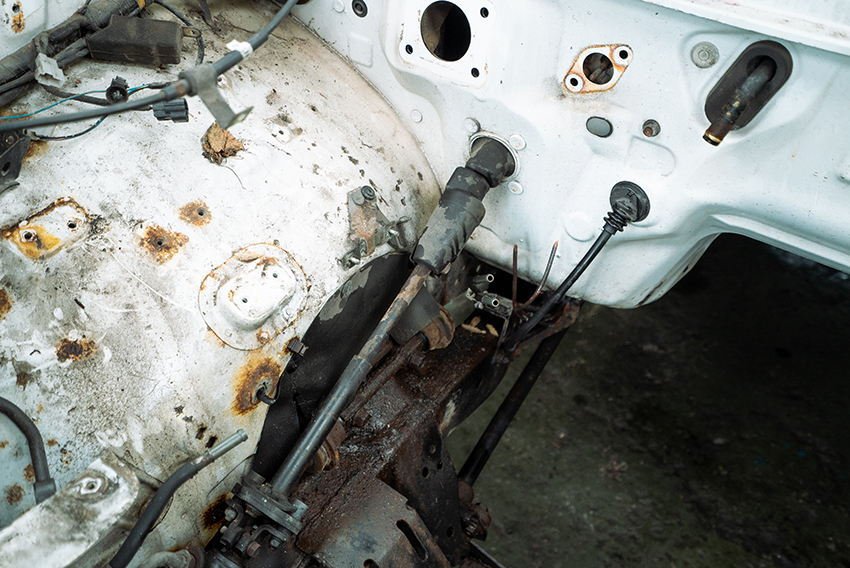
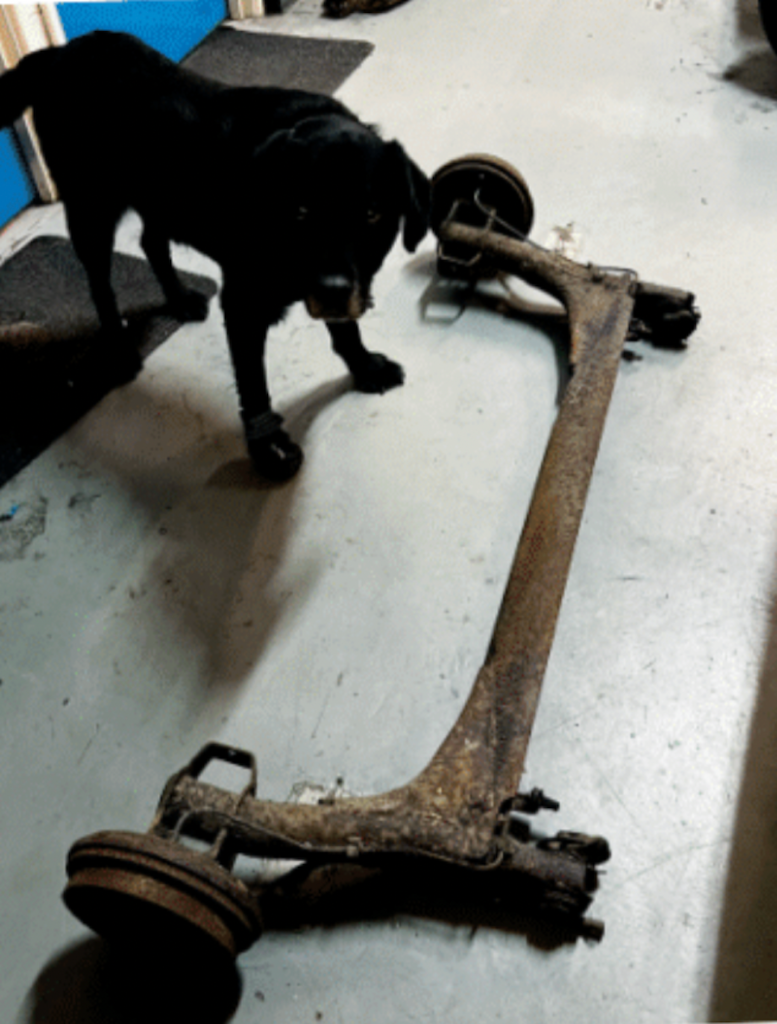
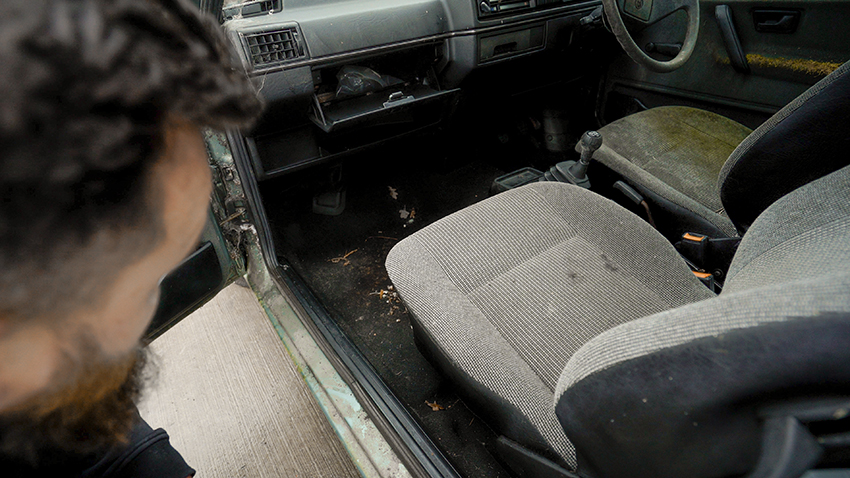
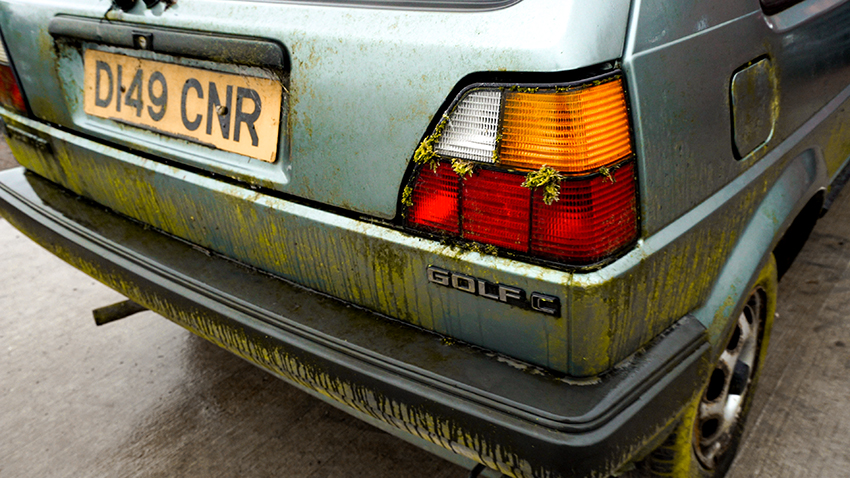
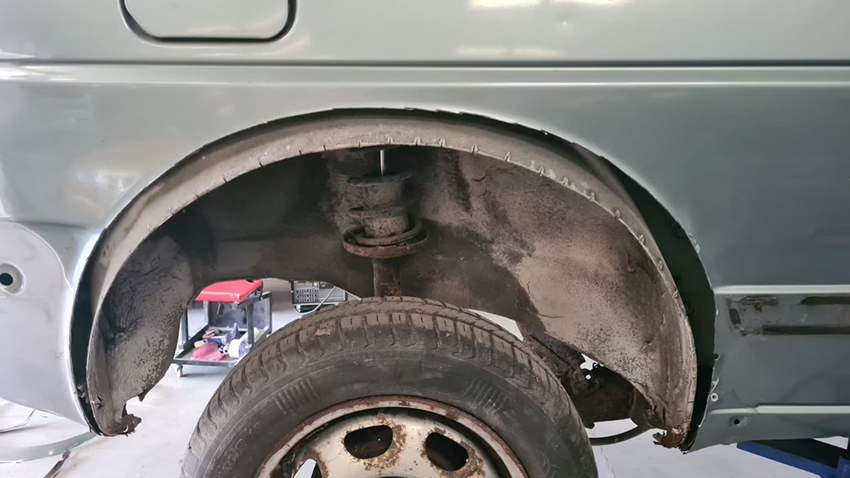
It’s hard to believe but in the whole strip out of the interior just one screw didn’t enjoy coming out!!! The rest of the bolts and stuff were like new. I guess this is part of the reason why people love VWs so much. I don’t know if this is normal procedure for Wolfsburg builds in general but I’m used to French cars and that definitely isn’t normal! Externally, all panels appear to be original too, which is great and when it came to rust, honesty, we found just one bit that will need a little TLC – that’s the outer of the rear suspension turret.
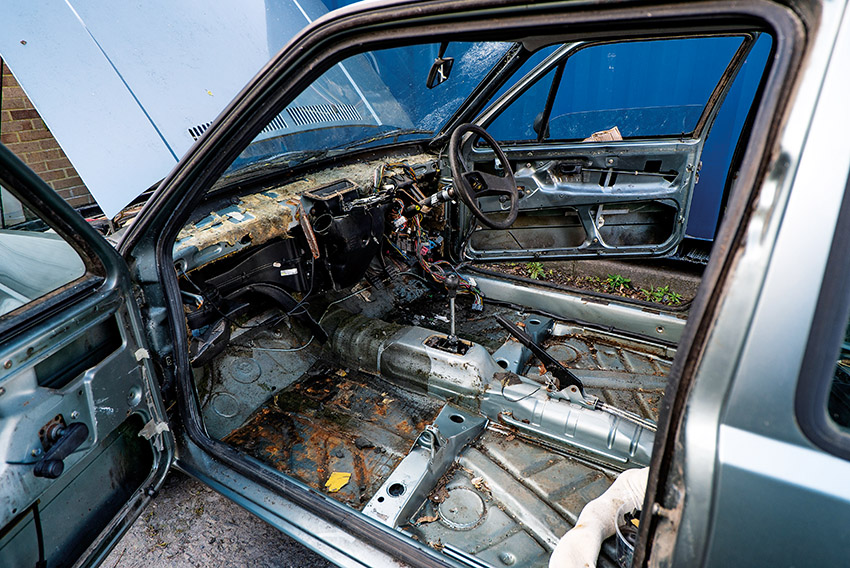
With everything removed, next stop for the car is Custom Cages to have a full, GT-spec, six-point cage welded in. I appreciate all these images of a bone-stock Mk2 aren’t exactly sexy, but I’m not quite ready to show you the render we knocked up of the completed car. I’m happy to tell you a bit about it, though. As we’re going to be using a Japanese bodykit, I wanted to throw homage to the Advan racing livery, but with a German twist. So, the current plan is to go with Rubystone Red inside the car and bay, then something two-tone (front pink, rear black) externally. My brain is always whirring away, though, so maybe this will change a little over time but this is where I am currently. Catch you in a couple of weeks with the next update
Part 2 – Deep Clean
As Tom finally gets his mitts on the Mk2 project it’s time to break out the bucket and wash
mitt to assess what’s hidden beneath all that grime. Is it a good egg or a scrambled one?
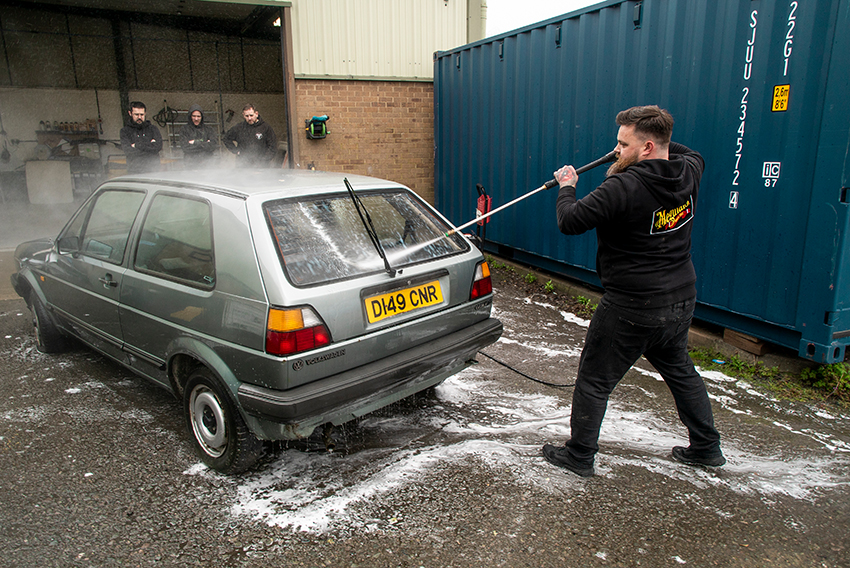
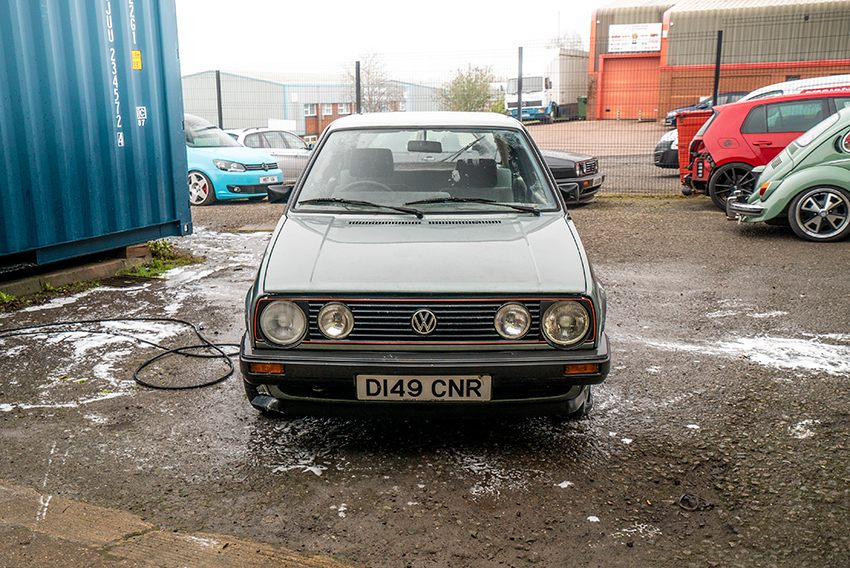
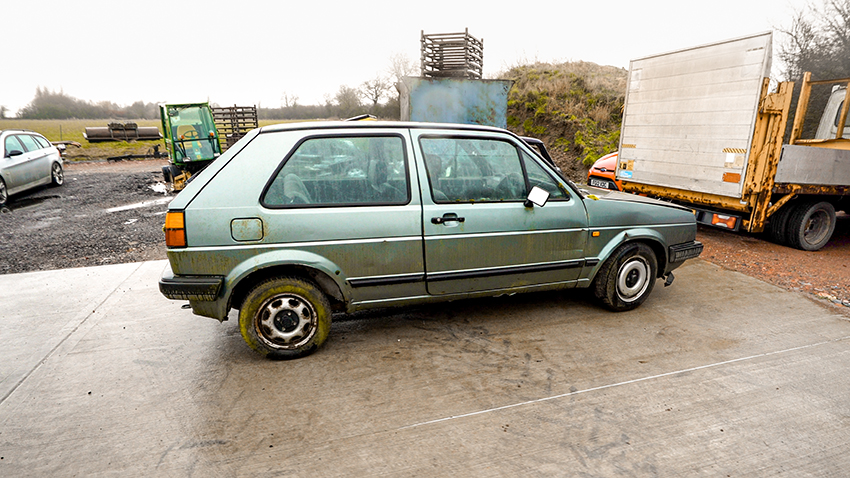
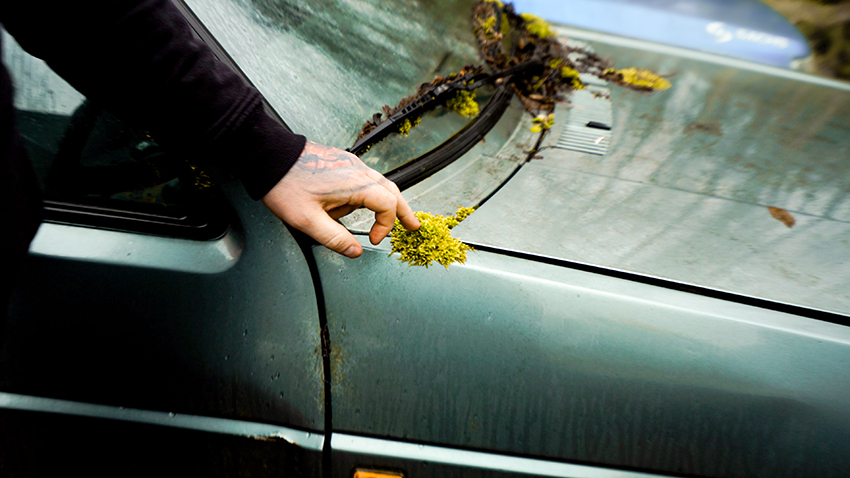
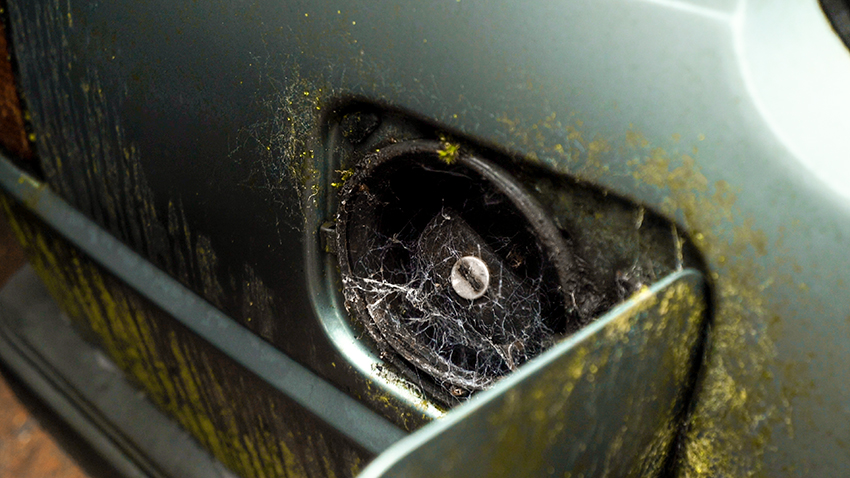
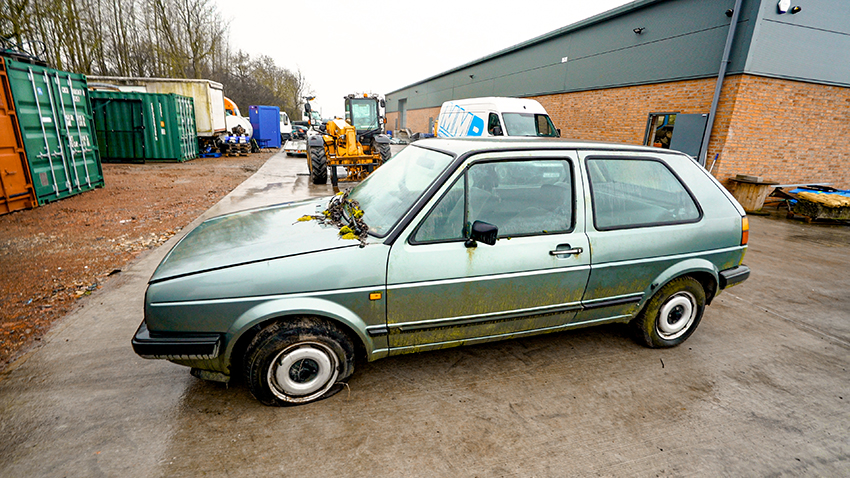
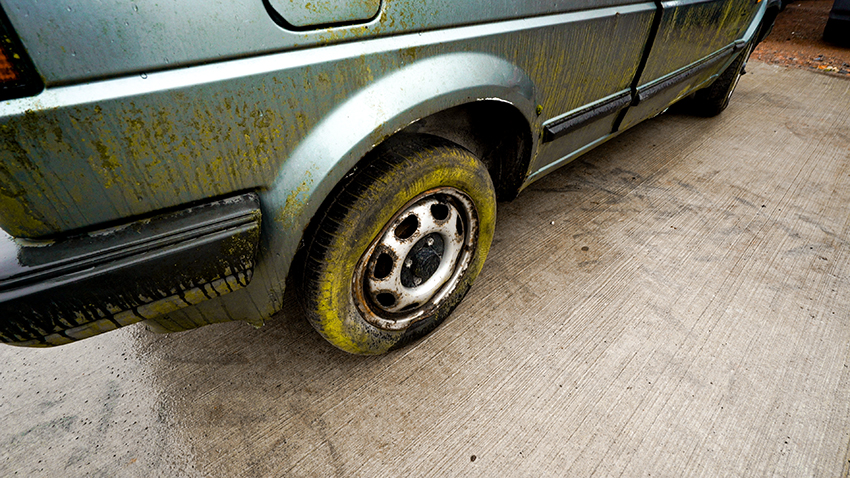
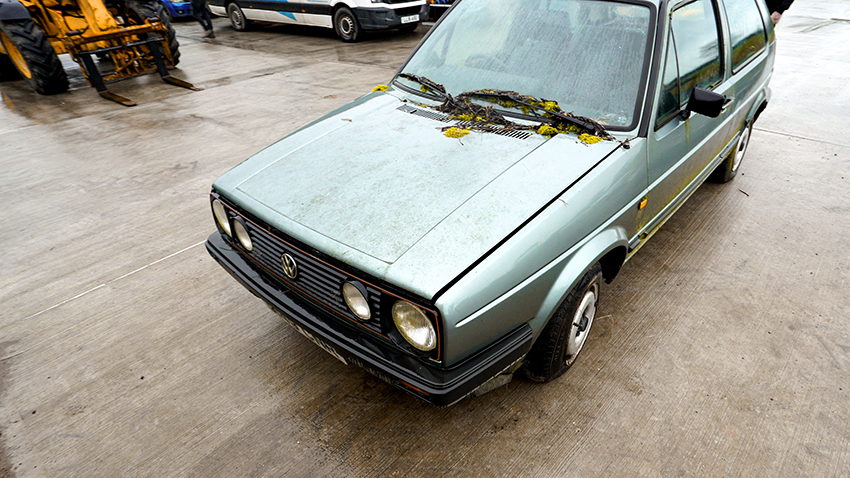
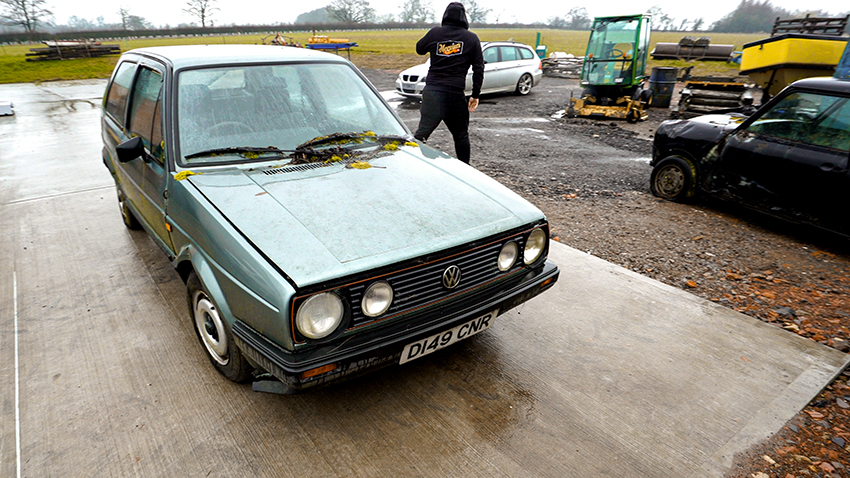
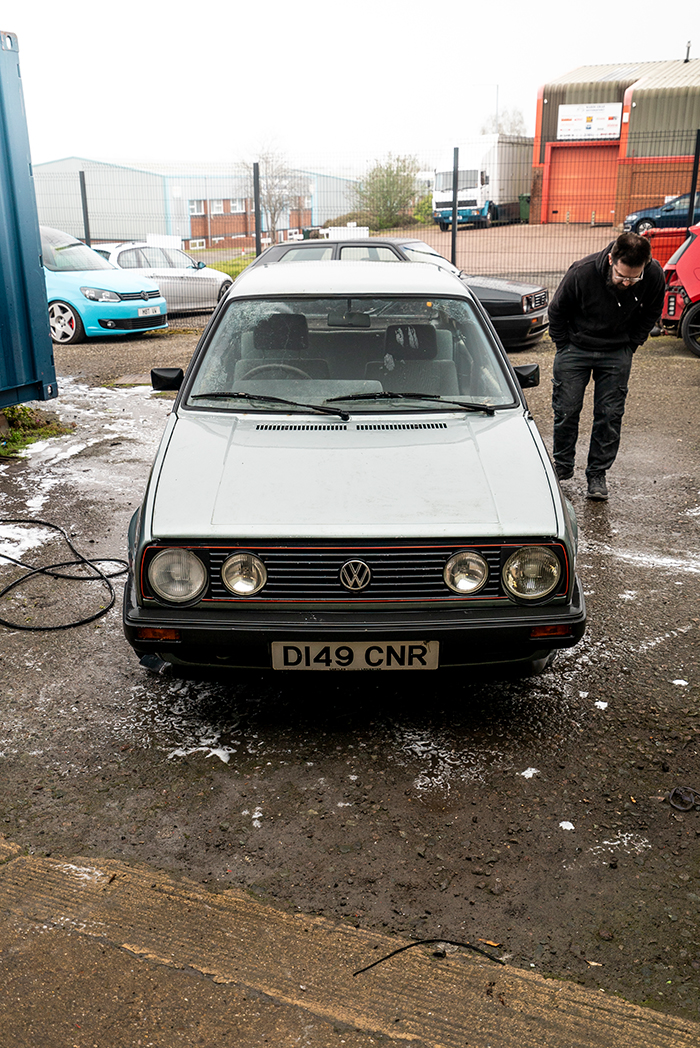
So, first things first, once the Mk2 arrived back with us it was time to give it a quick once over so we could see what we were dealing with. When I say back with us, rather than having the car delivered straight to us here at Meguiar’s HQ, I had it taken directly to Reflex Auto Design who would be taking care of the bodywork. At least it would allow the team there a chance to assess the shell at the same time as me, to see if it really was a good as I had hoped.

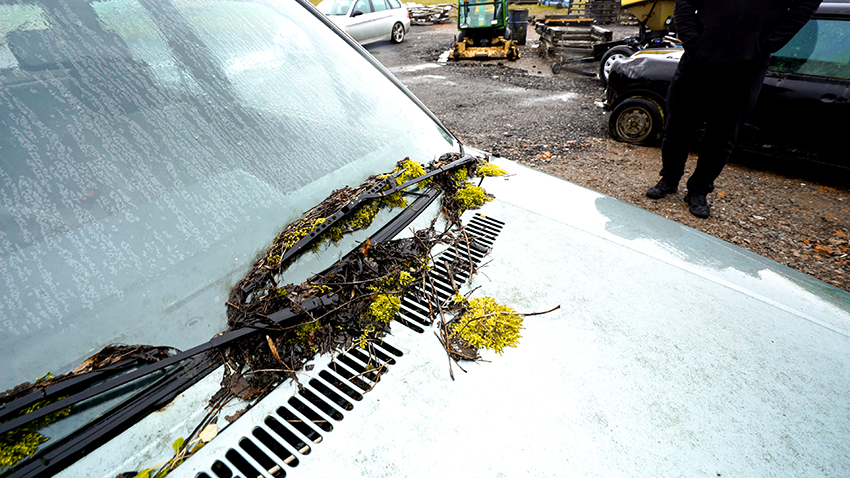
While we were far from being close to full detailer standards at this stage, it’s still amazing what a quick wash, using good quality products – even if just the basics, can do… even when a car has been sitting outside for a number of years. It certainly was in a right state to begin with, but fingers crossed it was mostly just superficial grime.
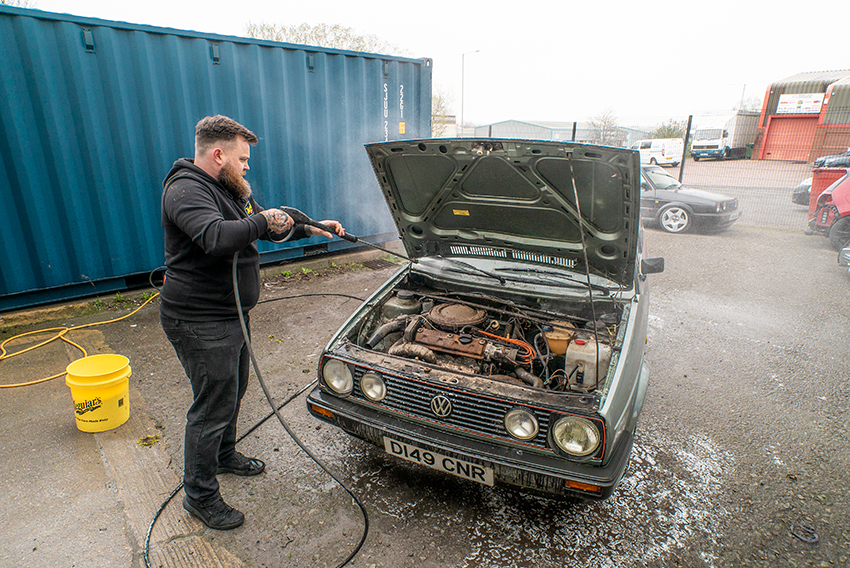
And when I say basics, at this stage, I literally just armed myself with a trusty Meguiar’s Yellow Bucket (with Grit Guard) and a Wash Mitt, plus a good helping of Wash Plus+, followed by some Ultimate Wheel Cleaner and then a Due Twist Drying Towel. Oh, and not forgetting the jet wash as well. These few products alone allowed me to rid the car of grime and assess exactly what we were dealing with, before the full strip down could commence.
I’m not too sure why the Reflex lads found my jet washing stance quite so amusing, but they certainly weren’t chomping at the bit to get involved or help me out at this stage.

Regardless, I’m pleased to report that the shell appears to be very solid and original, and thankfully most of the original paint remained on the panels even with some vigorous jet wash use. While the original paint might not be remaining, it did give us hope that the car still retained most of, if not all, of its original panels.
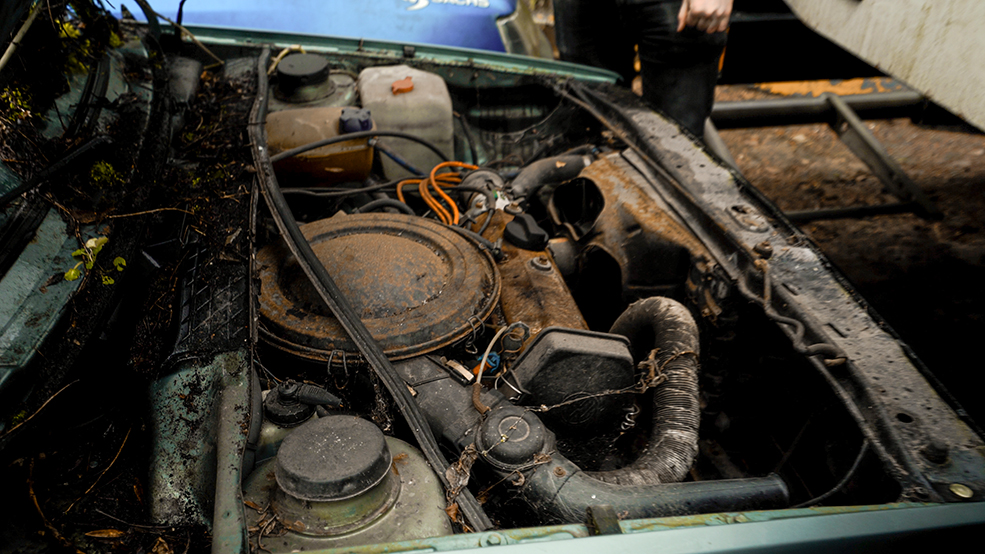
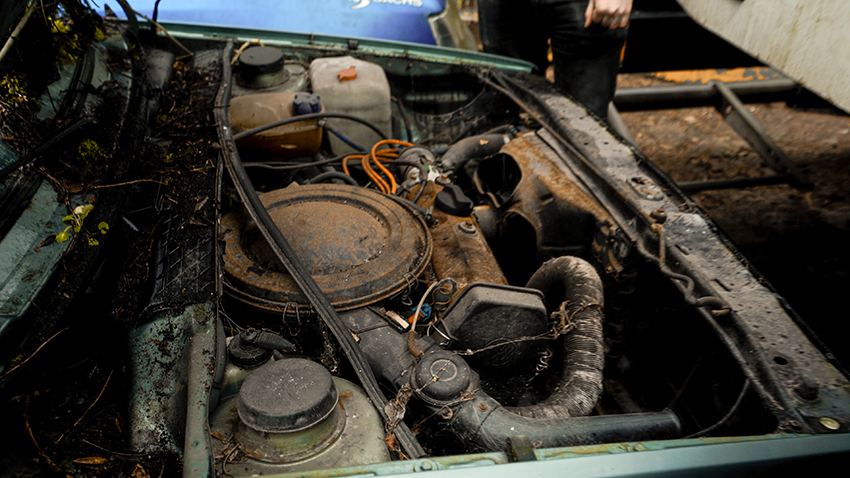
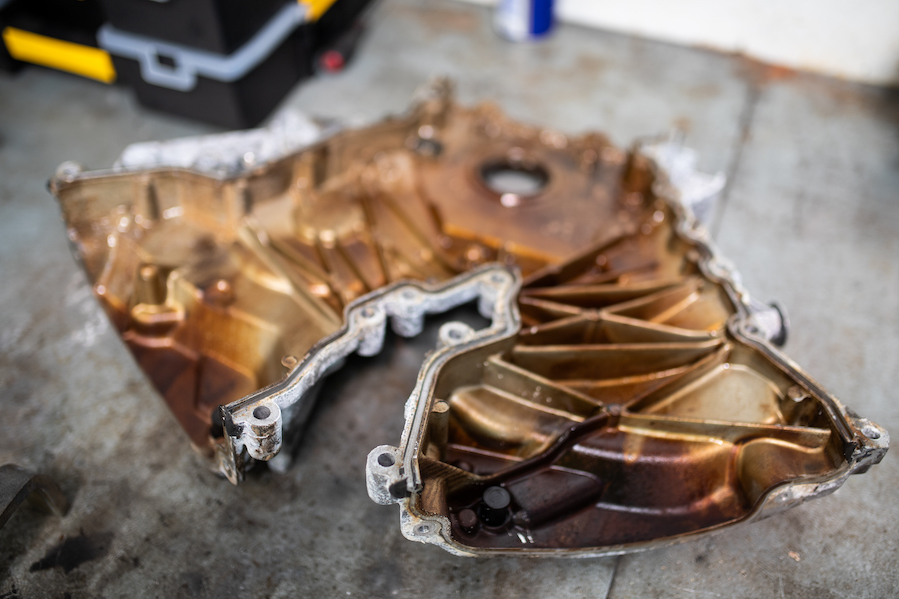
Likewise, under the hood, while the rusty engine still looked very, er, rusty and sorry for itself after the quick clean, the motor itself was being binned anyway, and thankfully the actual bay cleaned up very well – there was very little rust to be found. Result!
Next time, as the full strip down commences, we’ll be able to assess the shell further and I’ll also talk you through some of my plans for the build. For now, I’m certainly feeling quietly confident in this, the third Meguiar’s challenge. Even more so with the news that my partner in grime, Dale, has just picked up his base vehicle… a Ford Ranger King Cab. God help him…

Part 1 – Intro
Tom has form for choosing obscure project choices, his debut solo effort was a wide-arched R5 GTT that he gave a 21st century twist, then last season he went fully left field with a fully customised Volvo Amazon, quite an eclectic mix. So, we were quite surprised to hear that 2022s weapon of choice is a Mk2 Golf. Of course, the car might be a sensible choice but I’m sure his plans are anything but….
FC: Why did you opt for a Mk2 Golf?
TC: They’re iconic for me. Having owned one for just months but watching friends build them over the years I’ve always wanted to scratch that itch properly. Truth be told, there are some pretty mega builds out there and it’s about creating something I feel is different but that takes the recipe and adds some spice.

FC: Where did you source the car?
TC: I bought it from a good friend, Max. He’d owned the car for 15 years, with a plan to do something with it. Turns out, that ‘something’ was to sell it to us. Ha ha.
FC: What condition is it in, other than being very dirty?
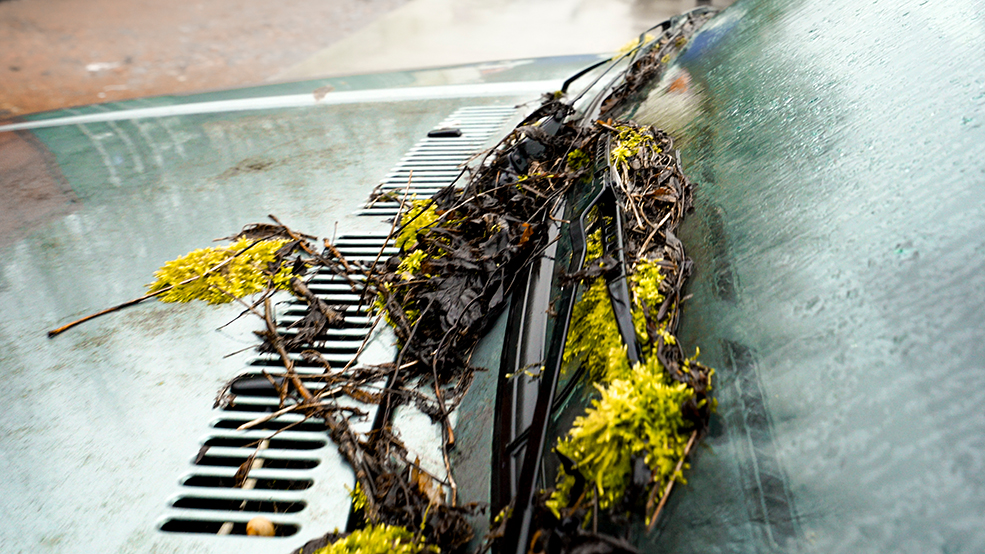
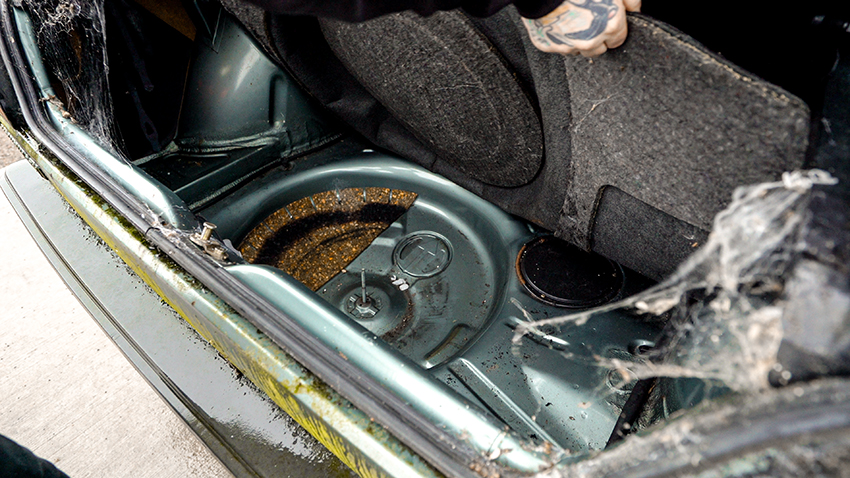
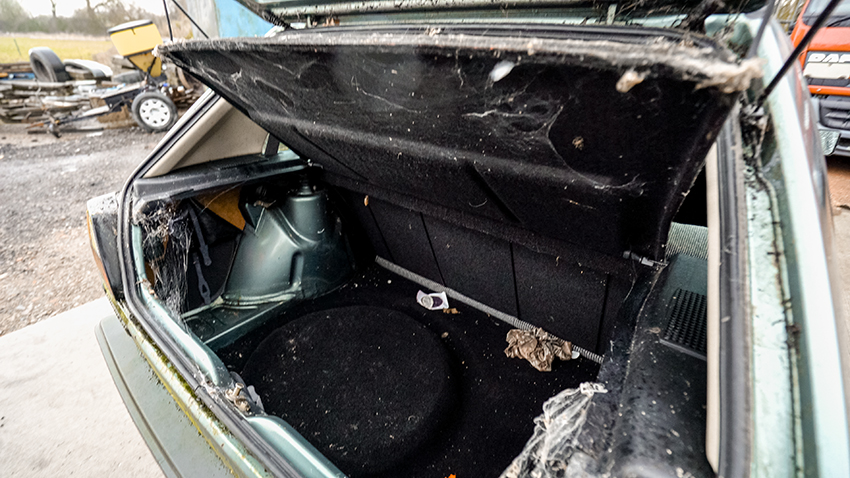
TC: Before Max, it was a one lady owner car. Obviously, it doesn’t look it but, it’s a great base car. It’s been sat under a tree for 15 years and never moved. The inside of the boot hasn’t been touched for all that time and is like a time capsule. The jacking points and the rear beam mounting point are all solid and whilst there is some moss and superficial grime… it’s all good. I hope…
FC: What are your plans for the project?
TC: To not follow the recipe and cock up the chance I have of building a decent Mk2 show car.
FC: Which cars will inspire the build?
TC: Well, let’s just say that when you said I have an eclectic taste, I’m looking to bring some of that taste to the build and inspiration from not just the VW scene. Watch this space…
FC: So, when are you aiming to have this finished? Will it be 6-months late like the Amazon?
TC: Haha, I hope not. My deadline date is the cover of PVW for Ultimate Dubs, so it needs to be ready for Jan 2023!


Meguiar’s Build-Off 2022 – Dale’s Ford Ranger King Cab
Part 15 – Steady Scoring
There’s been decent progress on the Ranger this month, so perhaps it’s time for a quick recap on how far we’ve come. This time last year we were outlining the ambitious plans we had for getting the truck down to the ground: the King Cab was set to achieve a whole new level of lowness, with both the front and the rear of the chassis being very heavily modified to cater for the huge body drop.
And obviously this was never intended to be a trailer queen or a static show piece – it has to be a usable vehicle that’ll get driven to and from events. So Phil at The Install Company was the man for the job, custom-fabricating pretty much everything to turn this into a Ranger like no other.
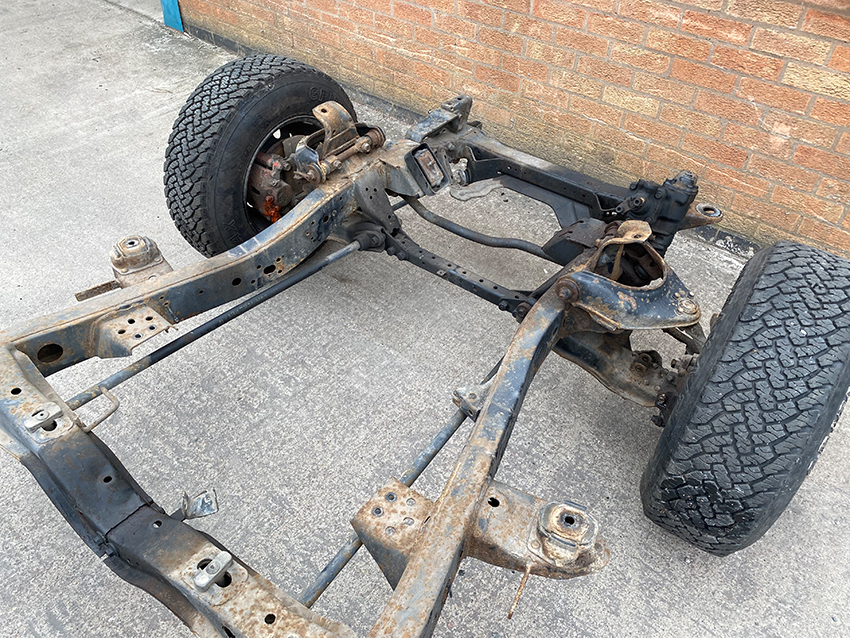
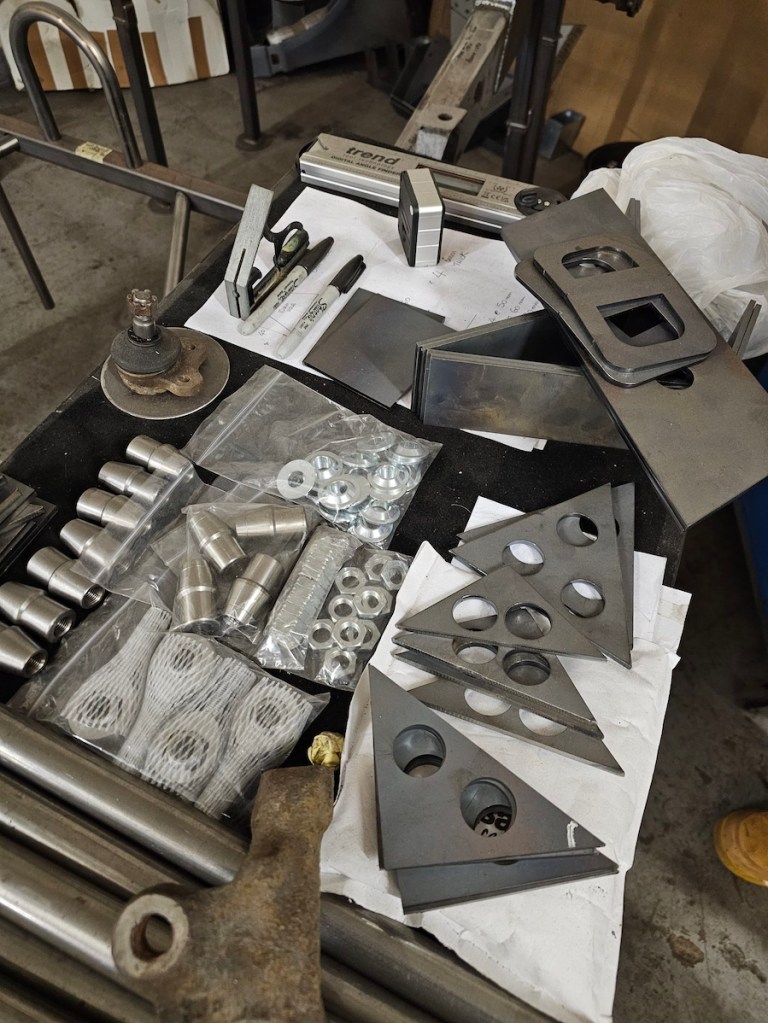
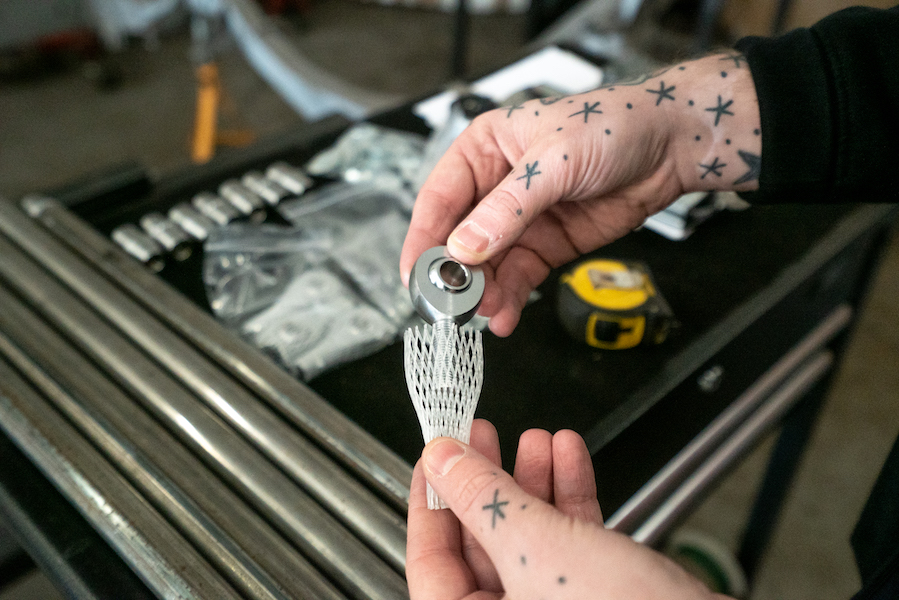
In the following months, we worked on the interior options, including the Cobra seats and hide colours to match the Meguiar’s product portfolio; all the while, Phil was busy fabbing the parallel 4-link setup with adjustable heim joints, strengthening plates for the chassis rails, and a custom narrowing job for the L200 rear axle.
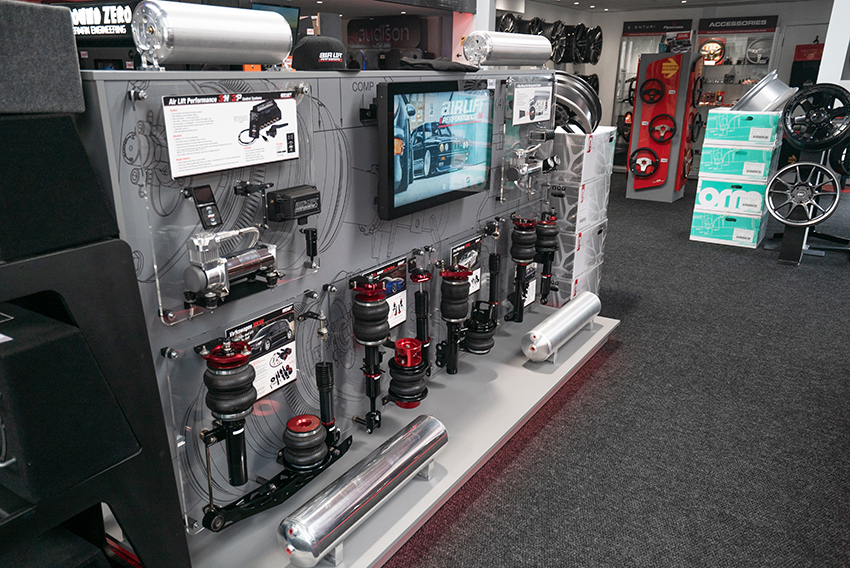
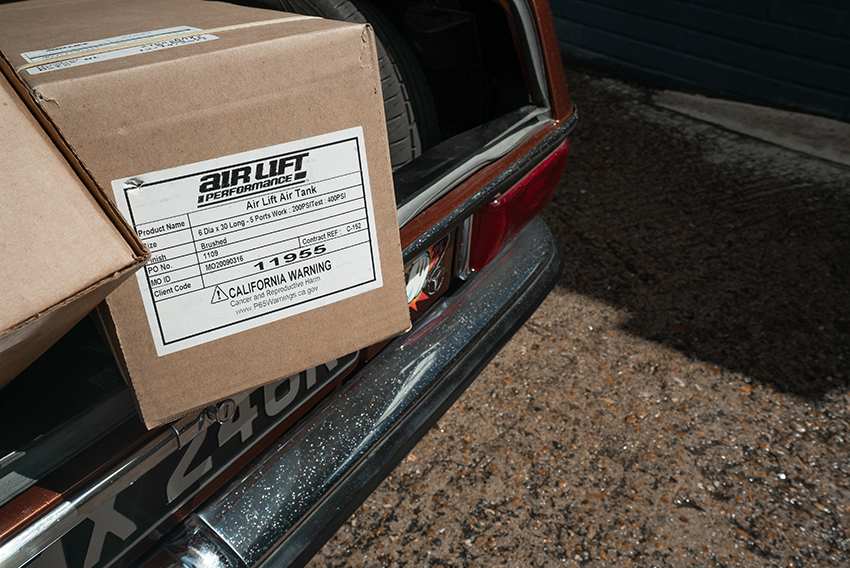
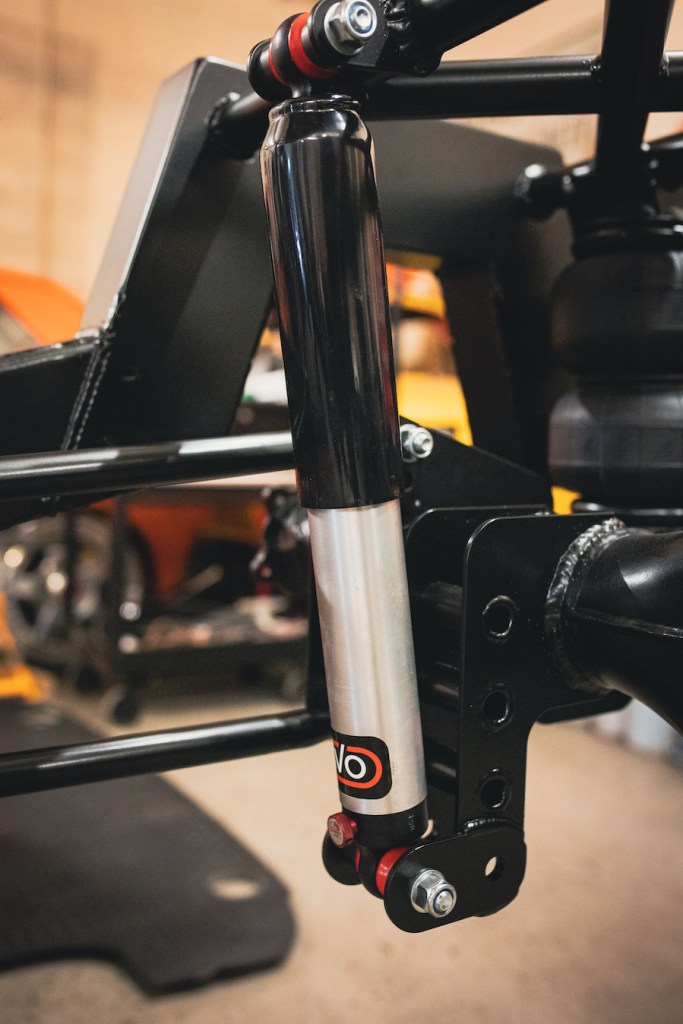
The full custom chassis was completed in the summer, the air-ride was fitted by The Install Company (all supplied by Car Audio Security and Air Lift), and Swallows Racing sourced the AVO shocks, so the stance and handling all came together – that led to conversations with Image Wheels about the choice of custom rim specs.
The Jaguar V6 received a pair of massive mirror turbos, the bodywork was customised, perfected and prepped for paint, including the super-cool smoothed tailgate and offset frenched rear number plate recess.
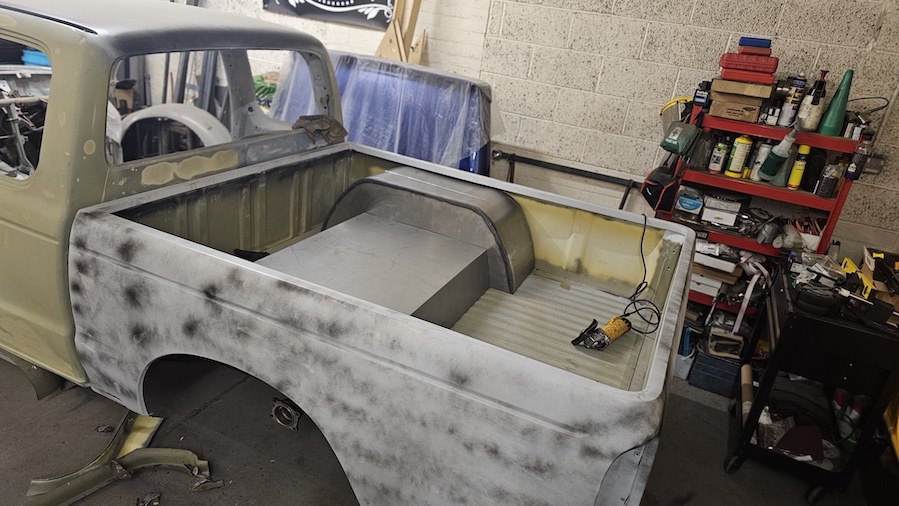
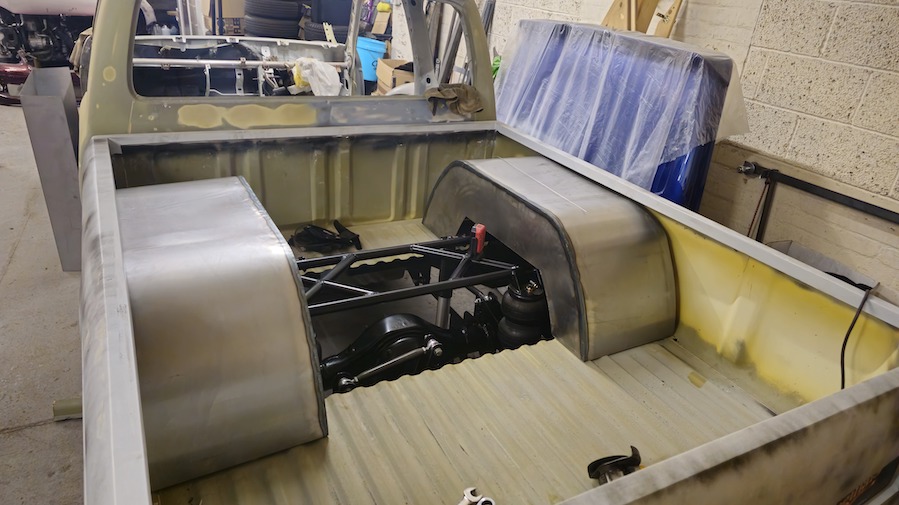
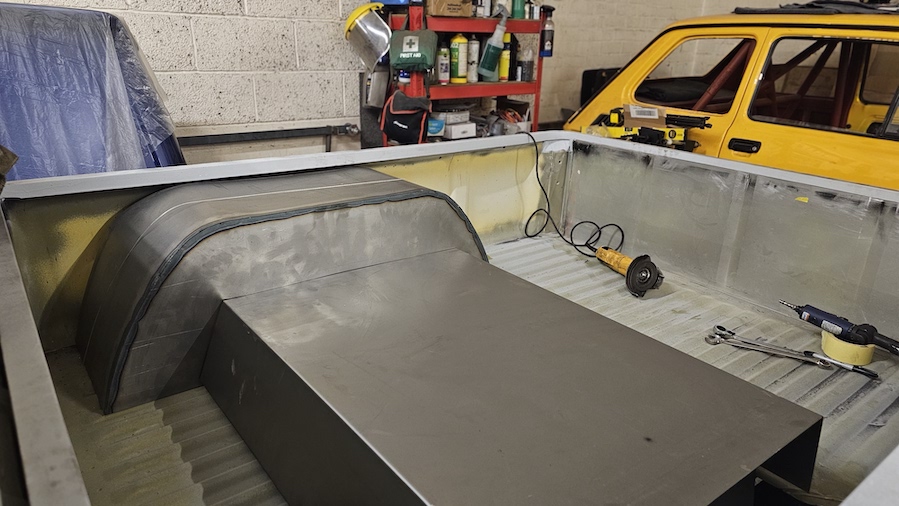
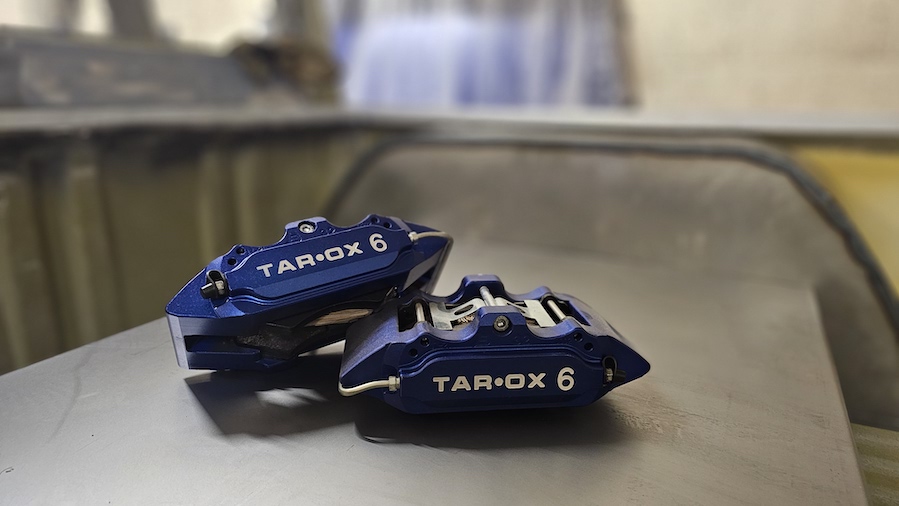
And this month? Well, once again Phil has been busy making magic things happen. The rear tubs have been crafted from scratch and fitted to the bed, and the meaty Tarox calipers have also arrived, ready for final assembly.
Now it’s just a case of waiting for the final custom parts to land to finish the front setup and weld in the tubs. All outstanding progress – it’s getting close…
Part 14 – If it fits, it sits
It’s often said that ‘wheels maketh the car’ and, well, that’s just as true for trucks. However, there’s an additional dimension to consider here, because trucks are quite big aren’t they?
And since we’re going for a full-on show truck look here, we definitely want to strike a pleasing balance of lows and wheels that don’t look too small on a pickup.
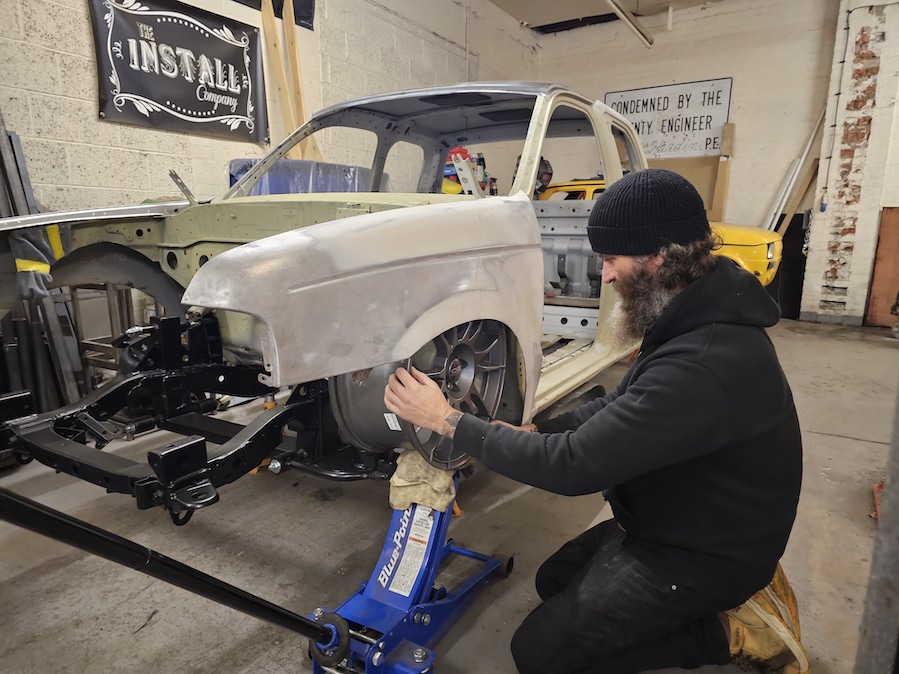
Now that the body and pickup bed are sitting sweet on the chassis, it’s time to size up the wheels, and I’ve been down at The Install Company with Phil trying out a few different dimension combinations.
We’ve been playing around with various 18” and 19” wheels to see which would suit the stance, the style and the truck overall best. It’s been specifically built to accommodate some pretty juicy sizes.
Ultimately, it’s a case of making sure we’re totally happy with the fitment before commissioning the bespoke rims. Phil wants to be super-sure on the sizing and have it all totally nailed down before we work with Image Wheels.
Basically, Phil will be cutting even more out of the bed for maximum stance and clearance! And even now we’re just mocking it up, we can already start to visualise how devastatingly awesome it’s going to look once the custom wheels are built and fitted. You’re going to love what we’ve got in mind for this – stay tuned for the next update…
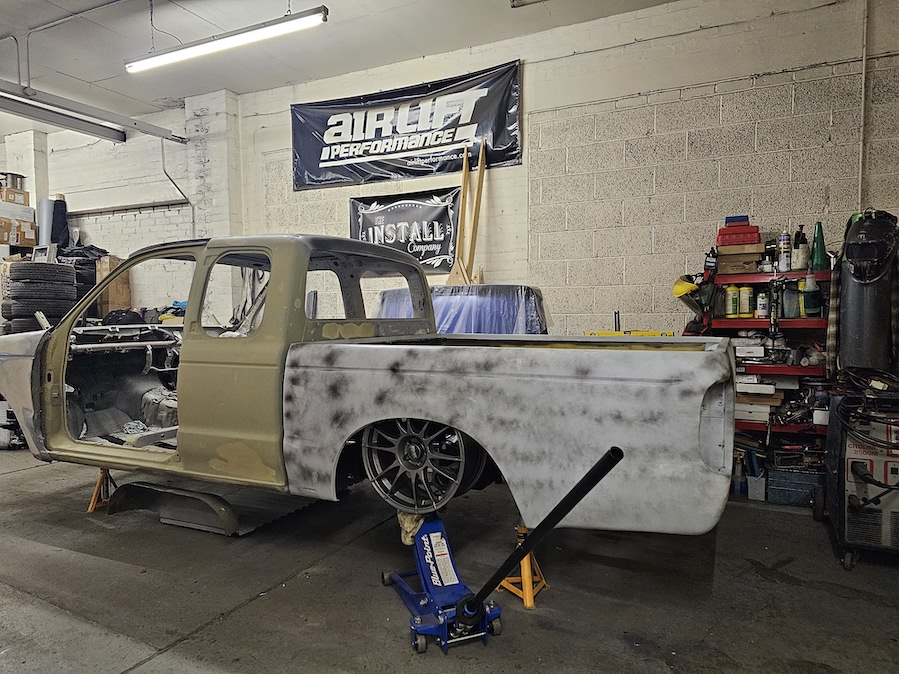
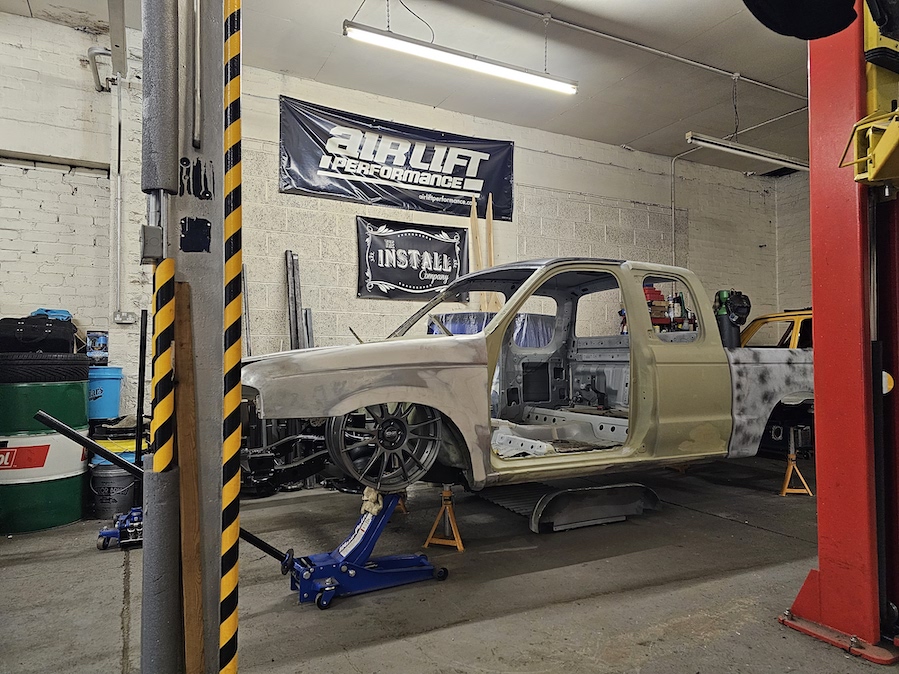
Part 13 – Body Beautiful
As you’ll know if you’ve been following the build, we’re aiming for a properly nineties aesthetic with this truck. There’s been so much blood, sweat and tears poured into the full custom chassis.
Not to mention the suspension and – of course – the twin-turbo engine build, and here we’re able to finally envisage what it’s all going to look like, wrapped up in its unique body with its offbeat old-school vibe.
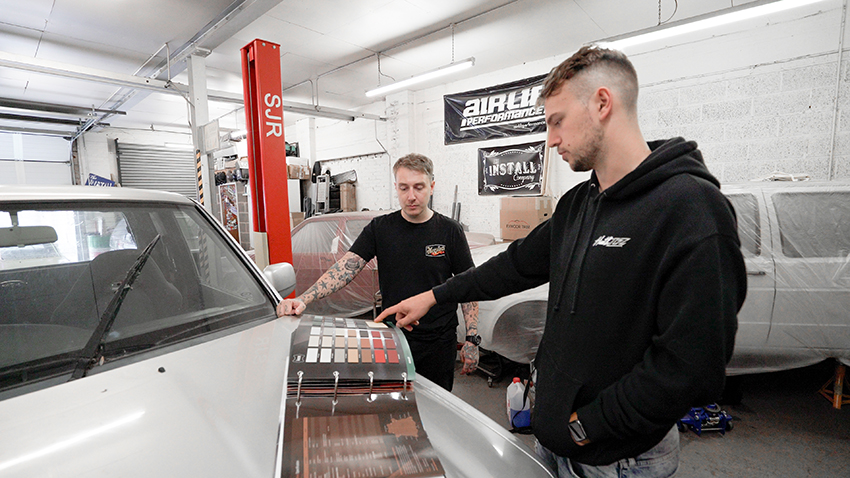
Work has now begun to start cutting, prepping and customising the Ranger’s bodywork for paint, and it’s all starting to look pretty rad.
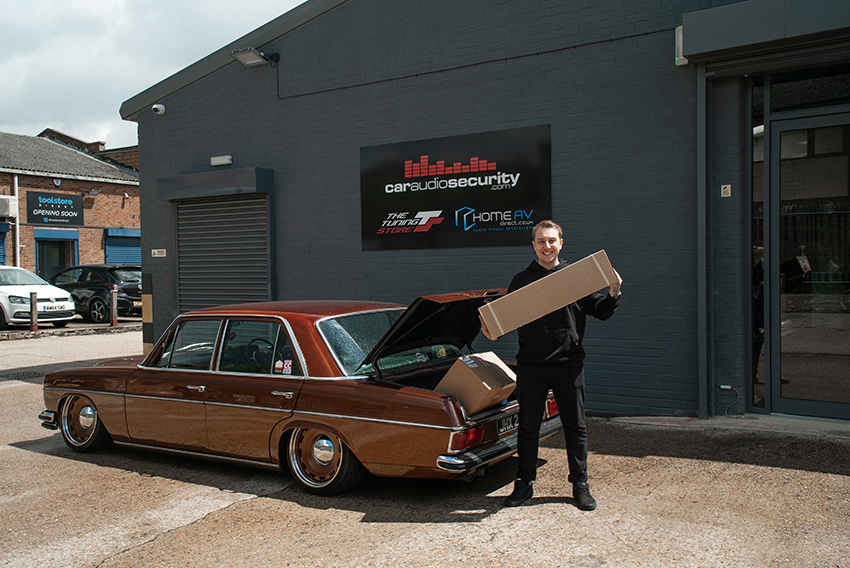
I have worked with Colin at Kustom Kolors in the past with my low-rider Mercedes, and it helps that he has had experience in the past with mini-truck builds. Basically, it was really a no-brainer when it came to deciding who I would want to work with on this.
We’re definitely not holding back either, it’s all got very creative – we are fully embracing the ’90s colourways and styles for this build, including the smoothed tailgate and offset frenched rear number plate recess.
And Colin has plenty of cool ideas about how we can customise the body to give the inherently boxy shape some fresh and eye-catching style.
This will include creating a one-off custom grille, deleting the door mirrors (as there’s not really a whole lot we can do with those cricket bats!), vintage heartbeat stripes down the sides, candy rear lights, and plenty more subtle touches along the way.
Our mothership 3M will be stepping in again to help with abrasive materials and PPE. We are definitely embracing the Meguiar’s Ceramic Range colours used for the interior – but we won’t give away what the base colour for the body will be just yet… you’ll have to watch this space!
Part 12 – It’s twins!
When you think of pickup trucks and what powers them, it’s got to be something pretty meaty hasn’t it? An engine that serves up a lot of torque, with readily deployable power to cart stuff around. If you’re a farmer with a Hilux, you might have a torquey diesel.
If you’re in the States and you’ve got an F-Series or a Ram, obviously it’s got to be a dirty great V8. So what about the Ranger? Well, when it was new you could get these with a Mazda four-pot or a Cologne V6, or a whole bunch of diesels. But for this build, I had other ideas…
If you’ve followed these Tom vs Dale build-offs over the years, you’ll know that I previously did a Jaguar S-Type R, working with Swallows Racing. And that’s where the inspiration came from for this.
The Jaguar V6 was shared by Ford in the early-2000s, so it’s era-appropriate for the Ranger. And it’s all in the family – and there’s a lot of tuning potential to play with too.
Tom Robinson (boss man and close friend) was instrumental in building the S-Type R, and when I first spoke to him about the truck he pretty much told me he was going to build an engine for us! So, here you see us at Swallows Racing stripping down the Jag V6 ready for its new life in the King Cab.
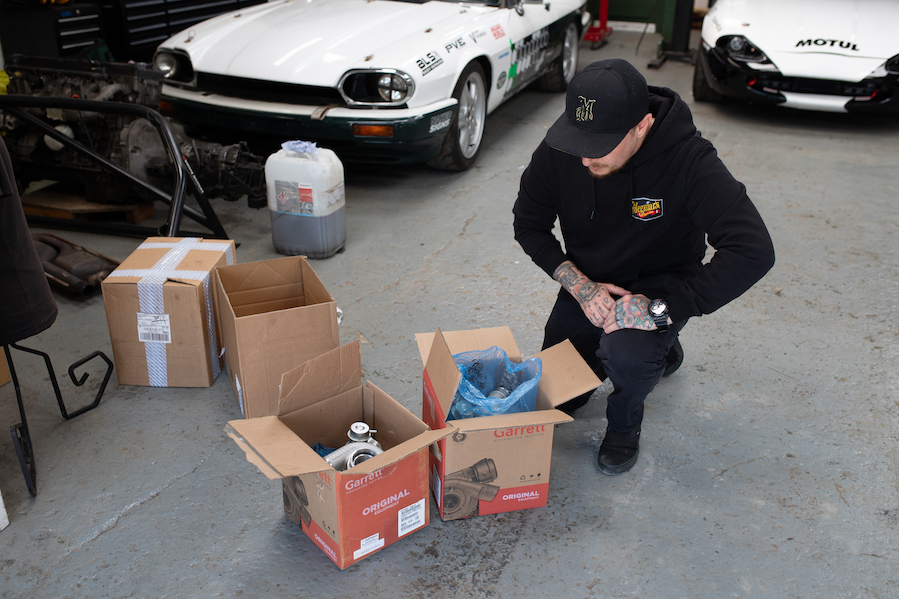
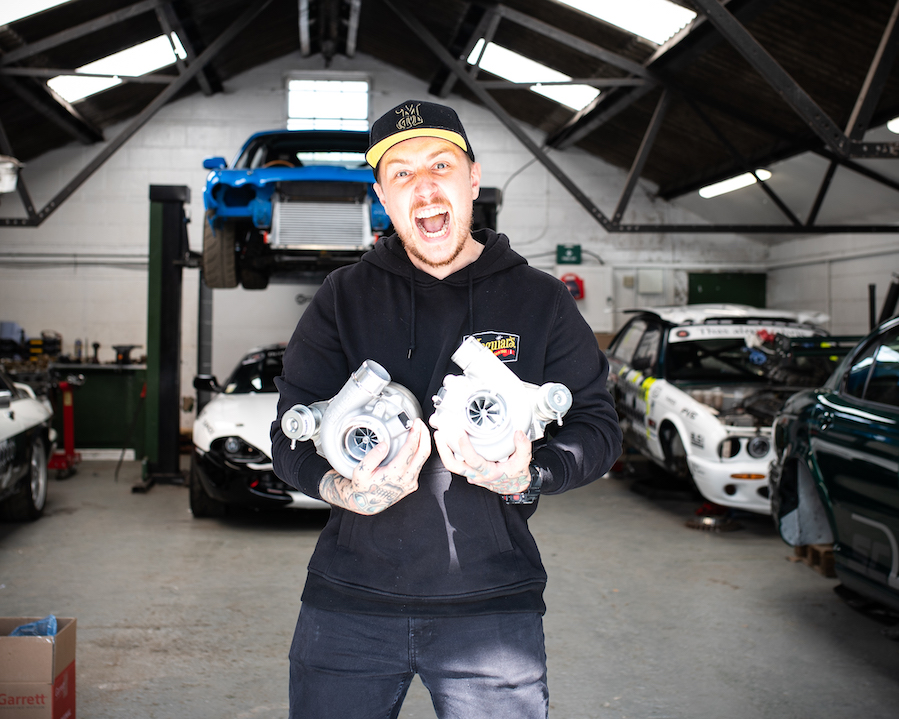
And very excitingly, a big delivery arrived from Garrett/Evoke Performance – the twin turbos we’ll be using. The big surprise here is that one of the turbos has been custom-made to perfectly mirror the other – because it really is all about the details, isn’t it?
To be honest, my involvement with regards to the actual specs was ‘can the turbos be mirrored?’! Tom is a mastermind when it comes to beefing up Jaguar blocks so the truck is in the best hands. Can’t wait to see what power (and noise) it makes when the brutal Jag motor meets the new twins…
Part 11 – Everything, everywhere
The Meguiar’s Ranger build reaches a very exciting stage this time. The Ranger King Cab has got to a point where a lot of the cool stuff is happening at once. It’s safe to say the finishing line is just tantalisingly over the horizon.
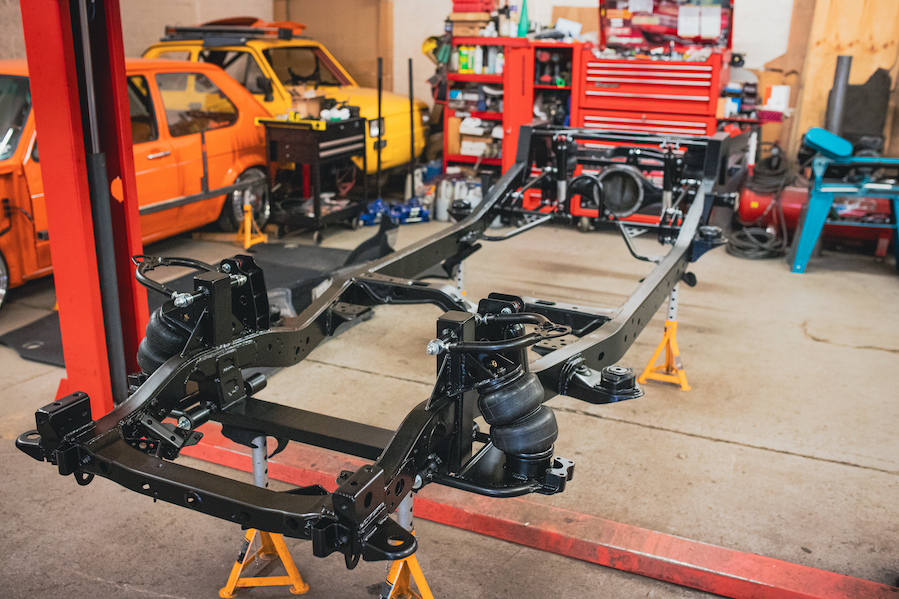
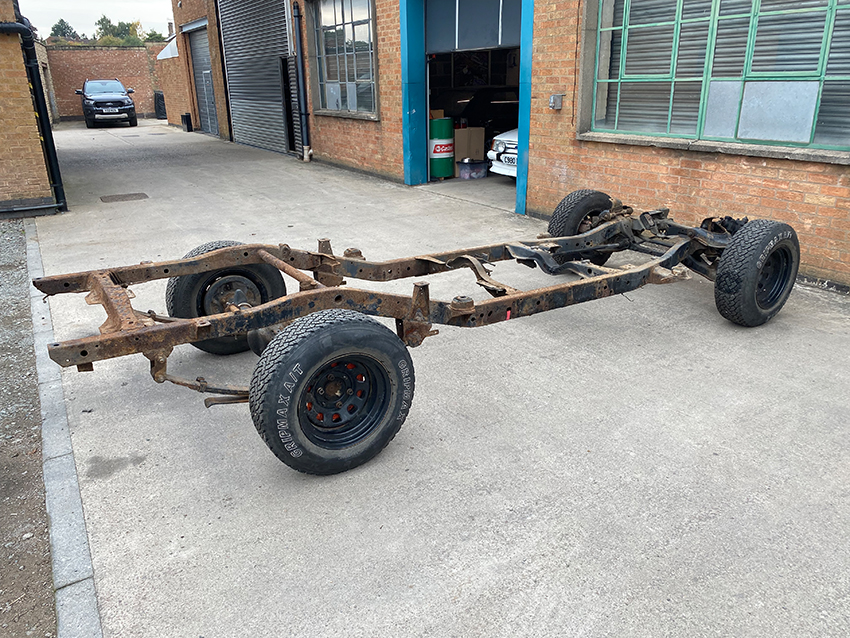
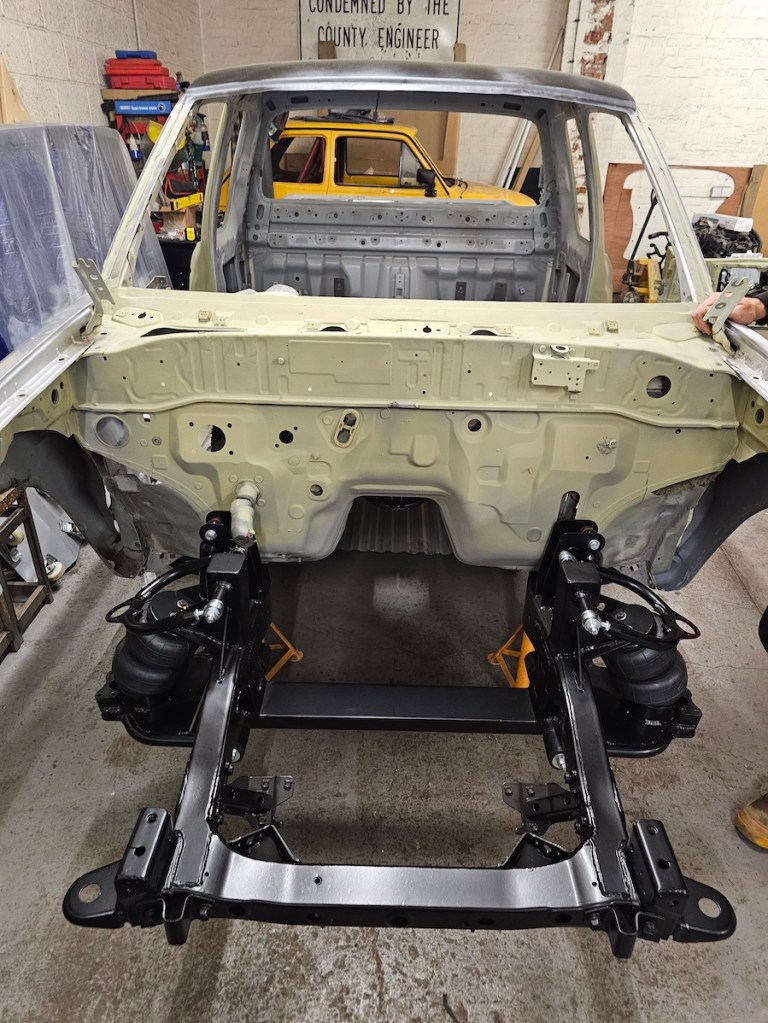
The really big news this month is that the custom chassis, components and narrowed rear axle have all been powder-coated and assembled. As you can see from the photos, there’s some truly outstanding engineering and fabrication here.
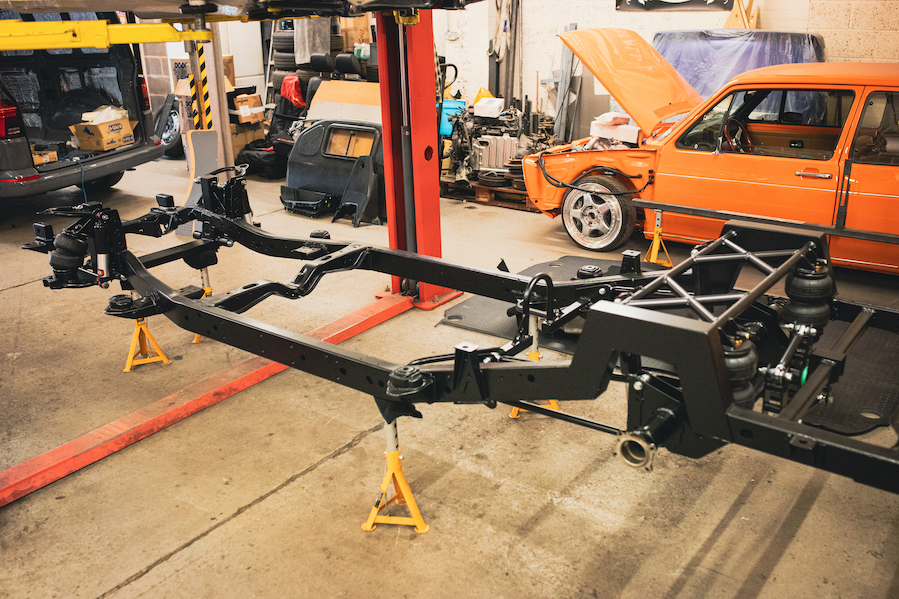
I simply cannot thank Phil James at The Install Company enough for how much time, effort and skill have gone into making this chassis come to life! Nothing created here ever existed before he imagined it in his mind, and the results are just mind-blowing.

The powder-coating was done by my dad and my uncle at The Spray Shop (where I used to work). It was great to get them involved with this build, as my dad has always been a huge influence in my love for customising cars. Naturally, it’s really special to have him working on this with me.
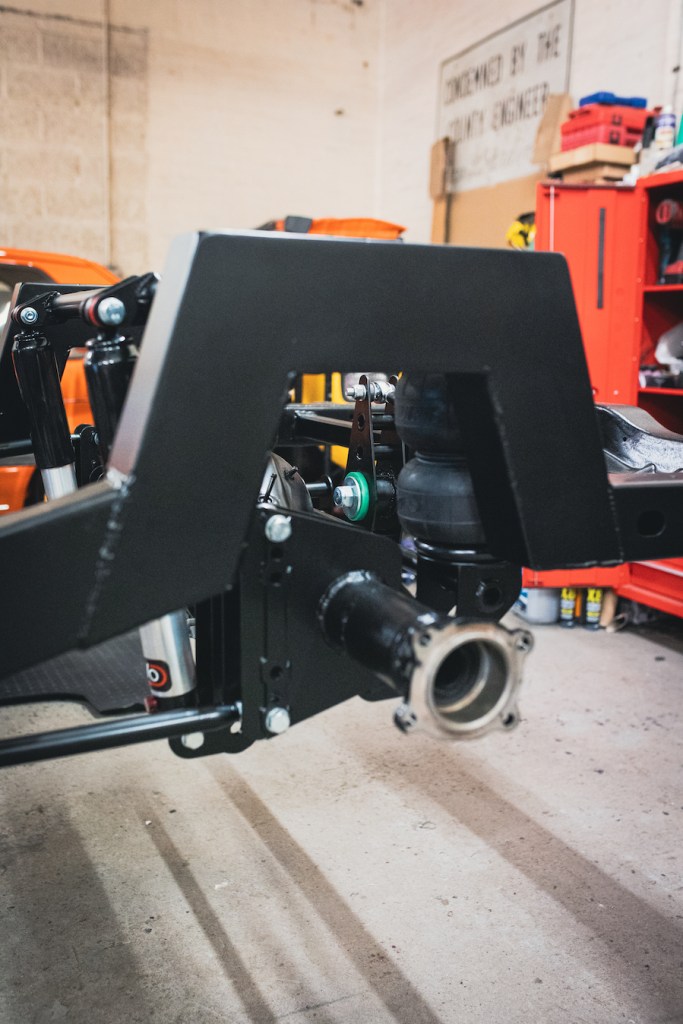
Something else that you’ll be able to spot in the photos here is that the bags have been fitted by The Install Company, which were supplied by Car Audio Security and Air Lift. Swallows Racing sourced and supplied the AVO shocks, so that’s the stance and the handling all coming together.
Next up we will be talking to Image Wheels, who I’ve used in the past (see below), about doing something very special when it comes to the wheels, and also to Tarox Brakes for that all-important stopping power!

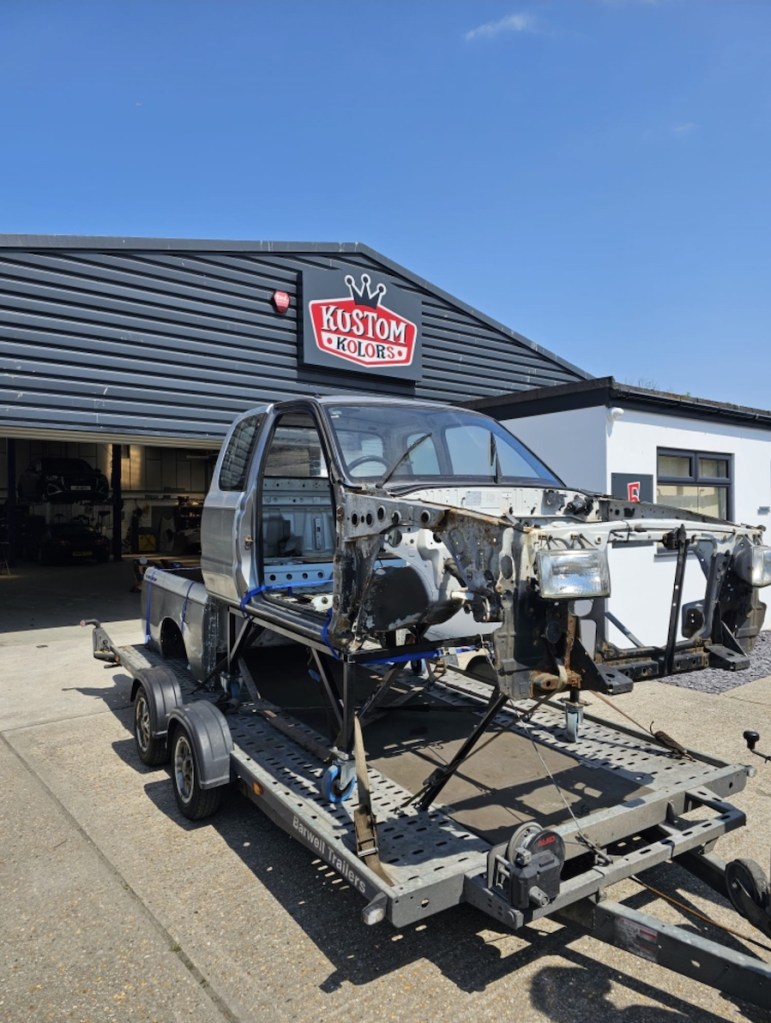
If you’ve followed my previous projects, you may remember that it was Kustom Kolors who painted my Mercedes (below). Well, they now have the Ranger’s cab, bed and body parts, and that’s all going very well. The doors are in primer and ready to go, while the cab and bed are being blasted as we speak.
And finally, the second mirrored turbo has now arrived at Swallows Racing, so the engine can be stripped and built back up to be the twin-turbo monster it always deserved to be. Show and go, you know that’s how we roll…
Part 10 – Cabin Fever
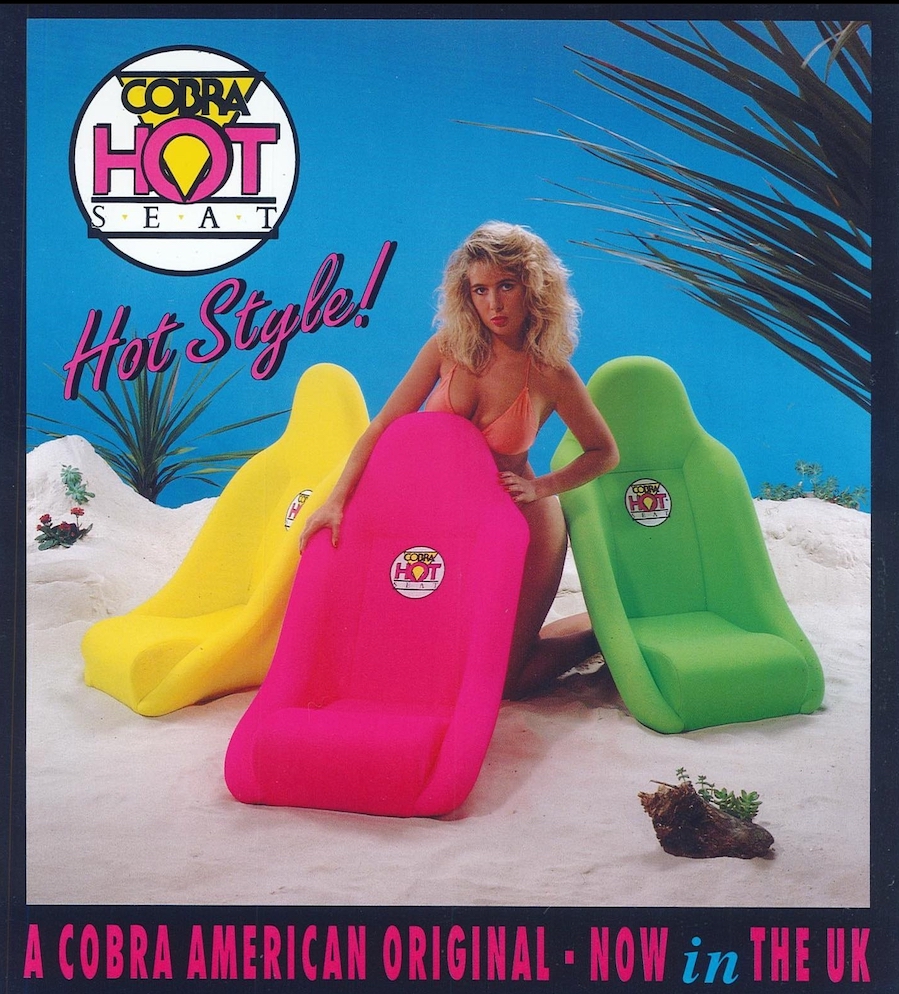
Dale’s taking it back to the ’90s for a unique custom interior for this instalment with inspiration from the a rather memorable Cobra advert. Anybody else old enough to remember it?
There’s been a massive amount of progress on the Ranger King Cab recently, but what I want to tell you about this time is the progress we’ve madeinside. Basically, when this is done, it’s going to be seriously next-level.
Max Hawkes of @hawkes.autoworks is working his magic on the interior trim, and if you’ve seen the work on his own cars or those he’s crafted for various customers over the years, you’ll know that this guy’s talent really is something else.
We’ve worked with Cobra Seats on various builds, so it only made sense to talk to them about supplying seats for the King Cab. And when it came to materials, we’ve got the very best available coming from UK Hide (@ukhideco).
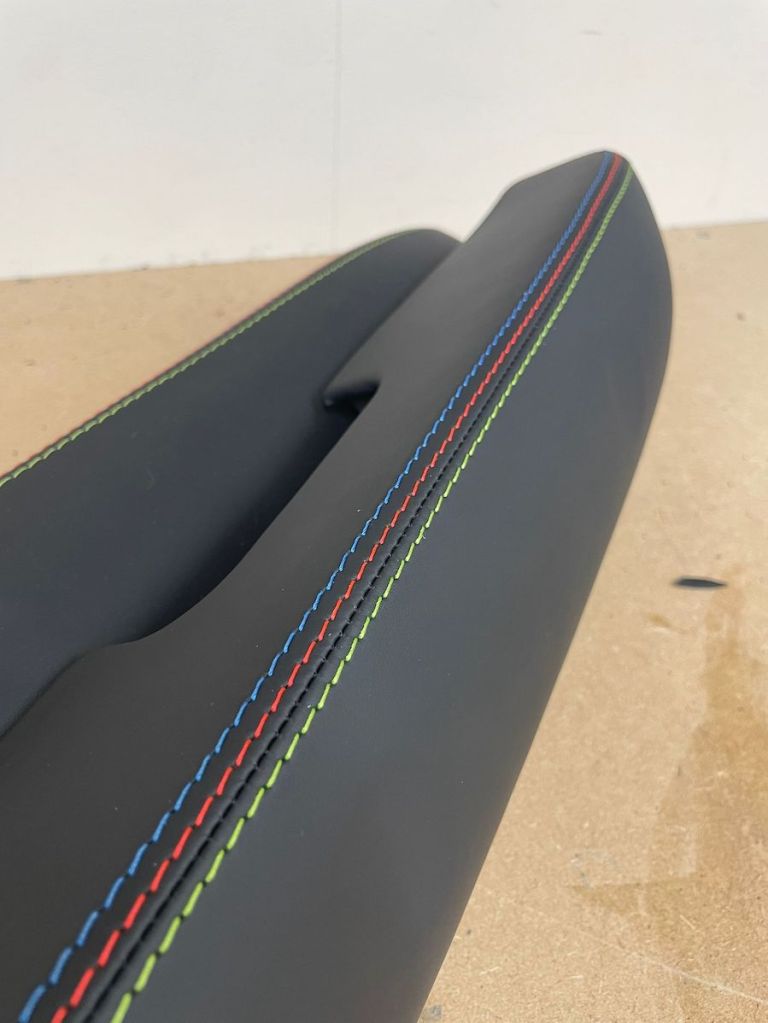
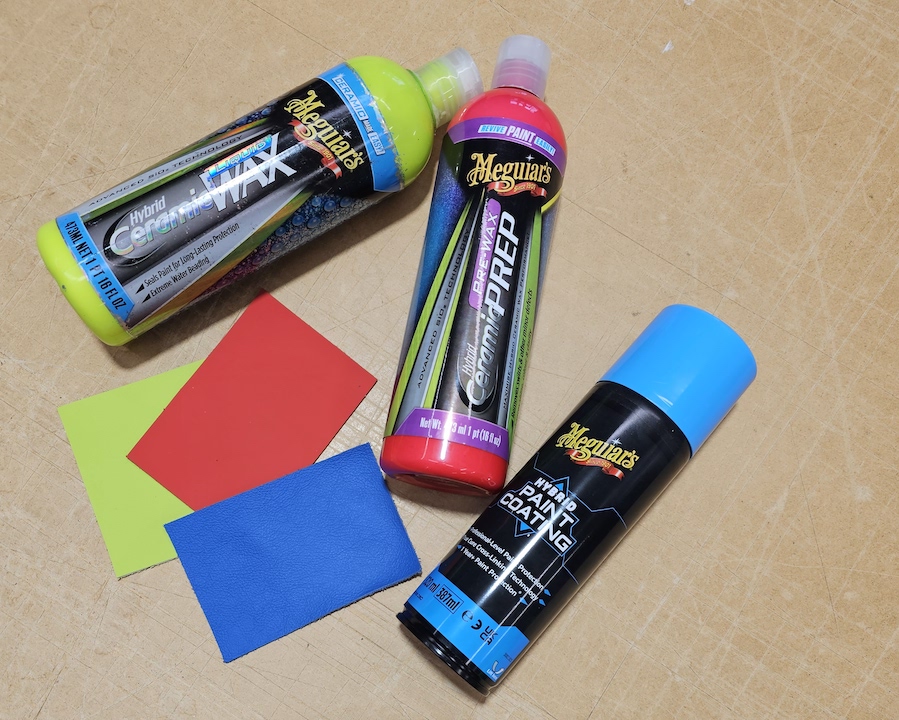
We’ll be using black leather and the ‘nearly black’ Dinamica, which will be used on the seat centres, headliner and trim. Then, we have chosen colours from our Hybrid Ceramic range to provide bright accents – see, we’re always on-brand!
Max’s custom work is incorporating some very cool details, including tri-detailed top stitching and laser-cut seat centres and door cards – a small circle pattern will be lasered into the Dinamica, with brightly coloured leather behind.
The digital design work is courtesy of Grant Marriott, our Meguiar’s UK Content Creator. He’s taken the retro ‘Hot Seat’ logo as used by Cobra back in the day, and made it look embossed into the seat. The overall design is taking inspiration from the ’90s colours and styles, and it’s all coming together beautifully. Can’t wait for you to see it!
Part 9 – Laser Focused
With so much custom fabrication work undertaken to get the body drop just where we want it, the pickup project is at an important stage right now. It’s fair to say that this is turning into a properly in-depth endeavour – but it was always destined to be this way.
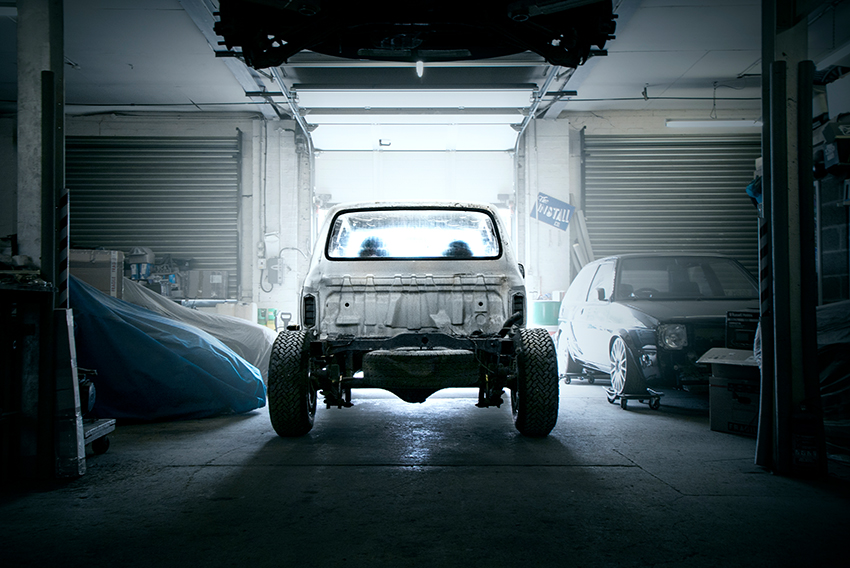
When the process of reinventing the Ranger King Cab began, it was never intended to be something simple. This had to be a build that really redefined what was possible with the end result being a Ford pickup truck the likes of which the UK had never seen.
And as the latest works by The Install Company demonstrate, there isn’t a great deal about the truck that hasn’t been cut, welded or customised to achieve the full body drop.
Phil James at The Install Company has been incredibly busy on the truck of late, with each step allowing for his customary creativity and flair. You can see in the pictures here the drawings, cardboard templates, laser-cut components and the finished fabrication.

Key highlights of this extensive work include a parallel 4-link setup with adjustable heim joints, strengthening plates for the chassis rails, and a custom 140mm narrowing job for the L200 rear axle. So there’s been a whole lot of progress to really push the project forward, and soon it’s actually going to start looking like a truck again.
What’s next? Well, you can see here that the front end and engine placement have been mocked up. Phil is waiting for the final parts to be delivered so we can place the engine over the chassis.
And then finalise engine mount locations, before the chassis is sent away for powder-coating. Onwards and upwards, tune in next month to see how it’s all looking!
Part 8 – Hide & Seek
Dale and the gang pay a visit to UK Hide to select some high-quality materials for the Ranger’s cabin.
Things are starting to get really exciting. Now that we’re picking out the final materials, we can really visualise how the finished product is going to look. And while it might have felt like sedate progress up until now, the rate of progress is really going to accelerate in the coming weeks.
We linked up with Max Hawkes (@hawkes.autoworks) who will be doing the entire trim in the truck, with materials provided by UK Hide (@ukhideco) and the seats supplied by Cobra Seats (@cobraseats).
Many of you will already be familiar with Max’s work on various high-profile project cars, so you know this is going to be something properly special.
To fit in with the ’90s colour scheme, we have chosen colours from our Hybrid Ceramic range to provide bright accents to the black leather and the ‘nearly black’ Dinamica; the Dinamica will be used on the seat centres, headliner and trim.
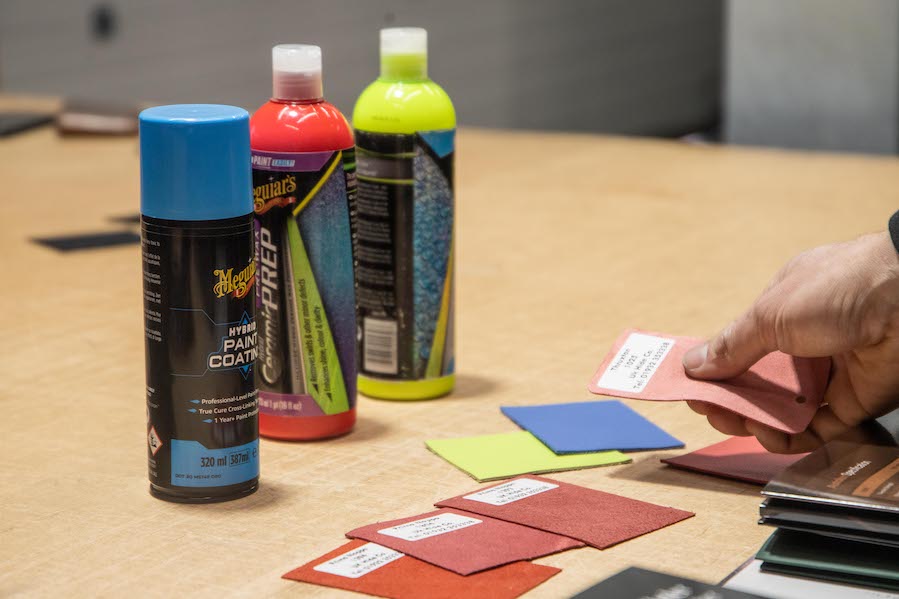
UK Hide is now the sole approved UK distributor for Dinamica, and it’s a great material to use – it’s soft to the touch, and very comfortable for seating, making it an excellent choice for automotive interiors and upholstery and, especially in this case, something way above and beyond the quality you’d expect to find in a Ranger.
It is both breathable and anti-static, and it’s also easy to clean and maintain (not that we’re afraid of a tricky cleaning job), and fade resistant. The brightly coloured accents are going to look very cool as a contrast while tying in the Hybrid Ceramic palette and… well, we’ve said it before, but we’ll say it again: this is going to be like no Ford Ranger you’ve ever seen before.
Part 7 – Daily Grind
Progress on the Ranger King Cab is really on a roll now as we start thinking about the 2023 show season. Well, we’ve got to be positive about what we can achieve, right?
You’ll have seen last month that we reached a really significant milestone in the project, having transitioned from the stage at which we’re pulling things apart into the infinitely more exciting one where we’re putting things back together.
Of course, it was never going to be anywhere near that simple – with the amount of fabrication work and lateral thinking that’s going into reinventing this truck into something ridiculously low and aggressive, we’re not exactly talking step-by-step Lego here.
Still, Phil at The Install Company has it all in hand: he has now worked his way through all of the custom laser-cut pieces for the chassis. So, it’s time to start connecting the knee bone to the thigh bone and… wait, how did that song go?
As we all know, low is a lifestyle, and this King Cab is going to set a whole new level of lowness for this type of pickup. Both the front and the rear of the chassis are being very heavily modified to cater for the HUGE body drop. And obviously, as always, this isn’t just intended to be a trailer queen or a static show piece. This has to be a usable vehicle that’ll get driven to and from events. The more I see the ideas together, the more I’m looking forward to driving it.
So at the rear of the chassis, the Ranger’s been treated to notches and strength beams along with the start of the four-link suspension setup, while at the front it’s getting custom-built suspension towers. It’s going to be all about the show, but we’ll have a whole lot of go in there too.
So what’s next? We’ve got to start finalising the rear axle setup as well as starting the engine build. We’ll also be dropping panels off at the body shop to start prepping. This is where it all begins to get properly exciting, as we can picture what the finished product will look like and what it’ll sound like too. Can’t wait!
Part 6 – Off the rails
Crazy projects like these always seem to have an odd sense of pace to them. Regular readers will have no doubt seen that initial progress tends to be slow; the teardown is exciting, but then things slow down while you work out where everything is going to go and try to figure out how it is all going to work. And then, when all the prep work is done, progress gathers pace again.
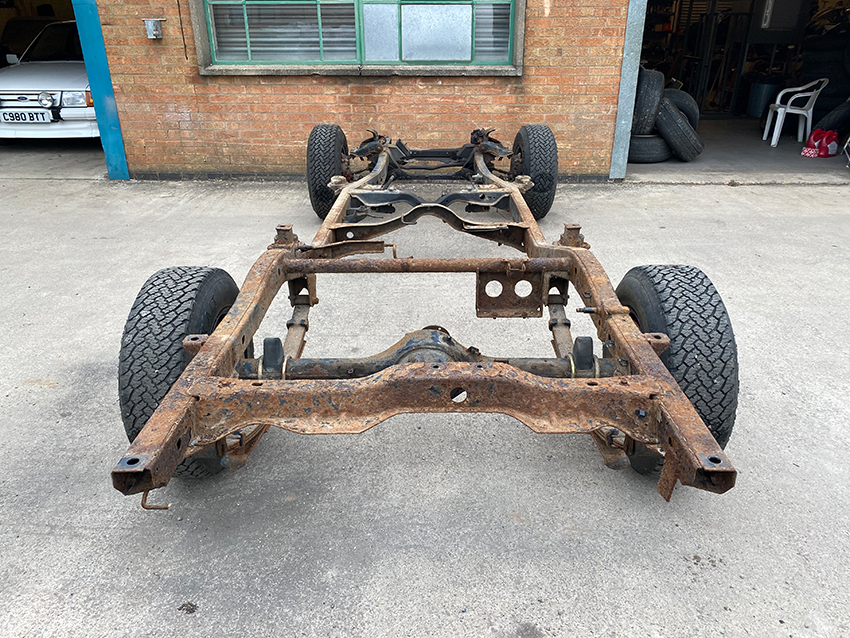
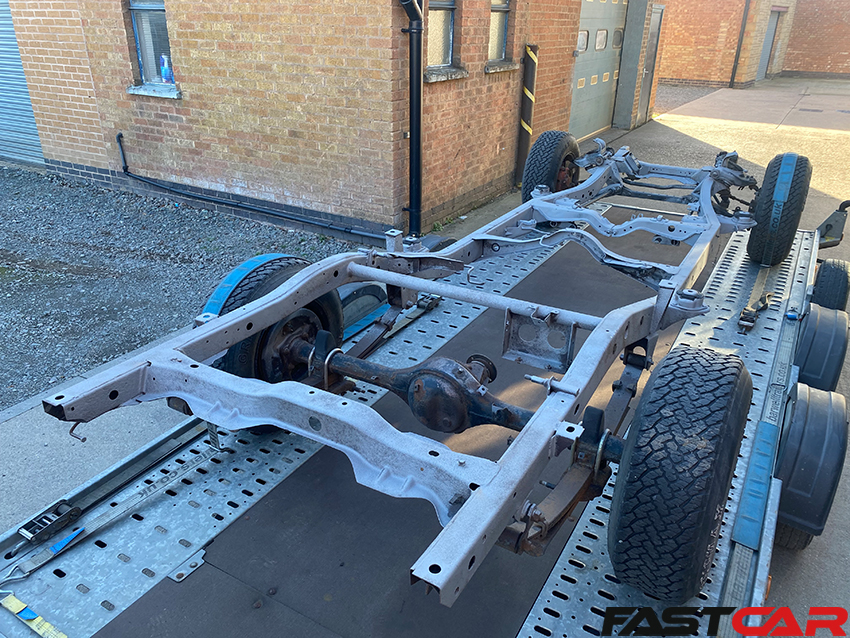
Well, that’s exactly where we’re at with the Ranger. The pick-up was quickly pulled apart, but then it was the laborious task of stripping everything back to the bare chassis, inspecting and assessing parts as they came off to determine if they are useable, salvageable, or need to be binned.
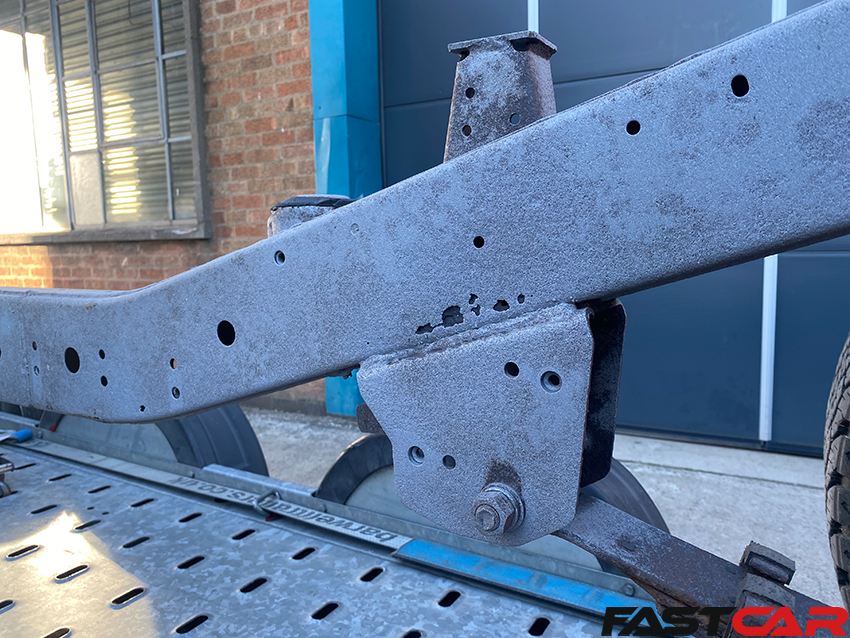
Last time, we showed you the cab and chassis had been separated, and the chassis rails were ready to be sent away for media blasting. Well, now it’s back. All the dirt, grime, and surface rust has been blasted away, and we were able to see what we were left with.
Luckily, Phil at The Install Company is still talking to me, which means the news is good. The chassis is solid and doesn’t show any signs of serious corrosion or previous repair. More importantly, it’s all nice and clean metal that Phil can start to get to grips with. With the metalwork exposed, Phil’s next job is to start figuring out which parts need to stay and what needs to be chopped away to get the Ranger sitting on the floor when the Air Lift kit is installed.

The project also needs to loop Tom at Swallows Racing back in at this point, as he is working out what rear axle we should run, and what to do with the front end too. Tom and Phil are currently swapping ideas, and the tape measure is in overdrive. They are under strict instructions to “measure twice, cut once,” so are carefully planning the best possible setup.
I have every confidence they will get it all sorted, and as soon as they have a plan it will be full steam ahead with the custom fabrication. The whole project will start coming together very quickly, and I can’t wait.

Part 5 – Blast off!
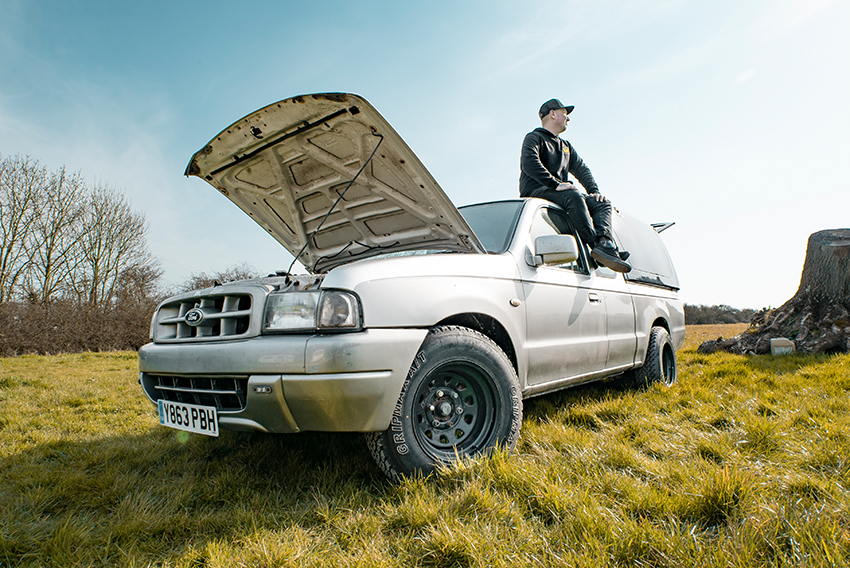
Last time, you may remember that I mentioned Phil at The Install Company had made a start stripping the Ranger. Well, this month he’s really got cracking.
The interior had already been removed – which is how I was able to grab Max from Hawkes Automotive and start looking at ideas for the custom retrim – but now Phil has completely gutted everything on the Ranger.

Along with the interior trim, all the wiring on the truck (cabin and chassis) has been removed, the fuel tank has been dropped, and all the fuel and brake lines have been taken off the chassis.
Why are we going to this extent during the strip-down, you might ask? Well, before Phil can start to work his magic on installing the custom Airlift setup, the Ranger’s entire chassis needs cleaning up – so it’s being sent off for media blasting.

This will do a number of things, but the main advantages are that it allows us to see just what condition the chassis is really in (will it be able to cope with twin-turbo V6 power?) and it provides a clean base for Phil to work from when modifying the chassis – nobody likes trying to weld to rusty old metal.

With all the ancillaries removed and nothing left to snag, Phil was able to unmarry the cab and chassis. The axles have been left in place to make it easier to wheel around, and underneath all the years of grime and dirt, the chassis appears to be in good condition. But there’s only one way to really tell, and we’ll find out next time when the chassis comes back from the blasters…
Part 4 – Sitting comfortably
In the last update I showed you my visit to Car Audio Security to pick up the Airlift Performance kit the Ranger will need to pull off that show-stopping stance we’re after. Well, that’s all still with Phil at the Install Company, who’s busy stripping the truck down to a bare chassis and getting everything ready for media blasting. Hopefully, I’ll have an update on that next time for you.
You may also remember my flying visit to see they guys at Cobra seats too. We’ll be fitting a pair of classic buckets as part of the build, but I’ve always said they won’t be any old off-the-shelf seats as ours would be treated to a custom retrim.
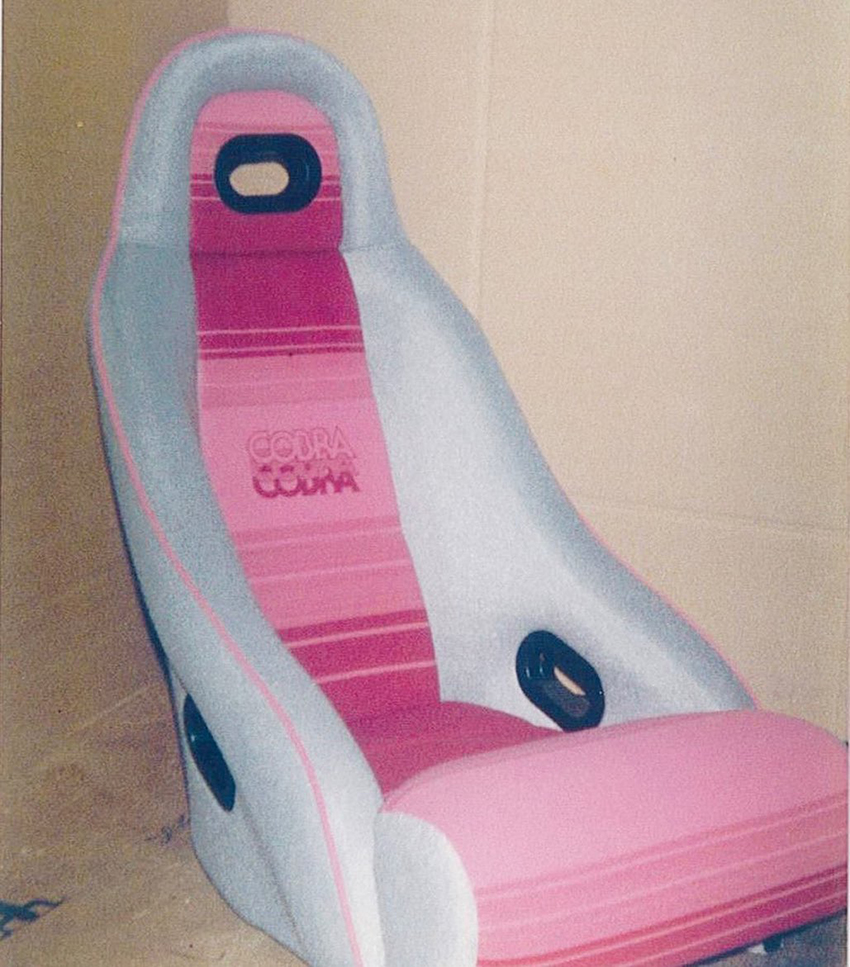
Well, things gathered pace in that department a bit unexpectedly recently. While browsing through Facebook, a post from Cobra popped up. It was one of those throwback type posts, looking back at the pink and grey seats the company supplied for Roland Rat’s ‘Ratmobile’ back in the day. I loved them. In fact, that photo has inspired me to go with a Nineties theme for the interior on the Ranger build.
I’ve even had Max Hawkes from Hawkes Autoworks pop down to see the cab so we can chat through some ideas. Max explained that there have been huge leaps forward in trim technology since the days those Ratmobile buckets were made, and he suggested ways of bringing that oh-so Nineties stripy pattern into the modern age. We also decided that we should delete the head rests, as this will allow for a much cleaner look that offers uninterrupted views through the cab, from windscreen to rear glass.
I don’t want to give the game away too much so need to be careful what I say at this stage (I don’t want Tom copying my ideas for his Golf!) but the interior will use black as the base colour, which will then feature brightly coloured accents throughout. What’s a Nineties build without a little bit of piping, eh?

The chosen accent colour will be picked from the truck’s overall paint finish. I’m going to tell you what colour that is just yet, but believe when I say it’s going to be bright! The entire cab is getting the custom retrim treatment to match too.
Now, I’m just keeping my fingers crossed there’ll be some truck left to work with after it comes back from the blasters. If you don’t see me in next issue, you’ll know why! Until then…

Part 3 – Off to The Install Company
I have big plans for this old farm truck: I’m going head-to-head in a build-off with fellow Meguiar’s man Tom Clarke, who is building a Mk2 VW Golf (VW fans can read about that in sister title, Performance VW). So, it needs to be something a little bit special to beat him.
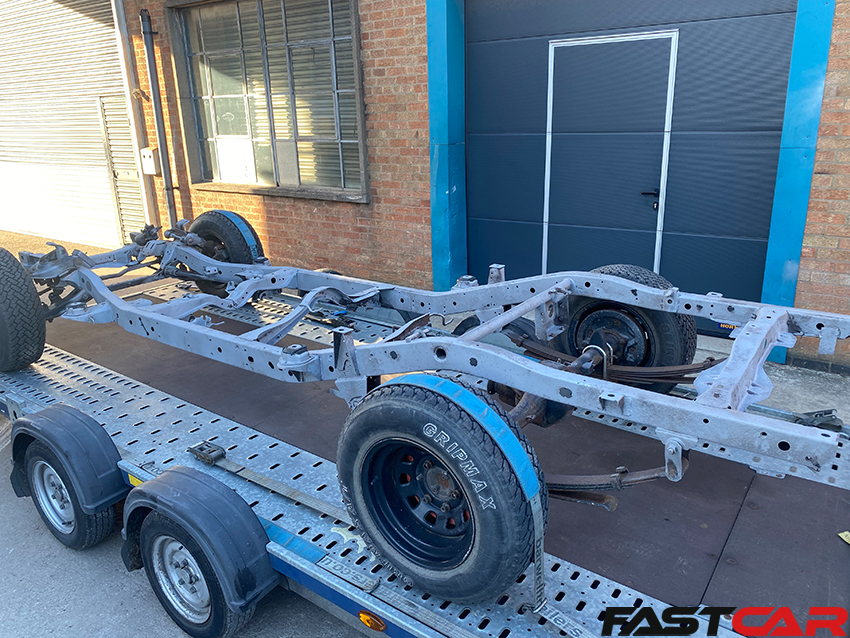
And it will be special. Last month I showed you the truck I’d bought to form the base of this build, and it was dropped off at Swallows Racing in Somerset where it was promptly pulled apart and assessed. We even got the tape measure out and did some quick maths to make sure the twin-turbo V6 I plan to run will even fit. It will.
Having been given the thumbs-up by the guys at Swallows, the stripped-out King Cab chassis found its way heading north to Phil James in Leicestershire. Phil is one of my best mates, and the guy I always turn to when it comes to fancy fabrication stuff like this. In this case, he was tasked with giving the Ranger the ultra-low stance needed to impress at shows and events, but still have the ability to drive there and back under its own steam.
The answer, like so many top show builds, comes from air suspension. I popped in to see the guys at Car Audio Security – who are once again fully behind the build – to pick their brains about which air ride kit would be best suited.

Airlift was the brand they recommended, and because we like fancy things with all the bells and whistles, we opted for the full-fat 3H system. It’s a very clever piece of kit, and Airlift says it’s the world’s first height and pressure-based air ride system. You can use a hard-wired controller in the car, or even use the dedicated app on your smartphone to switch between height and pressure sensors. In real terms, that means you can use the pressure sensors to control ride height when giving it some around a track, but then switch over to height sensors to level things out when you pick up your mates for a Sunday morning cruise. Or in my case, when I load the pick-up bed up with all the stuff show I’ll no doubt be carrying to and from events.
With a full kit of boxes loaded into my Merc, I then trundled off to deliver it all to Phil. Now it’s over to him to work out how to install it all – he does run a shop called The Install Company, after all.
But I do feel a bit sorry for him; this is no off-the-shelf, bolt-on upgrade. Phil has already stripped the truck right back and is busy working out where to nip-and-tuck the chassis to achieve that perfect show-stopping stance.

Oh, and just to make his life a bit more difficult, I’ve reminded him that I’ll need to run massive rear wheels to put all the power down, so he needs to leave room for some decent-sized rubber at the back, and the bulky engine with two whacking great turbos at the front too.
While Phil was busy calculating things (read shouting and swearing – I’m not sure if it was at the truck or me!) I dropped in to see the guys at Cobra Seats. They are supplying a pair of their classic buckets for the build, but like everything on this Ranger, they will be customised before fitting; Hawkes Autoworks will be giving the whole interior a full retrim, but let’s get the thing rolling first, shall we?
Come back next month to see how the build progresses.

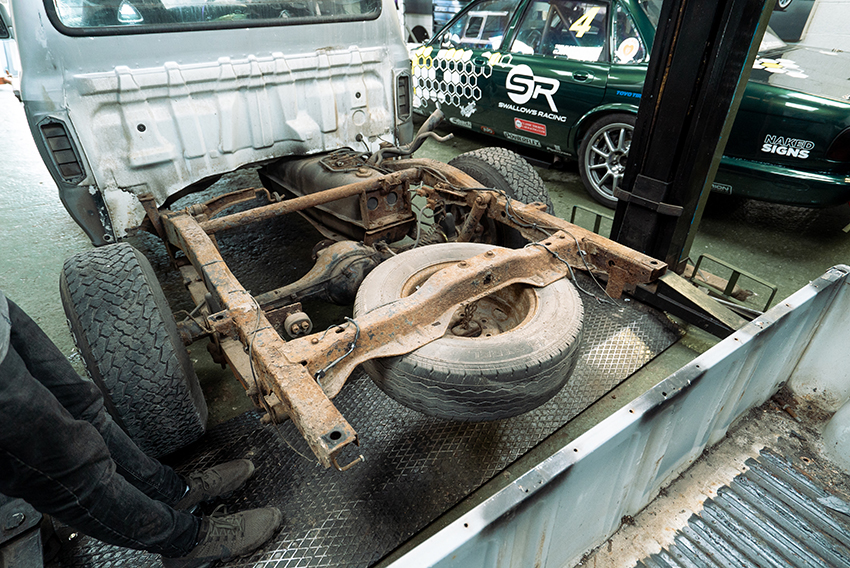
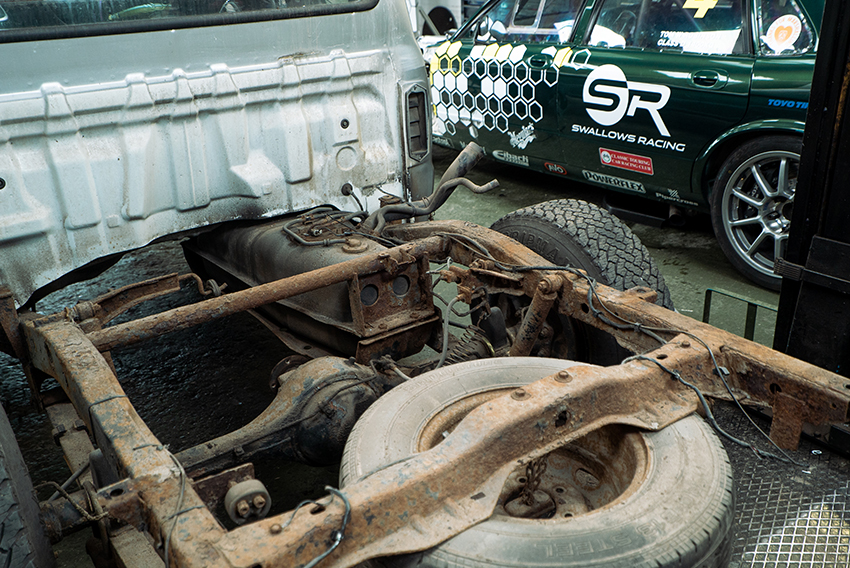
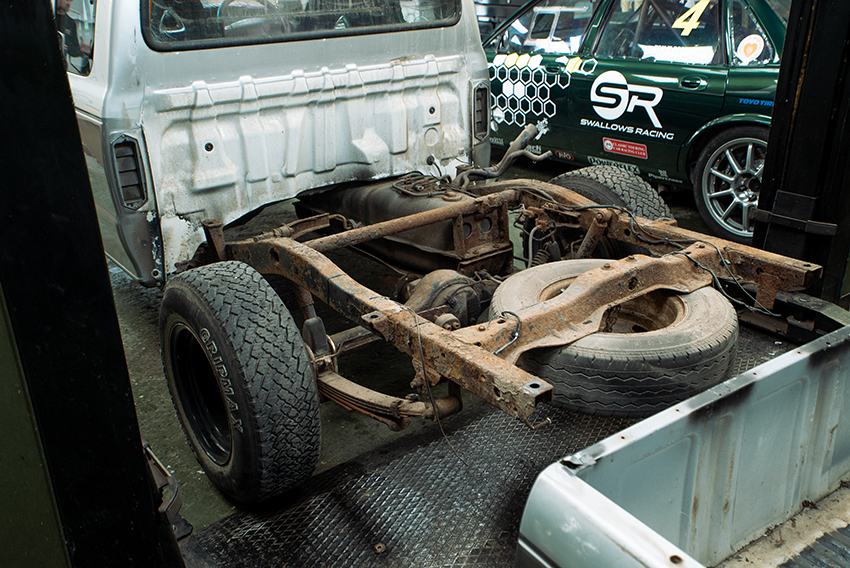
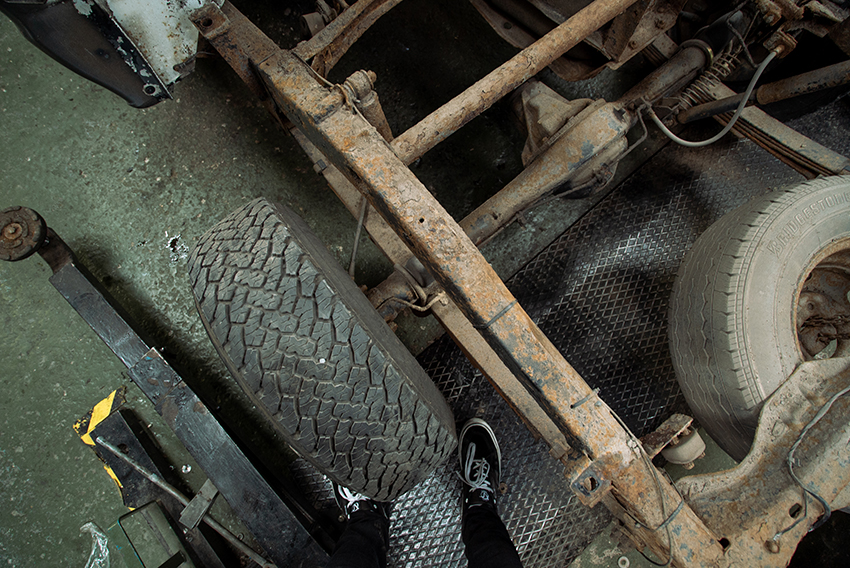
Part 2 – The stripdown
Since the last update the Ford Ranger King Cab has been shipped off to Swallows Racing, and with the help of Phil from The Install Company and myself we got to work stripping the Ranger down. As you can see from the pictures, we didn’t mess about and the old oil burner and pick-up bed was removed in super-quick time. It would probably have been even quicker if I wasn’t there sticking my nose in, but you’ve got to show willing in these situations and I was on hand to grab the biscuits when called upon.
There’s an awful lot of work to do to get this thing show worthy, and even our Multipurpose Cleaner won’t help that chassis but we’ll get that sorted at another time, our main objective was to mock-up and see where the new Ford Duratec will sit in the bay. Doing an engine swap is never an easy job, even when you’re swapping like for like, so the fact we’re binning off the stock engine and fitting a completely different powertrain and transmission is testament to the skills that Swallows and The Install Company possess.

With everything out the way, Swallows raided their spare parts room and grabbed a V6 to dummy-up where everything is going to sit, including the two snails that they are going to bolt to it. One thing is for sure, it’s going to be a tight squeeze but I have every faith in Swallows to get it sorted.

The other main factor that we’re taking into consideration when doing the swap is that we want the truck to roll super-low, and that’s one of the main reasons Phil popped along to help out, as this is his forte and he’ll be responsible for body dropping and tubbing it before the Car Audio and Security supplied Air Lift suspension is bolted in – but let’s not get ahead of ourselves as this going to take a lot of fabrication and engineering to get everything aligned. The only way is up, or should I say down? Until next time…
Part 1 – Intro
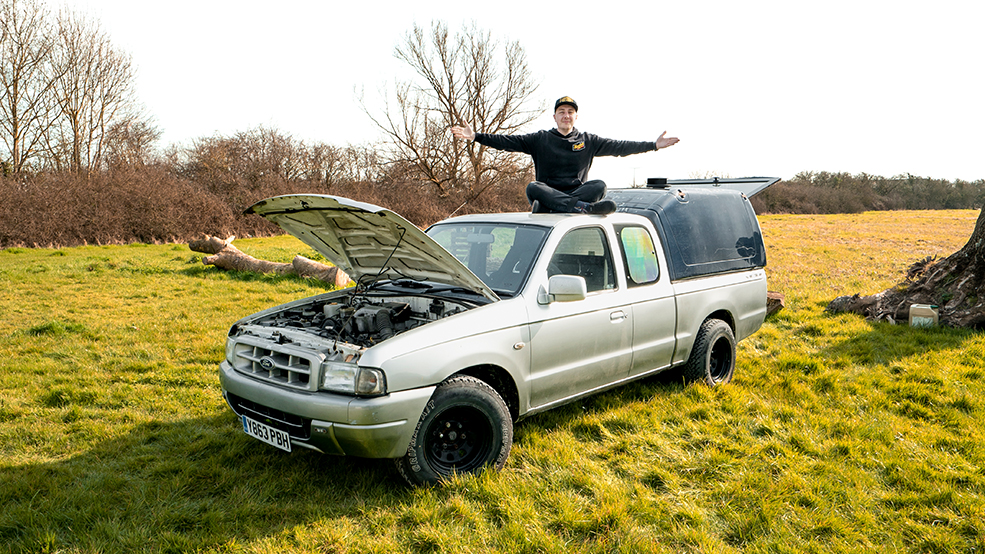
You’ve got more chance of winning the Euro Millions than you have trying to predict what Dale will build next. First time out he went for a low and slow W115 Merc, while last year he went for track-focused Jaguar S-Type R, that he had converted to manual. Quite the contrast. Is he going show or go in 2022? Well, he’s actually going for both with his Ford Ranger King Cab…
FC: Why did you opt for a Ford Ranger?
DM: My Dad loves American mini trucks and used to buy all the mags to follow the scene, his enthusiasm rubbed off on me and must have planted a seed all those years ago.
FC: Where did you source the car?
DM: I looked locally for a few weeks before word got out and I was offered this King Cab from an associate of Swallows Racing. I wanted this model because it makes for a slicker looking truck.
FC: What condition is it in?
DM: It’s been used for transporting mountain bikes about, so has a few battle scars but is a solid base car, and I’m going to completely transform it anyway.
FC: What are your plans for the project?
DM: Well, I want to combine my two previous builds, so Kustom Colours who painted the Merc and Swallows Racing who did the work on the Jag are both getting involved again. The paintwork will have a tribal show paint vibe, while the diesel engine is going to be ditched for a Jaguar AJ30, which is based on a Ford Duratec. The biggest difference is Jag upgraded it to a VVT. We’re going to twin-turbo it, we know it can be done as the Noble M400 ran this engine and was a twin-turbo setup from stock.
FC: Any other key modifications?
DM: Yeah, so Phil at the Install Company is also getting involved. He’ll be responsible for body dropping and tubbing it, then Car Audio Security are going to supply all the Air Lift goodies so we can get it rolling really, really low. They’ll also be an SQ sound system and loads more too.
FC: Loads to do then, when are you aiming for completion?
DM: Well, unlike Tom I always hit my deadlines, so I’m hoping to have it ready for Autosport in January 2023.