This time it’s our Brands Hatch track guide, which forms part of our motorsport series dissecting the country’s top tracks to give you the edge on your next track day.
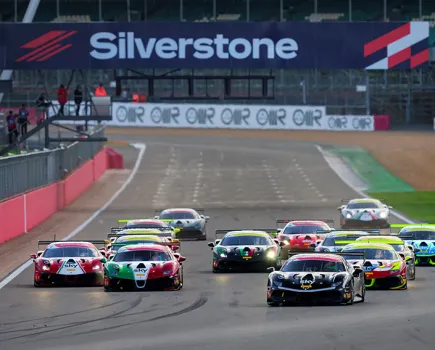
Established in 1926, Brands Hatch is Kent’s twisty, rolling countryside thriller that has evolved into one – or rather, two – of the most famous race tracks in the world, hosting everything from F1 to British and World Touring Cars. Famous for its changes in elevation and steep cambers, Brands Hatch is an extremely technical circuit, with each bend flowing into the next, making your choice of line crucial. Regular resurfacing makes grip levels superb and reasonable run-off areas in many sections allow for the odd off-track excursion. Holding such status, trackdays can cost a little more, but they’re well worth it – expect to pay anywhere from £139 for a evening on the Indy circuit, up to £325 for the full GP experience. Although sharing several corners with the shorter, more often used, Indy circuit, the full GP circuit is surprisingly different in character with faster lines are more wooded sections. Due to the cost of the respective days, we’re going to focus on the Indy circuit here.
The key highlights are the fast ascending sweeper Clark Curve, which leads onto the undulating flat-out Brabham start/finish straight, and the sweeping Paddock Hill Bend at the other end, that allows excellent overtaking opportunities for the brave.
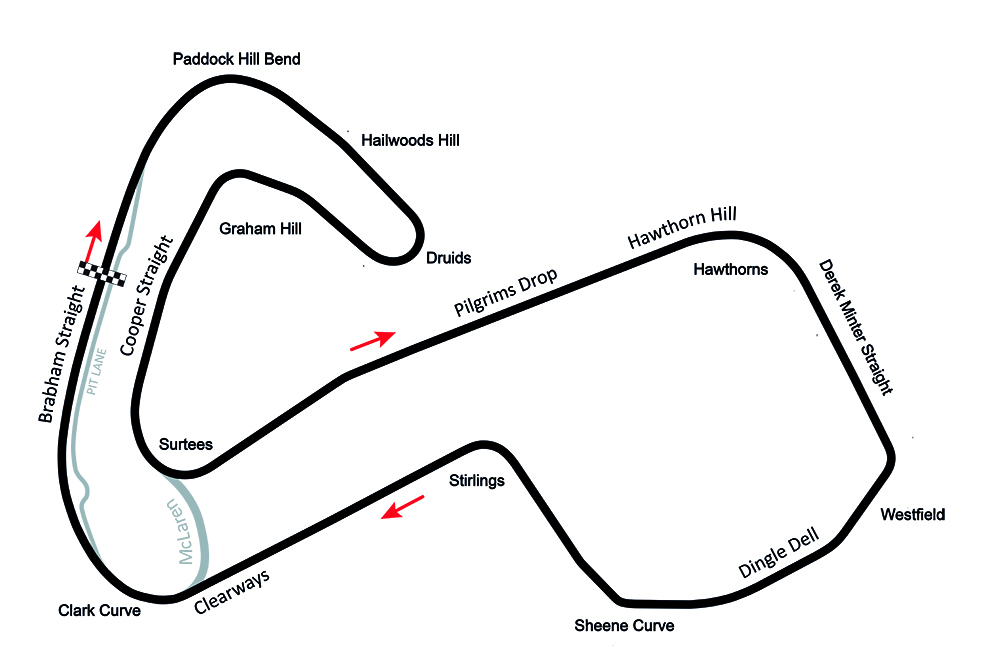
From there you have a steep climb to the Druids hairpin before dropping steeply into the off-camber left of Graham Hill Bend. Getting your entry to this one right is important as you can maximise your corner exit for the Cooper straight before Surtees and the long McLaren right-hander that leads into Clark Curve.
Brands Hatch Indy Circuit Guide
Brands Hatch Indy circuit is one of the shortest tracks in the UK at just 1.1 miles. It looks fairly simply, but what it lacks in quantity it more than makes up for in the quality of the corners; Paddock Hill is known around the world, and the technical challenges of Graham Hill and Clearways are unmatched at any other track in the country. It features short ‘straights’ and tricky corners, which makes it perfect for a fast Ford!
1 – Paddock Hill
The lap starts in the best possible way, with Paddock Hill bend. It’s one of the best corners in the world, and incredibly rewarding when you get it right. You should be positioned on the left of the circuit before you brake; there’s a crest just after the start/finish line and it’s a good reference point.
Start by braking just after the start/finish line and then as you build your confidence on each lap, start to shorten your braking distance and get a feel for what your car and brakes are capable of.
Take some time to familiarise yourself with the bumps and camber changes in the braking zone here, as they can make the car slightly unstable whilst you brake.
Your turn-in point for the corner is the start of the gravel trap to driver’s left, from here you’ll find the apex quite naturally. It’s essential that you are fully committed to the corner by the time you reach the apex. With the way the circuit drops away so suddenly at the apex, all the weight of the car will be at the front and the rear is even lighter than usual. Any lift-off oversteer here will only be saved by luck, and the same applies if the rear tyres are too cold.
Make sure you arrive at the apex at a speed you know you can carry through the corner, and once you’re there get back onto the throttle hard, and run the car out to the kerb to the left of the circuit.
2 – Druids
Up next is Druids. Use the footbridge running over the circuit as a reference point for both braking and turning, hitting the brakes hard as you go under the bridge and gently starting to turn towards the corner at the same time.
That sounds early to be turning, but the camber of the corner means you can do this and still roll in with quite a bit of corner speed, having also shortened the distance the car is travelling by cutting into the corner so soon.
The inside of this corner was re-surfaced a couple of years back and provides more grip than the older bits of tarmac, which also helps make this tighter line work.
Once you’re into the corner you have two options; you can either roll through and hug the white line on the inside all the way through the corner, or you can square the corner off into a ‘V’ shape.
To do this, turn-in at the same point but then allow the car to run out wider around the middle before turning back into the corner. It’ll help you put the power down on the exit, but you’ll have lost speed mid-corner compared to holding the car on the tighter line.
3 – Graham Hill Bend
After running out to the left-hand side at the exit of Druids, the next job is to set the car up for Graham Hill Bend. This is a corner that a lot of track day drivers struggle with, but it’s also the second most important corner on the circuit as it leads onto the second longest straight (which still has a slight curve in it).
To start with, the car needs be moved over from the exit kerb on the left out of Druids back over to the right-hand side of the circuit.
There’s a kink in the road just before the corner, which is also the start of the braking zone. Turn into the kink slightly to shorten your distance, but only back to the middle of the track as a maximum as you need to be braking in a straight line.
Most drivers here will turn in too early, which cost’s them a lot of time on the exit. Don’t be afraid to use a bit of kerb, and once the car is on target for the apex start to apply the throttle. Remember that the exit of the corner here is crucial as it dictates how much speed you carry into Cooper Straight.
4 – Cooper Straight
There’s not much to say about the Cooper Straight that follows, apart from there is a kink about halfway down that you’ll want to cut back towards the middle of the circuit for. It’ll make next to no difference to your lap time, but it does shorten the distance you travel and it’s therefore easy time to gain.
5 – Surtees
The second half of the lap begins with Surtees, followed immediately by McLaren. Both are easily flat in race cars, but without race tyres or suspension you may find you need either a slight lift (enough to slow the car but not enough to drastically change its balance) or a dab of brakes before you turn.
Like with Graham Hill bend, you want a late apex here, so that you can go straight from the apex to the inside of McLaren.
A lot of drivers use the kerb on the inside here, but it’s often faster to avoid it. If you are going to use it just bear in mind that it will make the car unstable, and if you don’t hold your nerve at that point you’re going to visit the Medical Centre. That’s not being overly dramatic – you’ll spin to the inside and hit the wall right where the medical centre is located!
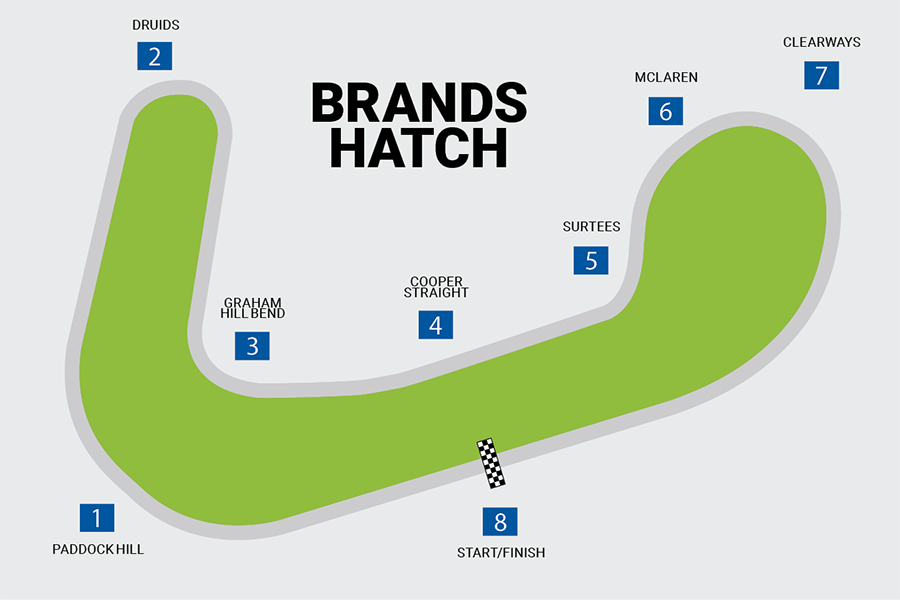
6 – McLaren
McLaren itself isn’t really a corner. If your line through Surtees has been correct then you won’t need to turn into it, the car should naturally go to the inside of it from the apex of Surtees. Then, as you want to be on the left of the circuit for Clearways you just need to let the car run back out to that side of the circuit.
7 – Clearways
Clearways is the most important corner on the circuit and the one that drivers tend to struggle with the most. A lot of drivers use a late apex and hug the right-hand side of the circuit on the exit. That’s not only slow on the entry (as you’re waiting for the apex to accelerate) but it’s also slow on the exit as the car is being held tighter to the inside and therefore not able to accelerate as it would if you use all of the road.
Your apex is the point of the inside kerb where it starts to widen, keep tight to the kerb and start to feed in the power smoothly until the elevation starts to drop away, by which point you want to be hard on the throttle and the car will naturally run out to the outside.
Using this line, you’ll be at full throttle before drivers on the wrong line have even hit their apex – it makes a huge difference.
8 – Start/Finish Line
From there it’s back onto the front straight, where you’ll see a slight curve just after the start of the pit wall on the right. Gently turn towards it and keep tight to the pit wall all the way to the finish line – but remember to move the car back to the left to set yourself up for Paddock Hill again.
And that’s a lap of Brands Hatch!
Fast facts
Track length: 1.2 miles (Indy), 2.3 miles (GP)
Corners: 6 (Indy), 11 (GP)
Highlights: Long Clark Curve and balls-out straight that leads into the descending Paddock Hill Bend – one the best sections on any race track in the world!
Price: From £139