

Looking for some decent boom-boom audio but are super-tight on space? We’ve got you covered with our guide on how to install underseat subwoofers.
Anyone who knows their car audio, or any other audio for that matter, will tell you that having a subwoofer as part of your system is vital.
Audible sound, just like your music, is simply a collection of frequencies that need to be reproduced by specific speakers. Basically, there’s the high frequency treble, mid-range frequencies, and mid bass – all of which can be reproduced by your normal door speakers that include tweeters and mids. However, only a subwoofer can reproduce the final part of the sound spectrum – the low frequency sub bass. So, without a woofer, you’re just not getting the full picture. You’re not listening to your music how the artist recorded it.
But, now you know why you need one, what if your car doesn’t have one as standard, and space is too tight to have a big old sub box and amplifier in your boot? Well, that’s where underseat subwoofers come into play.
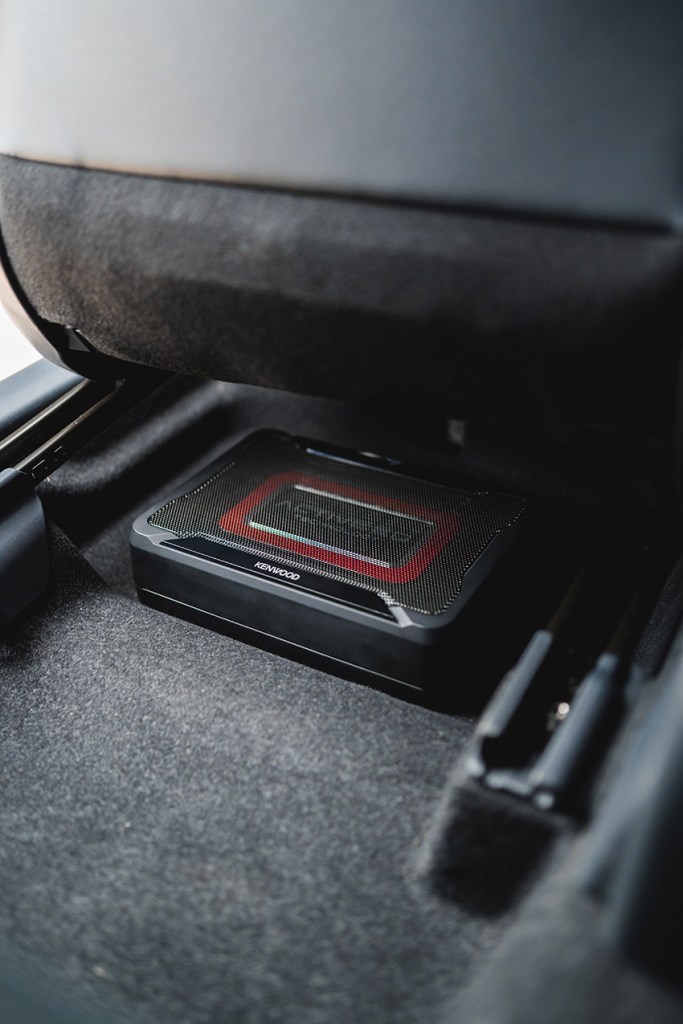
These are basically and all-in-one sub and amplifier combo that fits right under your seat. And what’s more they usually come with a full wiring kit making them practically plug and play… well, sort of.
But fear not, getting one of these in your car is a relatively easy process that will sort out your system a treat. And most importantly doesn’t require some sort of degree in advanced sound engineering and 72 hours to do the job. In fact, we reckon an underseat woofer is one of the all-time great audio mods.
Here’s what you need to know…

Step 1: Choose your kit wisely
Numero uno on your list is picking out which underseat woofer you’d like to install, and as always there’s a few things to look out for. It’s true to say that not all woofers are equal, and that’s both in terms of output, along with physical size and the technology they contain to make your life easier.
The Right Dimensions
First, you’ll need to break out the tape measure to check the dimensions of the unit verses the available space. In other words, the footprint of the woofer you choose needs to actually fit in the car you drive. It’ll surprise you just how many won’t!
For a start, not all floor pans are the same. Some vehicles have chassis reinforcement directly under the seats, or simply an uneven surface, these aren’t ideal for underseat woofers as you need to fix them down relatively securely. You don’t want the box flying out from under the seat or flapping around when you’re on the move, right?
Preserving Leg Room
Second, think about the legroom for rear seat passengers. Granted it’s not much of a problem in any 2-seater, like a Mazda MX-5 or Honda S2000, but in most hatchbacks and sedans you’ll need to ensure that you can tuck the whole underseat woofer out of the way to prevent it being kicked about by your mate with the size 13s. Underseat – the clue really is in the name there.
Aside from the length and width of your new woofer, you’ll also have to take note of the height. Again, some car seats are mounted lower than others, so you need to make sure there’s room for the seat to move back and forth without any issues. Don’t forget that that modern cars nearly always have airbags in the seats and electronic seatbelt tensioners, too. More often than not the factory harness that connects all these up can be right in the way. The same goes for factory air vents (you don’t want them blowing hot air all over your woofer) and all sorts of electric modules for electric adjustable seats. You need to check out all of this before you even consider shelling out your hard-earned cash on a new woofer.
Head Unit Compatibility
Finally take note of the head unit you already have in the car. This comes into play when you come to wiring in your new sub. Most good quality underseat woofers come with the option of both low- and high-level inputs, but not all of them. You won’t have a problem if your car is fitted with an aftermarket head unit, as low-level RCA leads can be used to send the music signal to your built-in amplifier. If it’s a standard head unit however, you’ll almost always have to tap into the speaker outputs, so it’s important to check that your woofer supports this kind of high-level input. That said, it’s not a complete deal breaker, because you can buy a (High-Low) Line Level Converter for around $30/£25 these days, which do much the same job.
Need a little inspiration on what underseat woofer to choose? Just check out our full guide to the best underseat woofers of 2023.
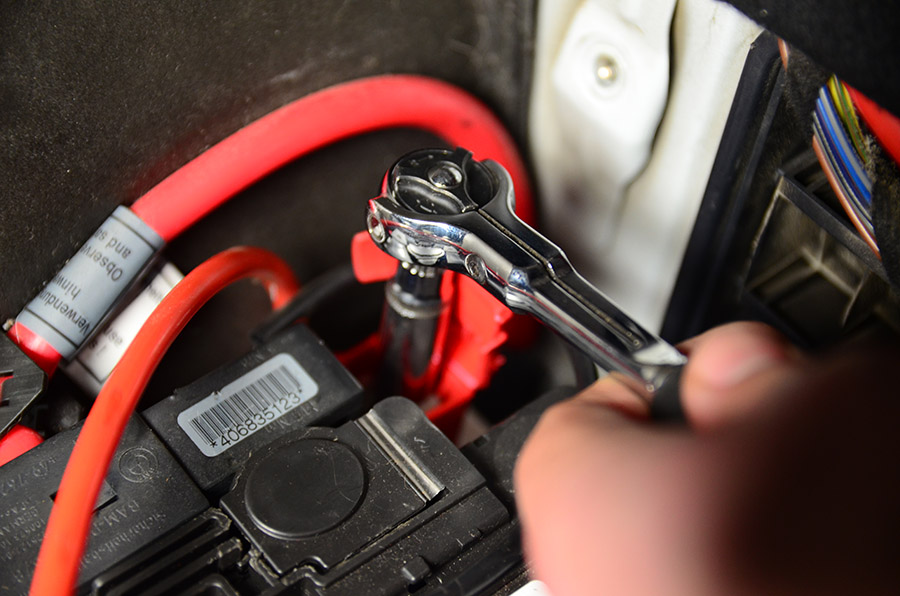
Step 2: Disconnect your battery
There’s a couple of good reasons why you should disconnect your car battery (and wait a few hours or overnight for any residual charge to fade) before fitting your underseat subwoofer. The first is because you’ll be accessing the rear of the head unit and you want to avoid either being shocked, or causing any damage to the vehicle. You’ve seen those gangster movies, right? You can get a hell of a jolt off of any car battery.
Second, getting an airbag in the face is even worse, and by no means heroic. On many cars you’ll need to take the seat out fully to do the job, so we always disconnect the battery to prevent any interference there. Got it? Good. Let’s move on.

Step 3: Make space
Speaking of seats, while on some cars (most often 2-door hatchbacks where the seats are designed with rear passenger access in mind) you can get away with sliding the seat all the way forward to get the space to install your woofer. In many cars there won’t be enough movement though, so if that’s the case you’ll need to unmount the seat and move it out of the way. As we said, in some instances you may even have to take the seat out entirely, disconnecting any factory wiring to enable its removal. That said, moving or removing the seat always tends to help with running the wiring harness for the woofer neatly under the carpet. Again, you don’t want this snagging or moving during day-to-day use of your car.
In most cases we’ll mount the woofer under the passenger seat because there’s less normally wiring to deal with in the front footwell on that side. Remember that you’ll not only be running a harness to the back of your head unit, but through to the battery, too. With the distinct lack of steering wheel and gauge, there’s almost always less factory wiring to contend with on the passenger side.
Step 4: Run your wiring
Power Circuit
As with any amplifier designed to have the sheer grunt to shift the relatively stiff cone on a subwoofer there’s two circuits that need to be connected. The first is the power circuit, which consists of the 12V positive power, negative earth and remote cables. The first two are pretty self-explanatory…
12V Positive
Because of the high current an amplifier will pull when the bass drops, the positive cable will go (via an attached fuse) directly to the positive terminal on the car battery. With this in mind you’ll usually have to run this under the inner door trims, behind the dashboard and through to under the bonnet. In most cases you’ll need to find a rubber harness grommet from the cabin to the engine compartment to poke your cable through, which is usually the fiddliest part of the whole job. Of course, you may be lucky, if you have a BMW, Mazda or the like, the battery may be in the boot, making life much easier. You can run your wire, but don’t connect it up to the battery just yet.
12 Volt Negative (Earth)
The negative earth wire needs should connect directly to the chassis, usually somewhere close to the amplifier like a seat bolt or self tapper.
Getting a good earth connection is as important as the power, simply because it completes the circuit. So, be picky when you’re looking for somewhere to mount it and, if in doubt, try to find a common earth where other wires connect to the chassis.
Remote (On/Off)
The remote wire, sometimes called the switch cable, is a little more complicated because it’s this that turns the underseat woofer on and off with the car stereo. Put simply, you need this one because you don’t want the amplifier drawing power all the time, only when the engine is running and the alternator is keeping the battery topped up. You’ll need to run this wire to the back of the head unit to match up with a 12v (out) positive, like the remote wire or the output for an electric aerial. If there’s an aftermarket head unit fitted this will usually be the blue wire on the standardized ISO connector. Unfortunately, on a stock car stereo wiring harness, these can be any color, so you’ll need to break out the multi-meter or wiring diagram.
There is some good news though, and it’s that many of the top underseat woofers use ‘signal sensing’ technology, so you won’t actually need a switch cable at all. Instead – and as the name would suggest – they sense the music signal when the stereo is turned on, and then automatically turn the built-in amplifier on or off. Clever, eh? This also makes instillation so much easier.
For more on head unit wiring, and how to decipher what’s what, check out our full guide – How To Install A Car Stereo.
Music Signal
The second crucial circuit is for getting the music signal to your underseat subwoofer. No matter the type of input, the harness will need to be run to the rear of the head unit. You can run yours in various different ways – like under the inner door trims and glovebox, or up and under the center console – but basically you’ll want to find whatever is the easiest route for you and your particular car. Just make sure they can be tucked away under trim and carpets where they can’t be snagged.
We’ve already touched on the differences between high-level inputs for standard head units and low-level inputs for aftermarket items, but the big difference here comes with the ease of installation.
A low-level RCA lead is a simple set of phono plugs that can be connected to an RCA output on the back of an aftermarket item at one end, and on the RCA input amp at the other. They even come with color-coded plugs to make life simple. For some head units that have multiple outputs, we’ll tend choose the rear RCA output or, even better, a dedicated subwoofer output.
High-level inputs however, need to be directly spliced into the speaker outputs. This not only involves connecting up 4-wires (normally to each of the rear channels – left and right positive and left and right negative speaker outputs) but you actually have to find the correct wires first – there goes that wiring diagram again, eh? It’s not a hugely difficult job, but it can be time consuming and fiddly. That’s why we’d choose plug and play-style low-level RCAs and aftermarket head units every time.
Step 5: Hook up and secure
Once you’ve connected all your wiring to the car, with the exception of the positive power wire on the battery (always do that right at the very end of the job), you can connect up the other end on your woofer. The good news here is that the vast majority of underseat woofers have simple plugs for each part of the circuit, so it’s just a case of popping those in, and you can get on with securing your woofer to the floor.
Now as we said, the woofer needs to be secure, but all you’re doing here is trying to stop it sliding about. You don’t need to bolt it down hard like some sort of roll cage or strut brace. Some underseat woofers come with posh brackets, but in most cases some sticky hook and loop tape will be all you need to stick it down to the carpet. Many underseat woofers will come with this stuff in the box. Sticking your box down in this way also great if you need to take it out quickly for any reason, and negates the need to start drilling mounting holes in your floor. After all, there could be all sorts under that that you don’t know about. Fuel tanks, wiring, brake lines – it’s not worth the risk.
Test
Before putting your seat back, or the head unit back into the dashboard we’d always recommend reconnecting the battery for a moment, just to make sure everything works. On some underseat woofers, which may not come with a remote control, this is even more essential to set up the gain levels and other features such as bass boost. Once you’ve had a good fiddle and you’re satisfied with the sound, disconnect the battery once more and you can refit your seat, head unit and any other trim. When you’re done, reconnect the battery one last time and it’s a job well done. Enjoy listening to your music as it was intended…


