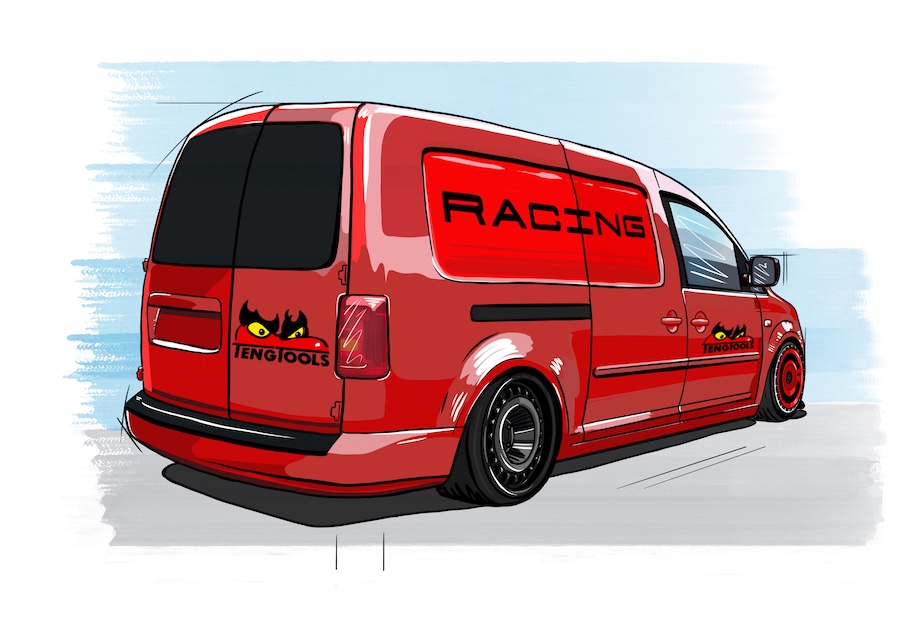
Welcome to the latest Performance VW project which, over the next few months, we plan to modify into a race support Caddy. Wish us luck…
Watch the latest video now…
Skip to:
Part 1; Part 2; Part 3; Part 4; Part 5; Part 6; Part 7; Part 8; Part 9; Part 10
Race Support Caddy Project (Part 1)
When Jules mentioned we were building our next project with Teng Tools, naturally I was excited at the prospect.
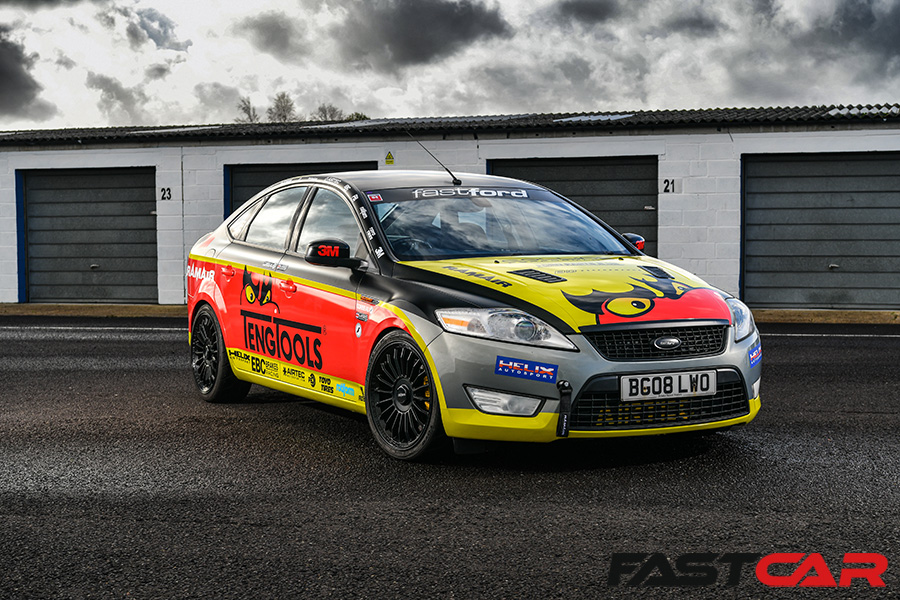
Having recently built a Touring Car rep’ with Fast Ford, I couldn’t wait to hear what they’d planned for PVW. And then Jules revealed it was going to based on a Caddy van…
First, we need to find one…
Let’s not get too ahead of ourselves, though. We still needed to find a base and I was a little bit worried about the budget we’d been given. So worried, that I decided to let Jules find us a‘decent’ Maxi himself. Meanwhile, I could work on a wish list of the parts.
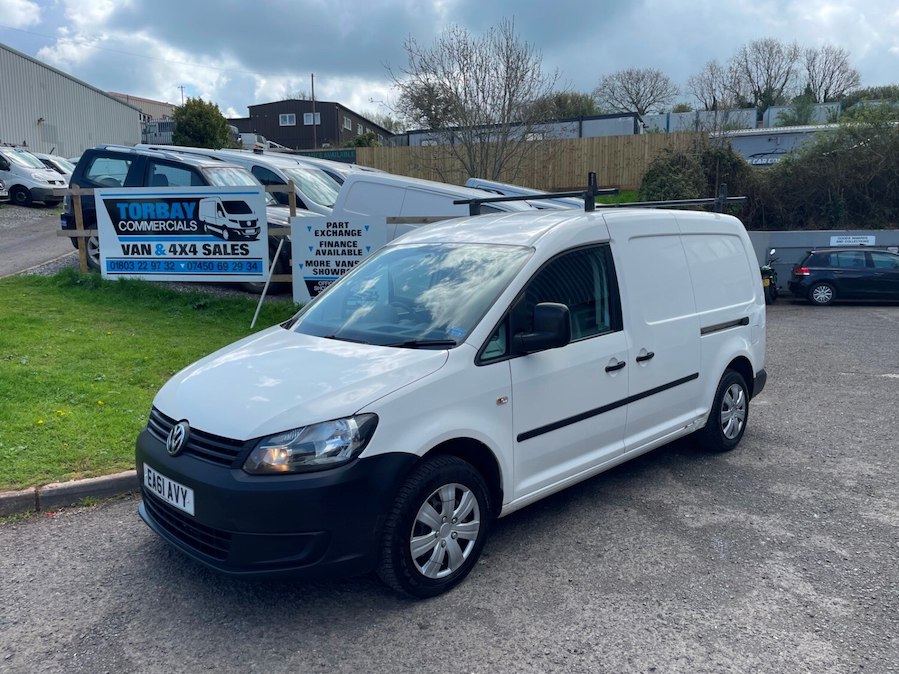
Jules soon discovered finding a Caddy for sale wasn’t the hard part as there are literally thousands. Locating the right one… well, that’s a bit harder. All I really specified was that it had to be a TDI, as the non-turbo versions are absolutely gutless. Air con would have been nice, too, but we needed to be realistic.
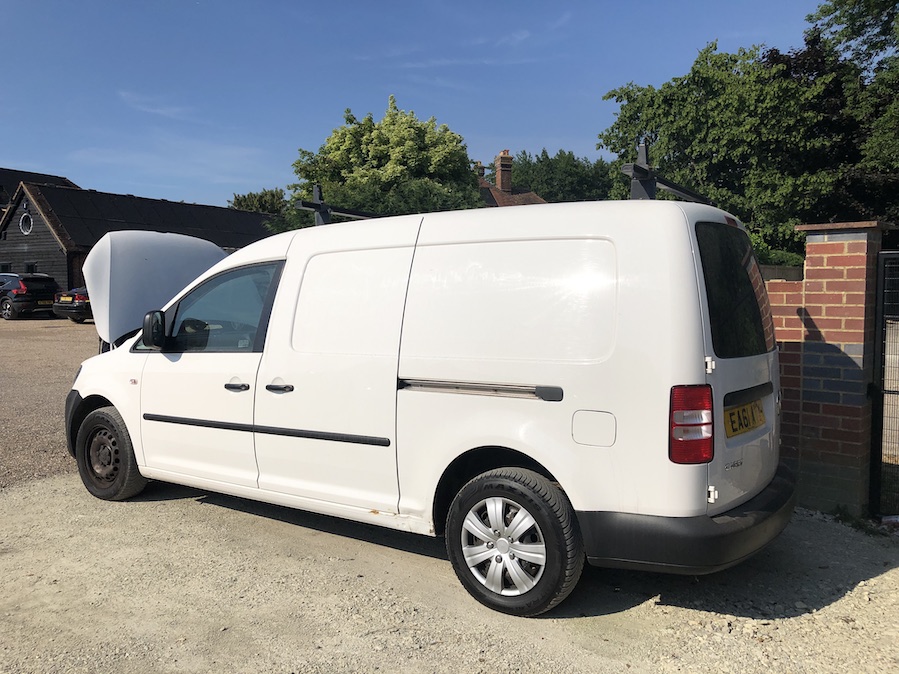
It’s already broken…
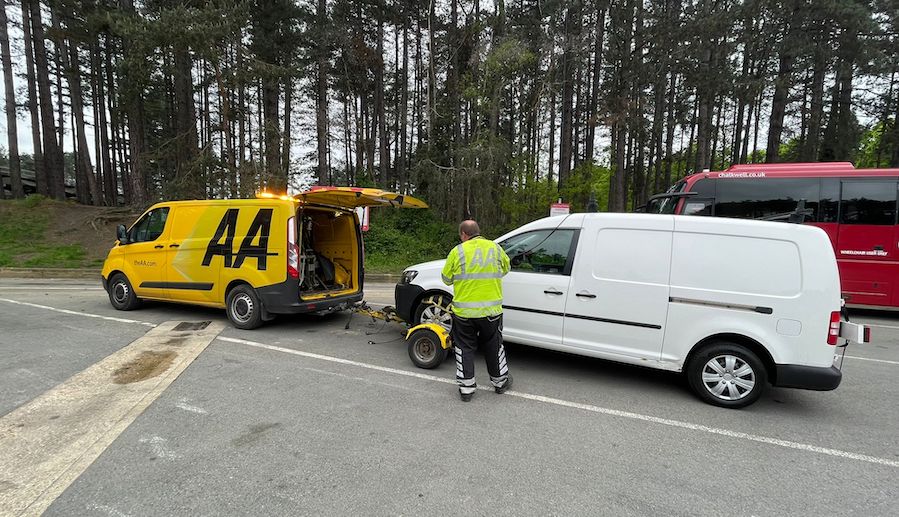
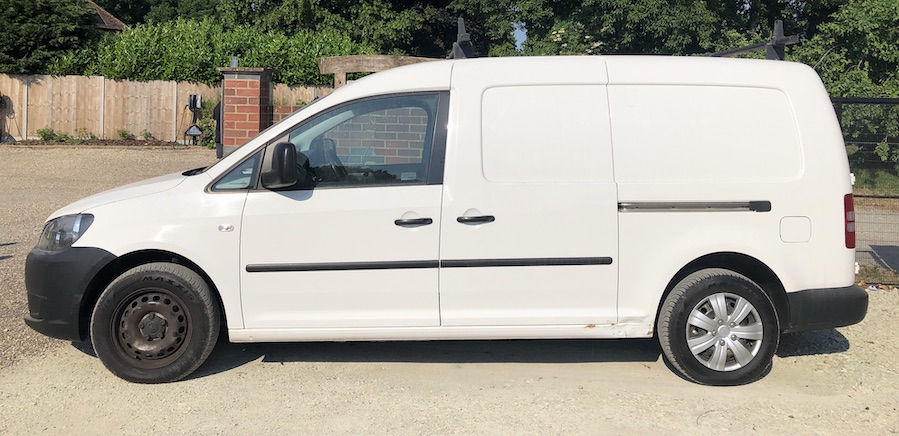
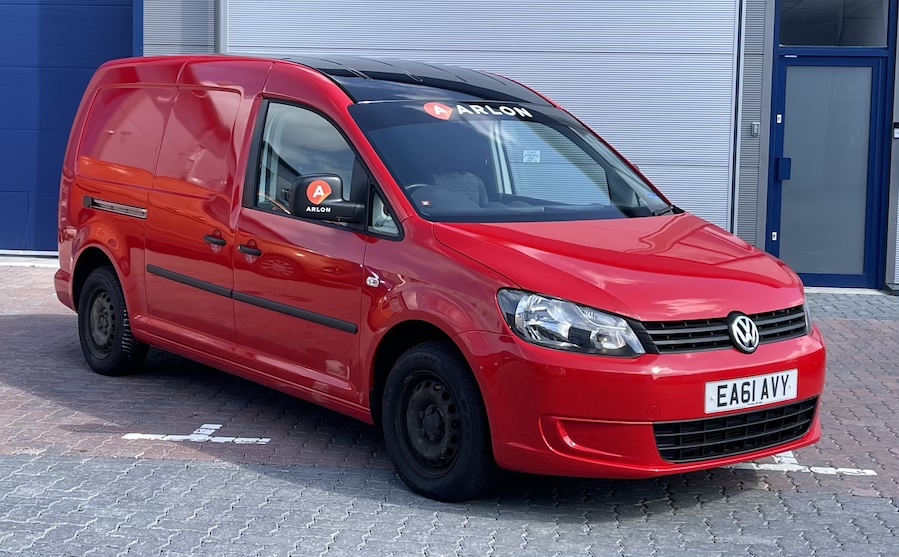
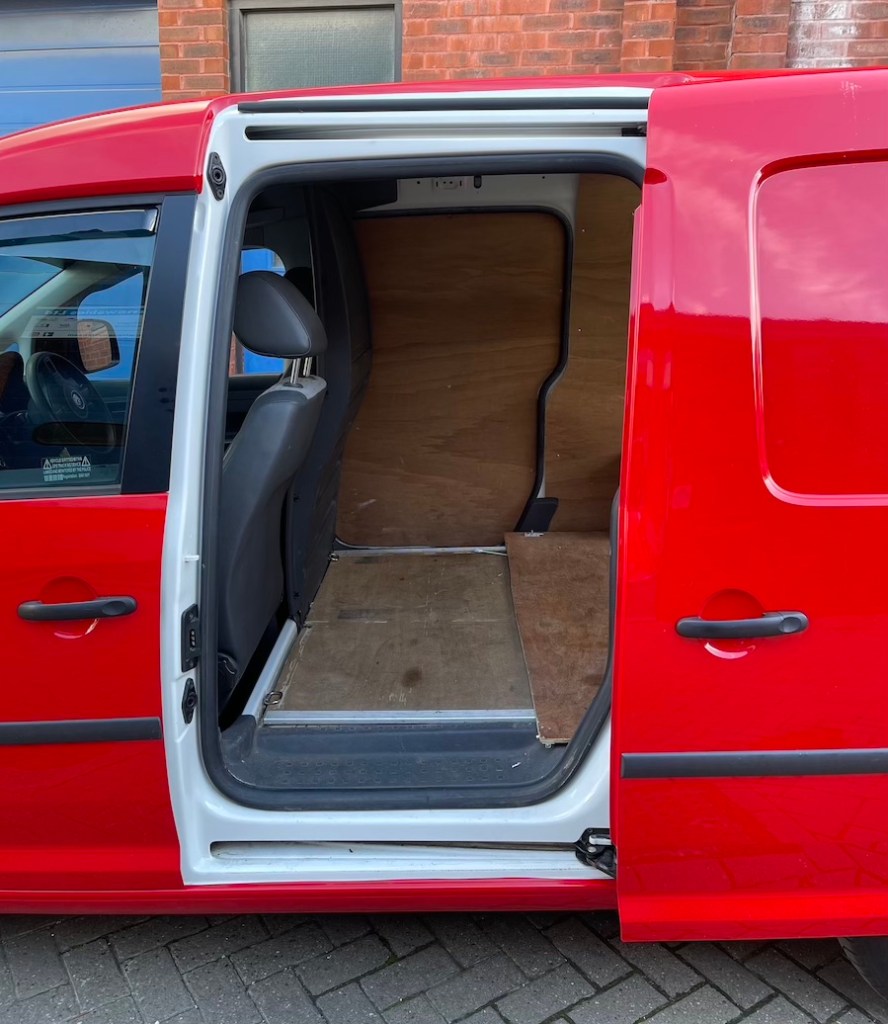
Eventually, after a lot of surfing, Jules found a pretty clean, white, 61-plate 1.6TDI Maxi that ticked all the boxes. Okay, so in hindsight, letting Jules go solo to collect the van from Devon was a bit mean. I felt even worse after getting a photo from him of ‘our’ Caddy at Fleet services… on an AA recovery.

Thankfully, the AA soon diagnosed the problem to be a faulty injector which is a common problem with the 1.6TDI. In fact, up until recently, the AA used to carry spares with them. Sadly, they no longer do, so it was a slow journey back to Kelsey’s HQ in Kent for Jules. Hopefully it will be an easy fix, though.

Next time…
Tune in next time where we’ll talk you over our plans for the build. Hopefully, we’ll also have an artists impression of what it might look like. We’ve got TV’s Helen Stanley to thank for that. See you then…
Race Support Caddy Project (Part 2)
We’ve got ourselves a theme
Okay, so we might have used a bit of creative license when introducing our Project Race Support Caddy in our previous video. I’ll be brutally honest, I’m a car guy, not a van guy. That being said, after Jules mentioned the theme for our van was a race support vehicle, it didn’t take long for my creative juices to start flowing.
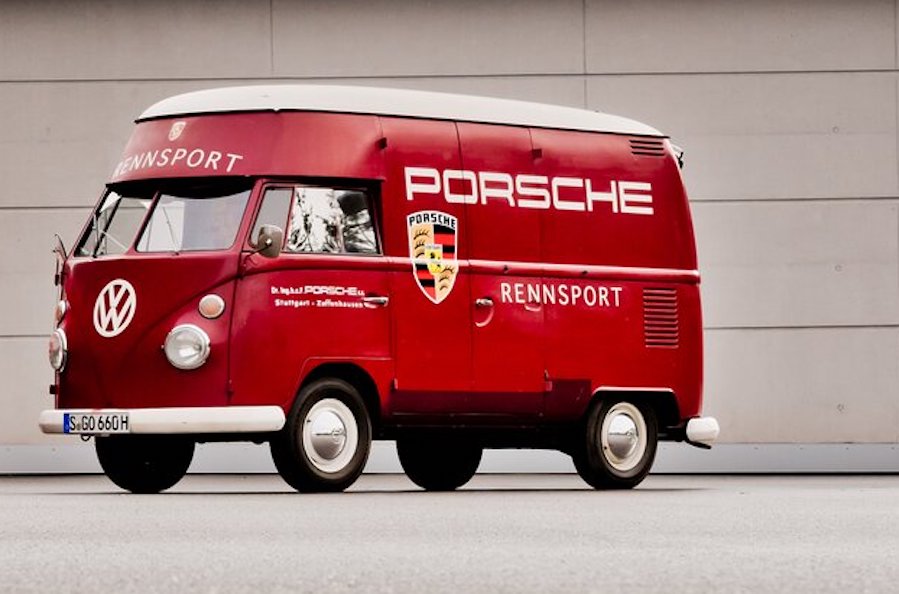
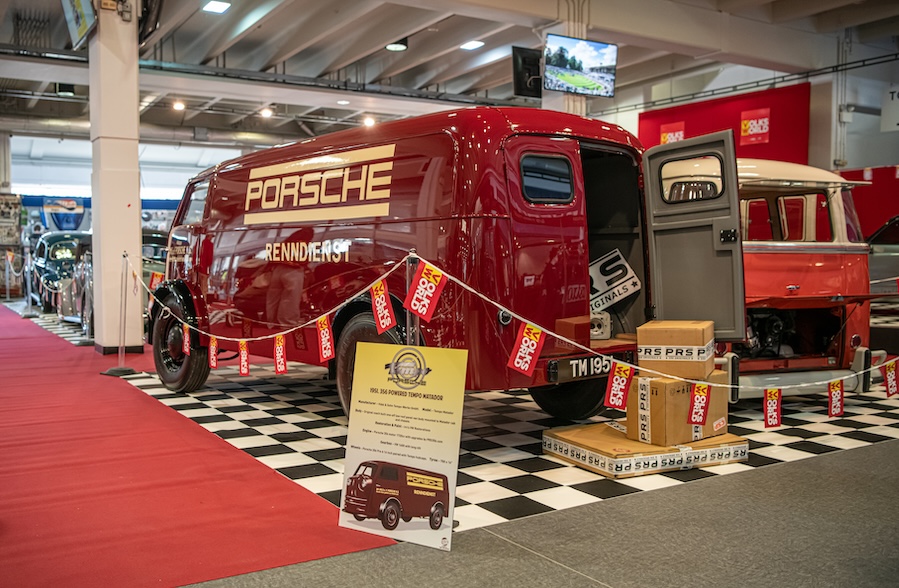
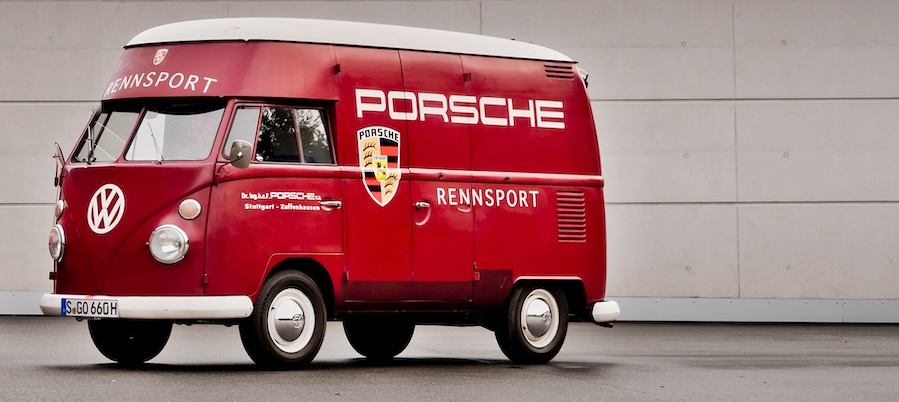
Firstly, Teng Tools’ branding is centred around a bright red base colour. This got instantly got me thinking back to the old VW T1 spit-screen ‘Rennsport’ (Racing) support vans that Porsche used back in day. These were all, you guessed it, painted bright red and looked instantly cool with their ‘Porsche Rennsport’ branding.
If it’s good enough for Porsche…
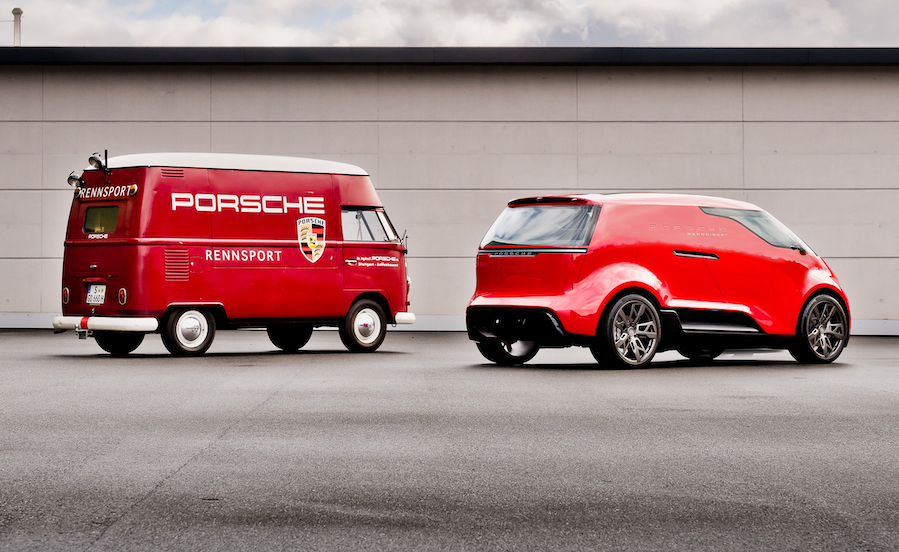
In fact, Porsche itself produced a concept EV MPV a few years back branded the Porsche vision ‘Renndienst’ (Racing service). This was loosely based on that same T1 support van.
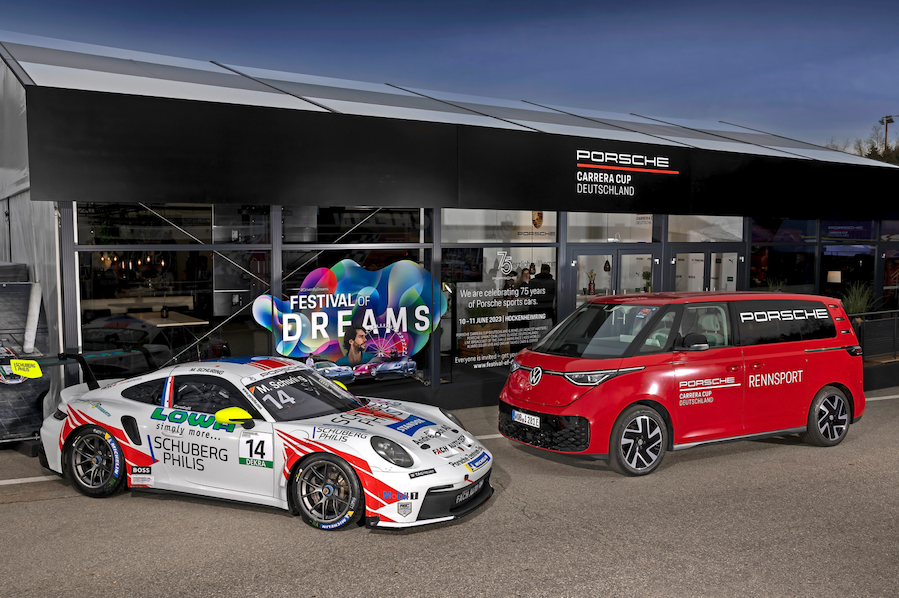
More recently, Porsche Deutschland also build a handful of ID.Buzz themed around the same Rennsport T1 van. These were created to support the German Carrera Cup teams. I figured if the theme was good enough for Porsche, then why couldn’t we adapt that idea for our Caddy project?
If the Rennsport T1 was red, though, and our Caddy was white, how were we going to colour swap it to suit? Were we looking at a full respray which would be both costly and time consuming, or did we have something else in mind? Tune in next time to find out…
Race Support Caddy Project (Part 3)
The masterplan
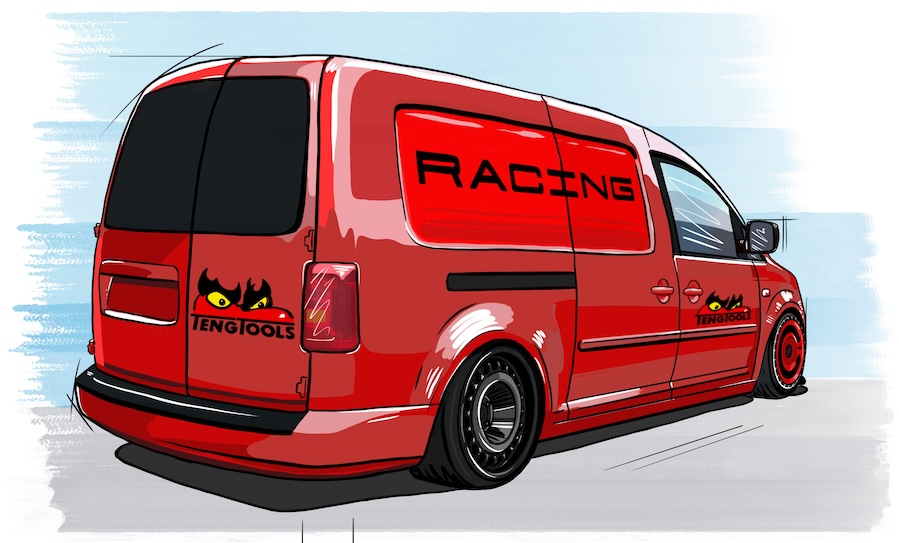
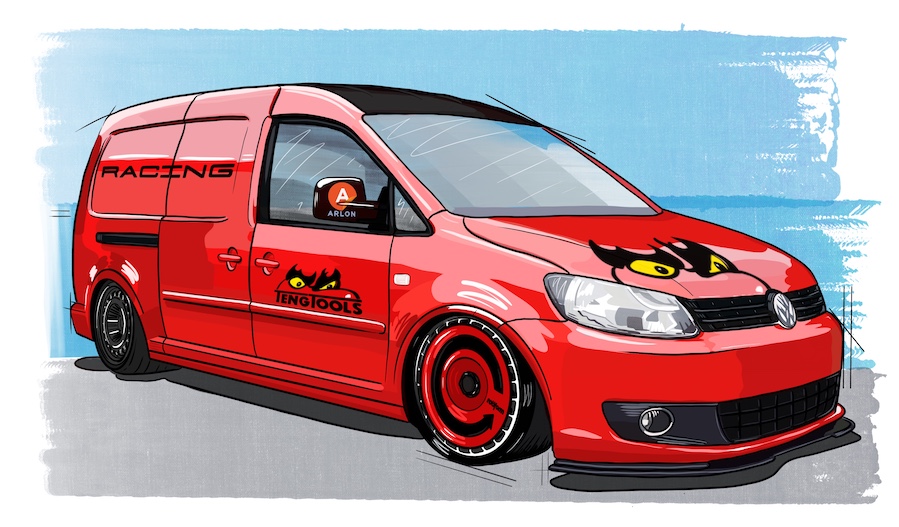
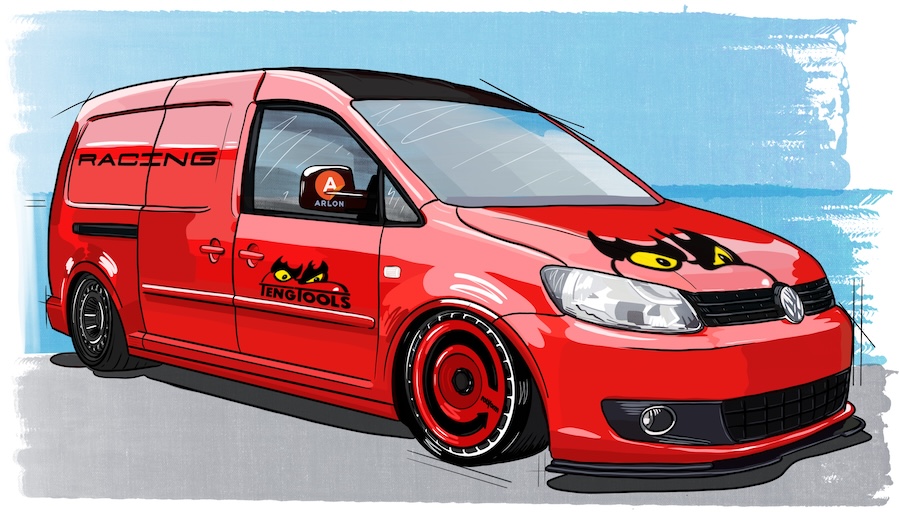
After sending her a bunch of ideas as inspiration for our Project Race Support Caddy, Helen Stanley’s artist impression gave us a real vision of what our van could look like. Could, we said…
That’s a wrap
With a respray costing upwards of £3000 and our project being based around a sensible budget, we decided a wrap was the perfect way to change our van’s colour without breaking the bank. For this, Jules suggested we use Arlon’s fantastic Premium Colour Change material featuring its FLITE Technology. This basically enables fast, easy installation, excellent repositioning and clean removability.

Red or dead
Basically, when it comes to wrapping film, this is as good as it gets. And when it came to choosing a suitable colour, laying one of Teng’s bright red tools over the Arlon colour-swatch drew our eyes straight to the Gloss Red (401) shade which, as far as we are concerned, is the perfect match!

Body moving
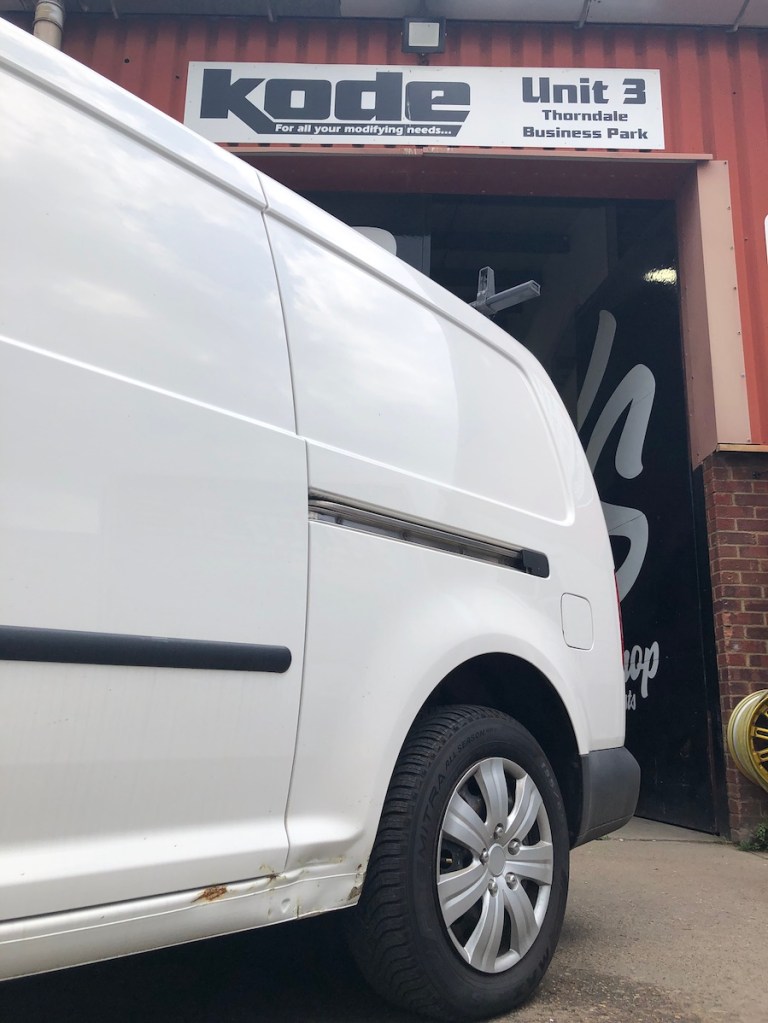
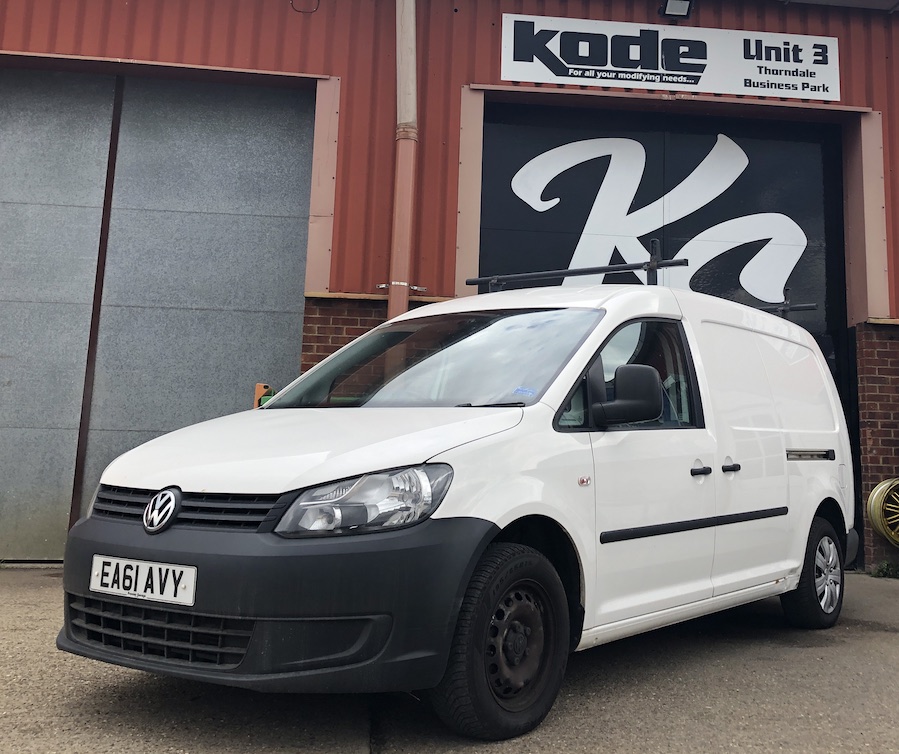
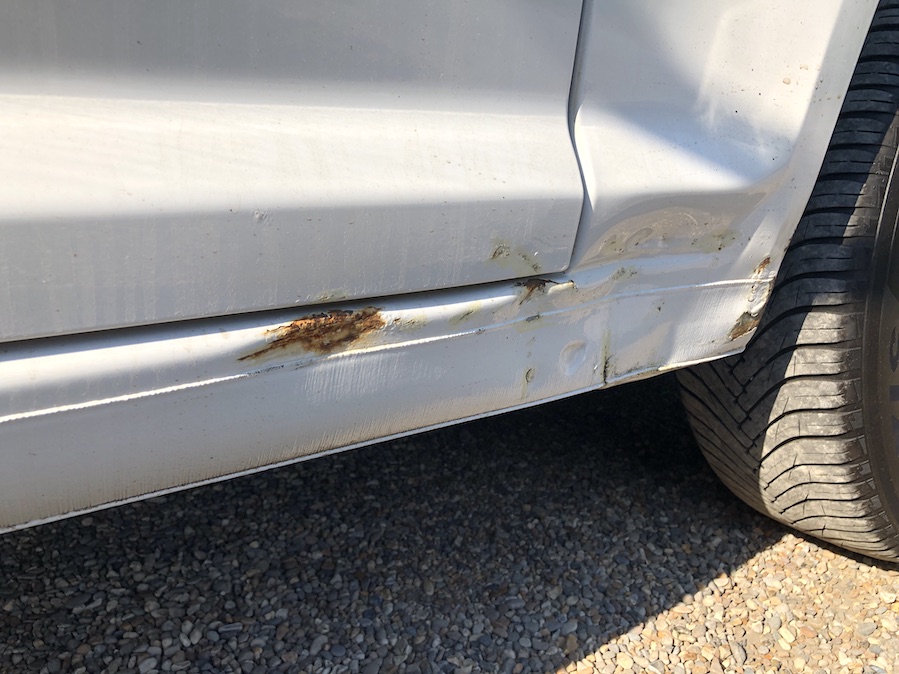
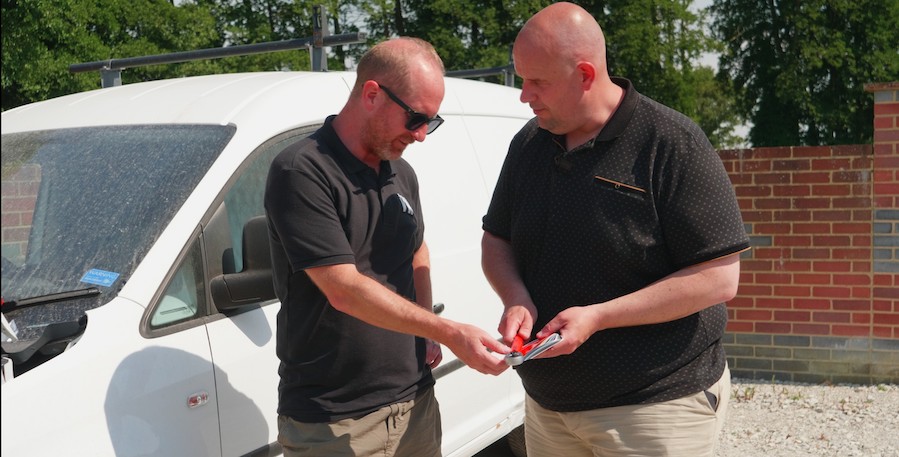
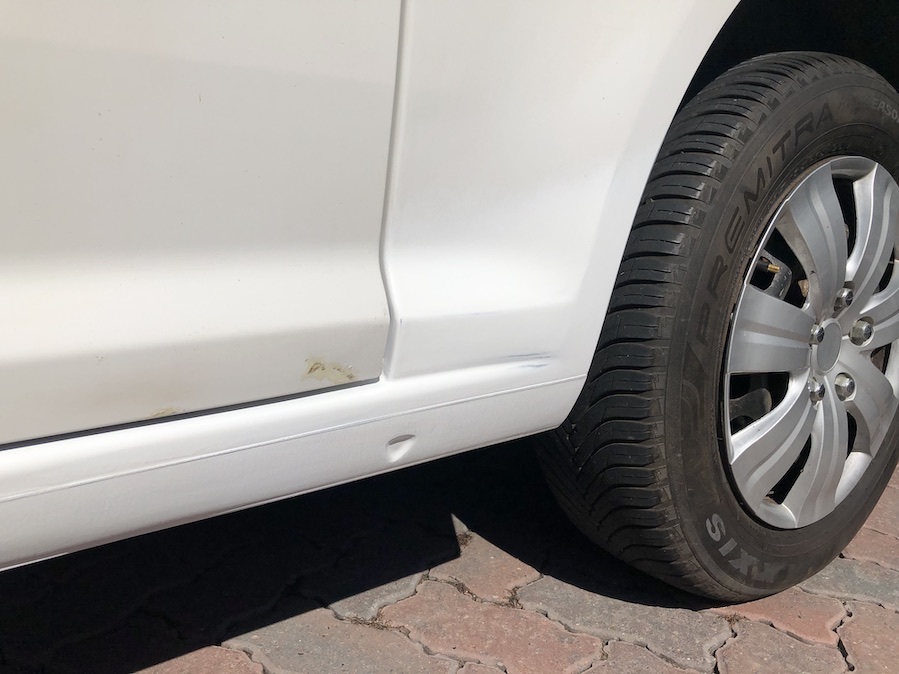
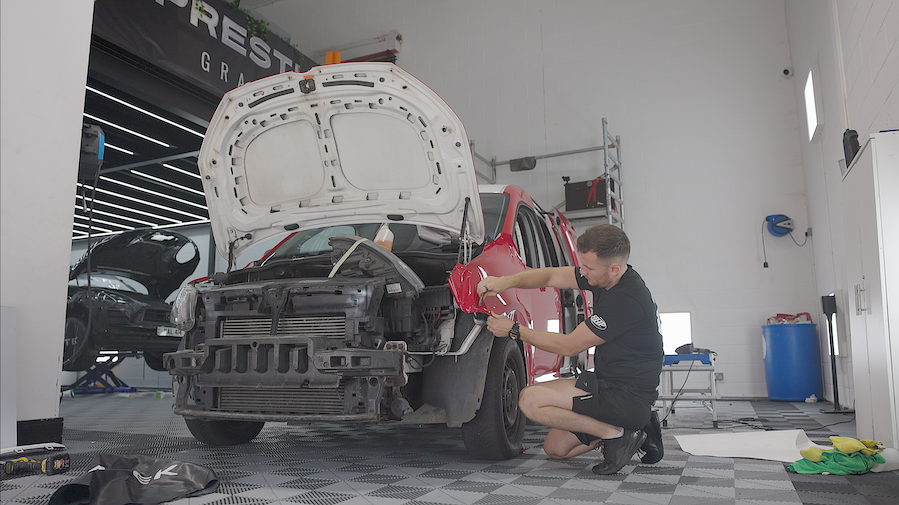
Before we could send the old girl off to be wrapped, first we would need to repair the slight damage to the rear of the near-side sill. We’d also need to fill any imperfections in the body that you would otherwise see once the van had been wrapped. When it came to choosing a suitable bodyshop, Midge suggested we take the Caddy to see Kwok at Kode in the Isle of Sheppey.
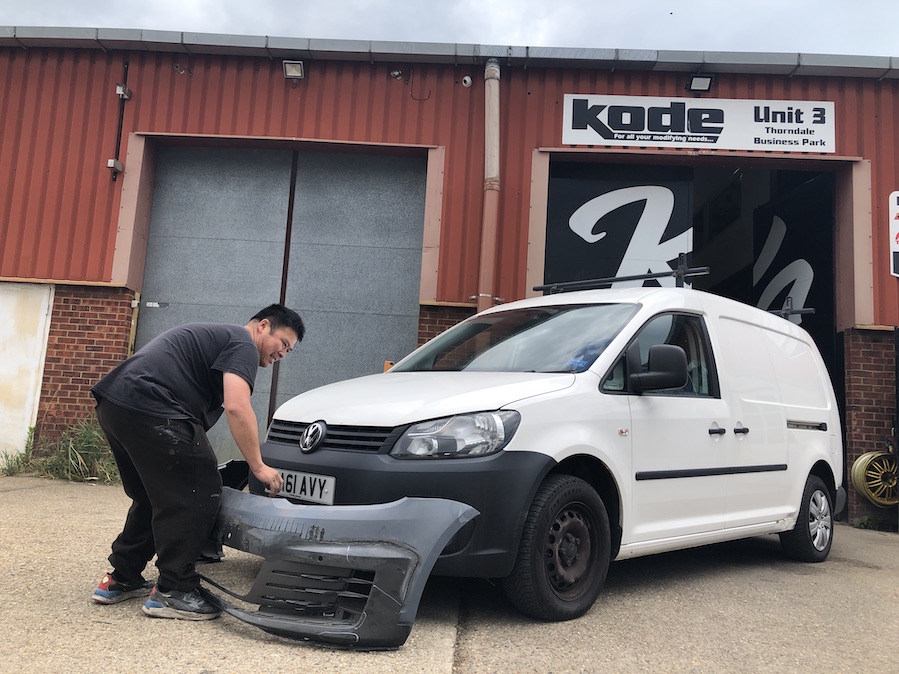
Not only is Kode’s bodyshop local to Kelsey HQ, Midge has also used Kwok for a number of previous projects. Nothing has ever been too much work for him previously. Kwok was quick to point out that on top of the repairs, we would also need to paint any textured parts of trim that we planned to have wrapped. And not just coat them with primer, but actually clear coat them, so the wrap would really stick to them.
Originally, we intended to stick with the original bumpers and just colour-code them to the rest of the wrap. Kwok had other ideas. He is currently trying to convince us to snap up the hybridMk6 GTI/Caddy bumper he’s halfway through building. It was started for a customer who then changed their mind, apparently. This would certainly look the part, but we are trying to demonstrate what can be achieved for minimal outlay. You’ll have to wait till next time to find out which way we go.

Race Support Caddy Project (Part 4)
Wheeler dealers
This month, we finally decided which wheels will be gracing Project Race Support Caddy. Initially, we favoured the new Rotiform STL, which is an 18, 19 or 20” wheel that looks like an over-sized steel. It’s actually an alloy that mimics the OEM pepper pot-style steels found on a lot of VW commercial vehicles.
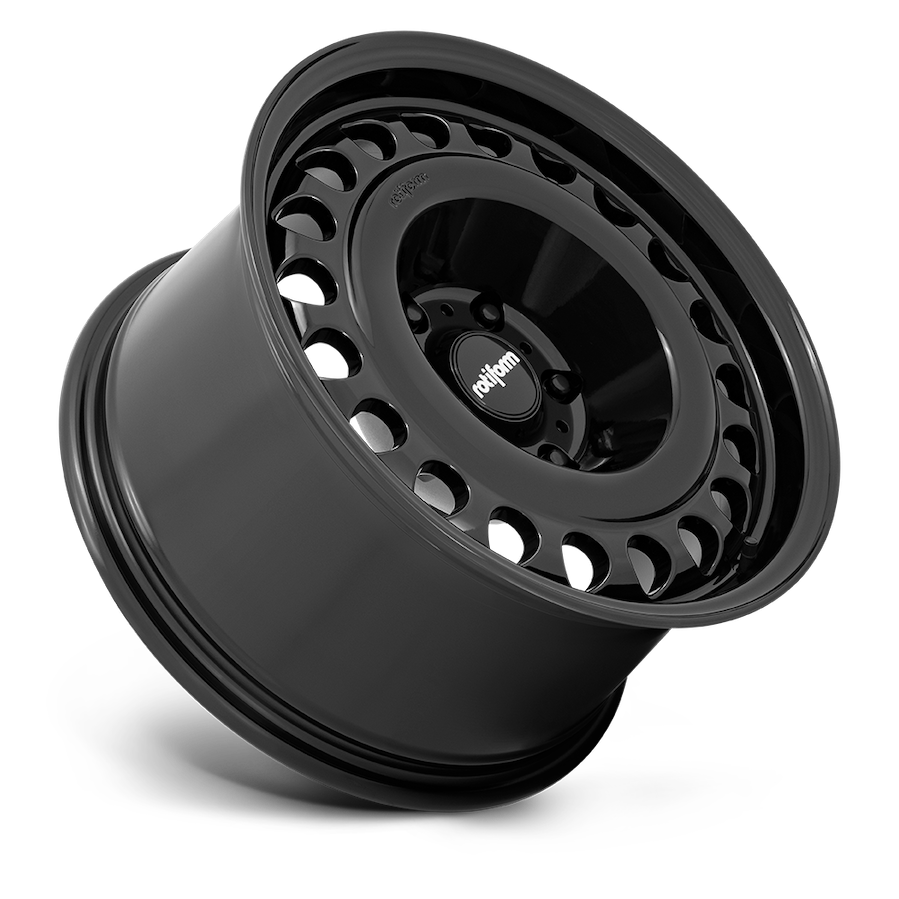
Back to the drawing board
Frustratingly, after speaking to Jay and Scott at Wheel Pros Europe (who import Rotiform into the UK) we soon realised this wheel wouldn’t fit the Caddy without major work as it’s not available in a 5×112. The other PCDs on offer don’t come in an adaptor-friendly ET. Back to the drawing board…
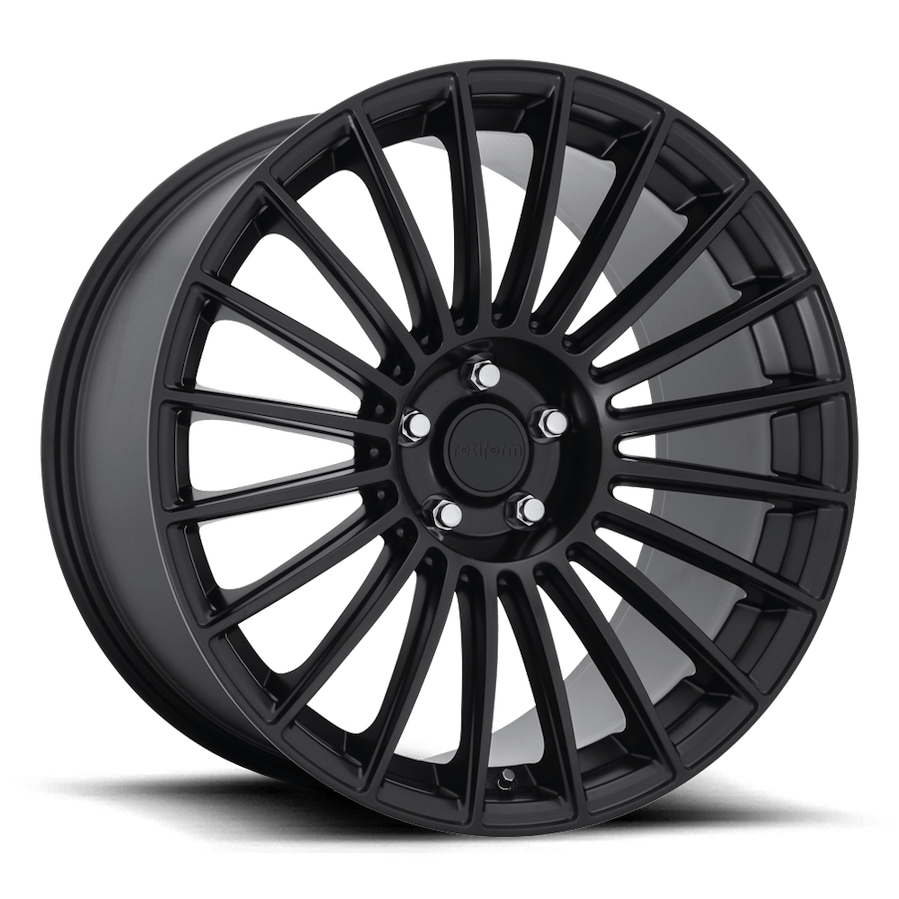
It didn’t take us long to find another suitable wheel from the Rotiform catalogue in its BUC-M model. Initially, we liked the clean lines of the regular BUC (above), but we decided it would be cool to run Rotiform’s futuristic AeroDiscs which aren’t compatible on the BUC. They do, however, fit on the BUC-M (below).
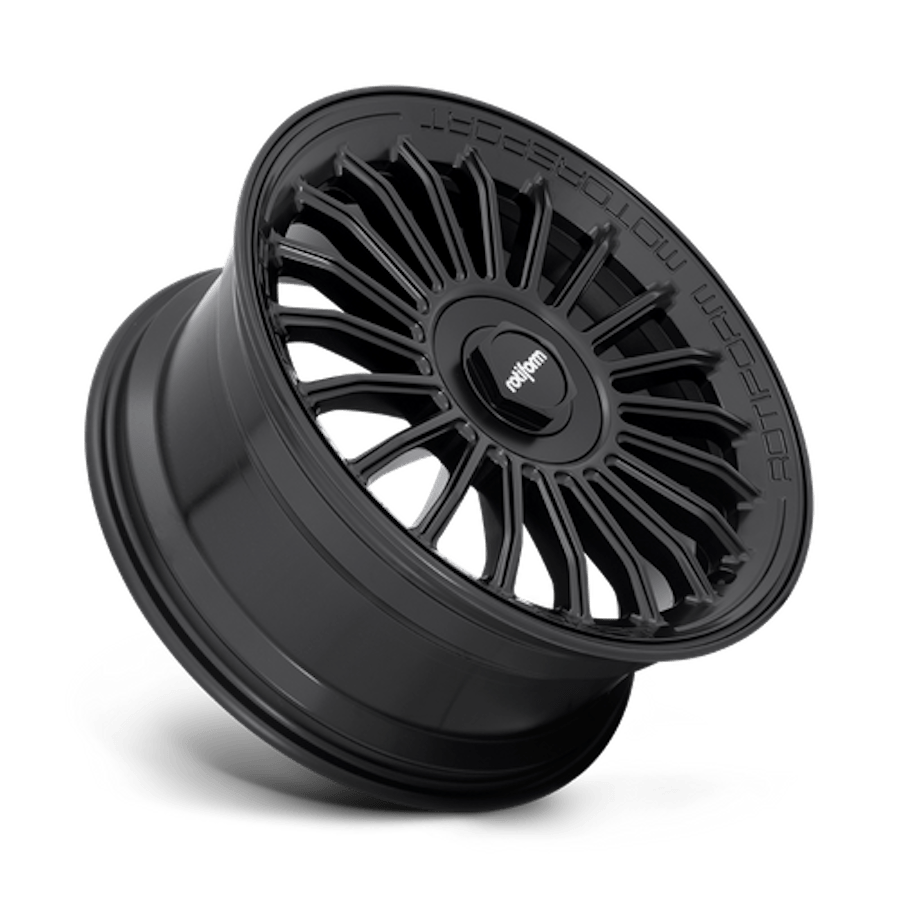
As it transpires, the ‘M’ model would actually be more fitting with our Race Support theme anyway. These have a deeper outer lip that also has ‘Rotiform Motorsport’ embossed into it. We only realised after making our minds up that these were actually the same wheels used on Fast Ford’s Rep to Racecar…
We ordered the wheels in black and also went for four black AeroDiscs, so we could pick and choose how we used them. At times we may want to run all four on the van, or occasional just have them fitted up front (like a lot of the old Group C cars did back in the 80s and 90s). It’s good to have a choice…

We’re also planning to have some sort of custom decals applied to the AeroDisc when the van is wrapped. Watch this space…
Race Support Caddy Project (Part 5)
This month we start to nail down the spec of the air ride for our Project Race Support Caddy. Choosing a solution wasn’t as straight forward as we had imagined. Still, exciting times…
Air suspension
Last time we went into a little bit more detail about the Rennsport T1 theme we had planned for our project. We also talked about how we intended to change the van’s colour from red to white. This time, we needed to work out how we were going to get our van, which was currently up in the clouds, considerably closer to terra firma. There was only one solution, in our minds…
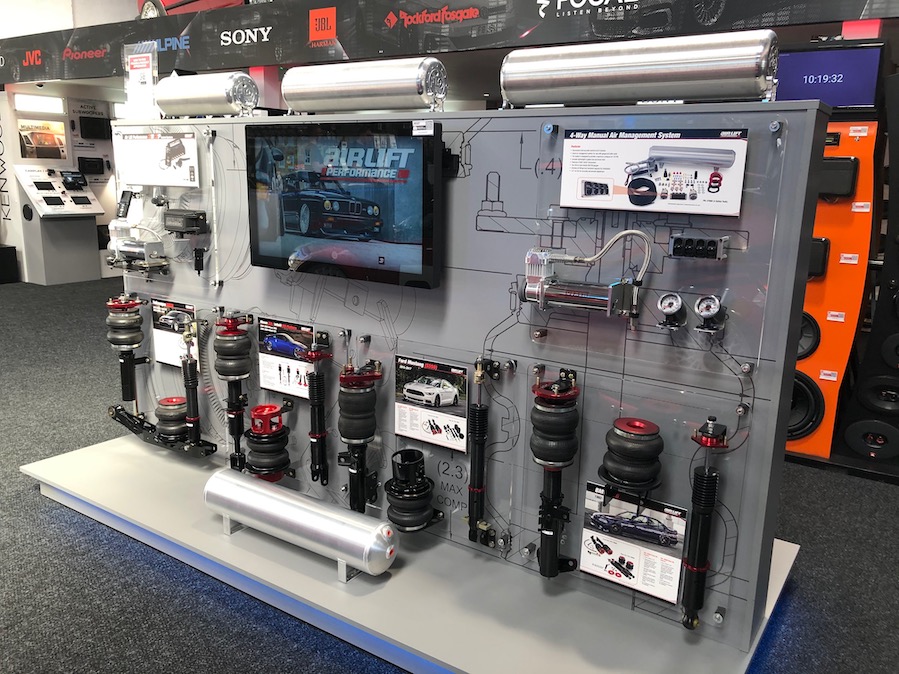
Firstly, Jules spoke directly with Air Lift Brand Manager, Mike Alexander in the States about the specific air ride parts we’d need. We’ve used Air Lift products on a number of past projects and it’s always been exceptional, both in terms of performance and value.
No problems, just solutions
The one slight problem we have is, Air Lift doesn’t produce a complete bolt-on set-up for the rear. The rear leaf-spring suspension on the back of the Caddy is something of a minefield, if we’re honest. Well, it used to be. After looking at converting the factory suspension ourselves, we decided one of the bolt- on axle-swap solutions made far more sense. This would certainly be quicker and a lot less work for our Midge, who already had his work cut out with the custom air install in the back.
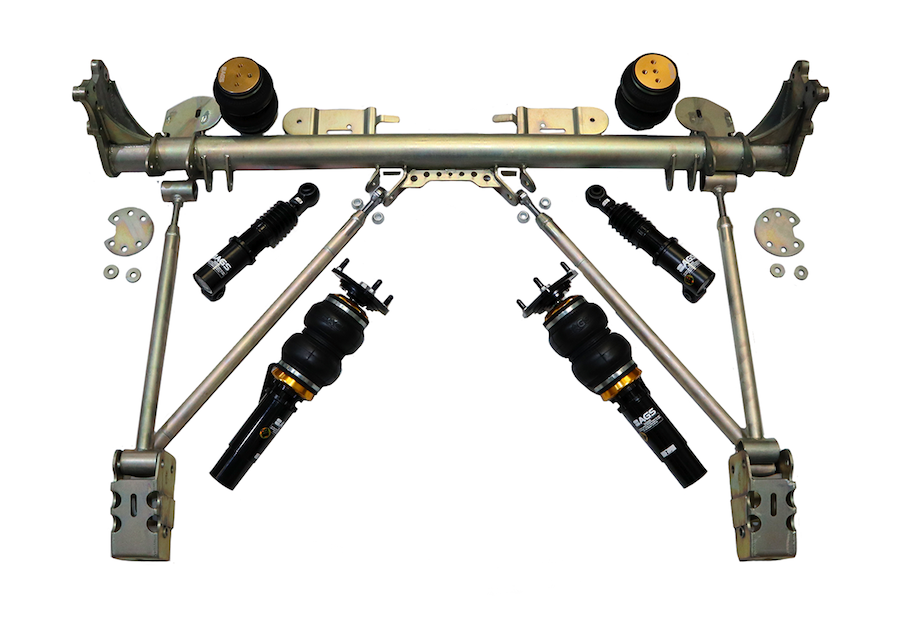
We’ve been drawn to Only Charged Dubs’s all-new four-link axle set-up (as seen above) produced specifically for the Caddy 2k. Not only is it a direct, bolt-on swap, but the axle is said to totally transform the ride of the Caddy. We’re contemplating using OCD’s BAGs rear bags, too, to keep the rear set-up totally uniform.
Midge is certainly excited at the prospect of using the OCD kit, but then the air install in the back of the van – attempting to utilise the compressors and air tank to also run a selection of Teng air tools from – is going to keep him busy as it is. We’ll be looking more at tools and tool boxes next time…
Back to the Air Lift products, we discovered we’d need to measure our front struts before ordering our dampers as Caddy 2Ks came with 50mm and 55mm legs. At least this gave Midge the excuse to break out his calipers of death (don’t ask) to measure them. Ours are 55mm. Apparently the calipers don’t lie…
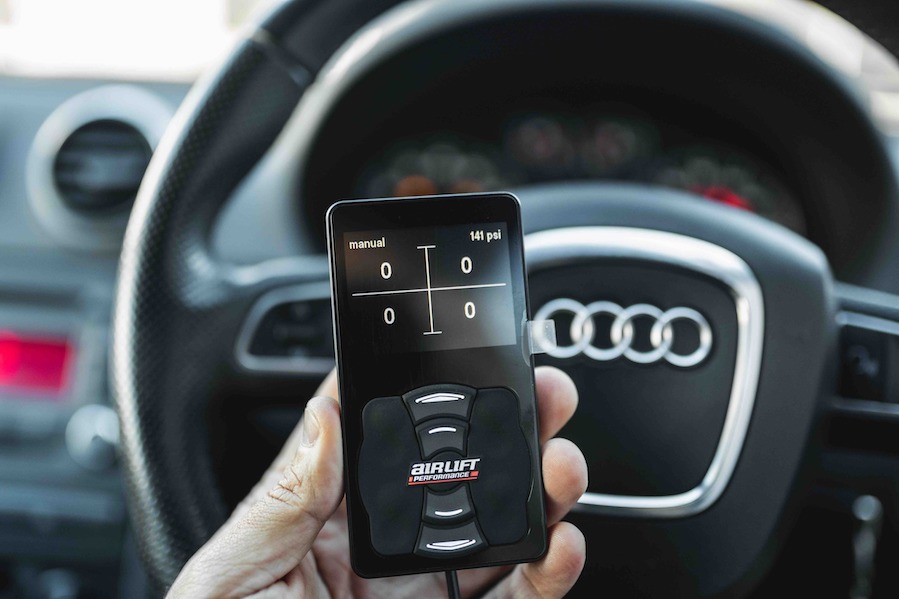
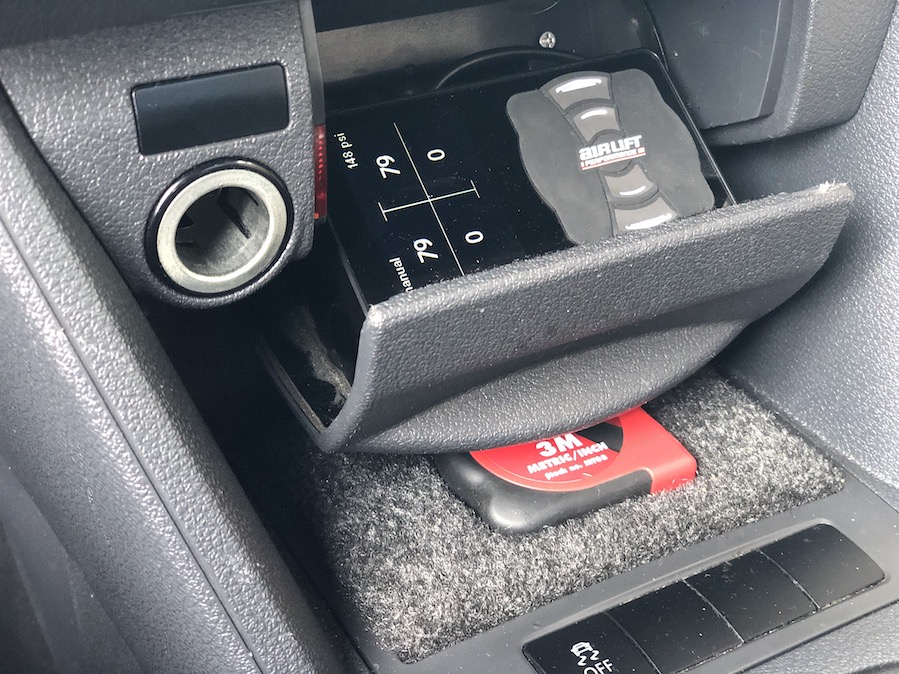
As for management, we’ll be opting for Air Lift’s 3P system, which is the simpler pressure based set-up, which would be perfect for us.
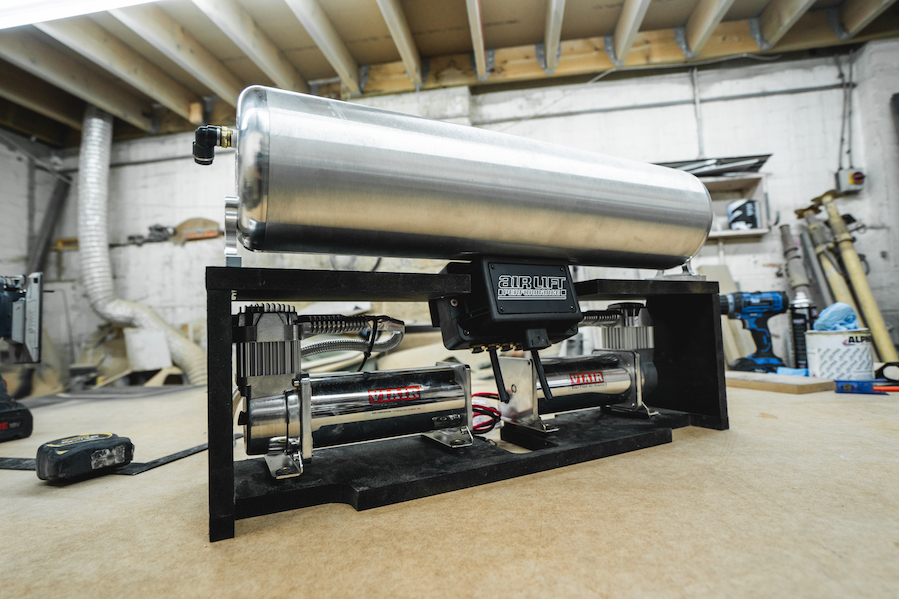
As it’s going to be on display for all to see, one of Air Lift’s FLO air tanks (as used in our Project Don’t Tell Mom), along with a pair of compressors should finish things off a treat. Below you’ll see the set up we used previously…
Race Support Caddy Project (Part 6)
With the air suspension ordered, it was now our chance to sort the bodywork on the Race Support Caddy Project, prior to its wrap. We would also need some tyres, too, so we called in ours friends at Toyo for some advice.
Body moving
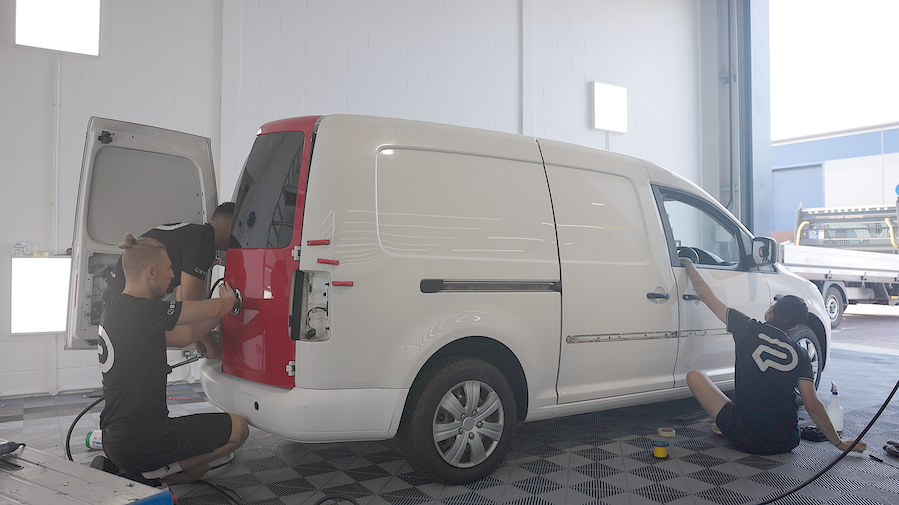
When we dropped our van at Kode for Kwok to work his magic, we assumed he would just be repairing the sill and sorting out a couple of dents. Little did we know there was more to prepping vehicles to be wrapped…
We soon discovered, though, that there’s far more prep involved in getting an old vehicle ready for a wrap. Especially if it’s seen a bit of action like our Caddy. Obviously, wrapping new or later cars means far less preparation is needed.
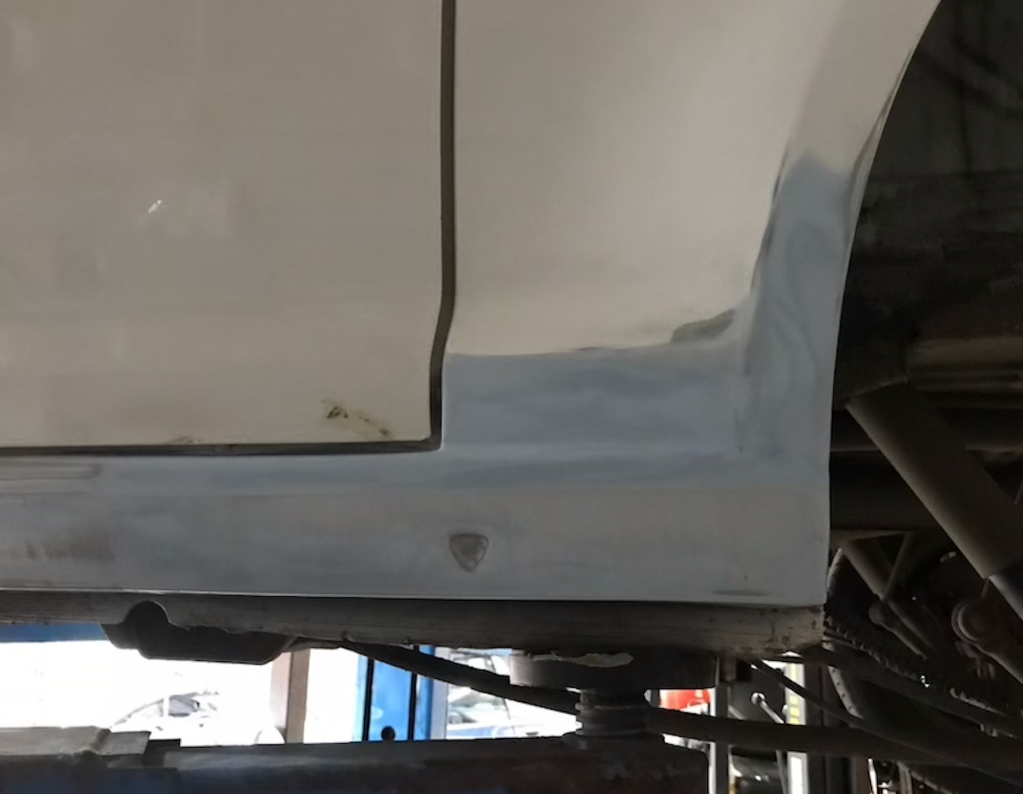
Not only do any paint imperfections need to be sorted at the bodyshop beforehand. We soon discovered any textured parts we wanted wrapping would need a clear coat in order for the wrap to stick properly.
While we originally thought about colour-coding all the textured trim, we later decided to only cover the bumpers and grille, leaving the other trim parts textured to help with contrast. As you can see, Kwok made quick work of the bumpers and sill, so we’re now all ready for the wrap. We’re getting there, slowly.
Rubber fetish
While Kwok was sorting the bodywork, I got on the phone to our friend Barry Vango at Toyo Tires UK to talk, you guessed it, tyres. Now, when people usually change their rolling stock, the focus is often on the wheels and the all-important rubber gets overlooked. Thankfully, that wouldn’t be happening in this instance…
While wheels may ‘Maketh The Car’, it’s actually the tyres that play a far more important role in keeping said car on the road and those inside safe. Decent rubber can obviously look good, too, but it’s usually the performance and what value for money the tyre offers that people are concerned about.
When it comes to performance, we’re usually concerned about the levels of grip offered in wet and dry conditions, plus how noisy (or quiet) the tyres are. Obviously, the levels of wear are also a major factor when choosing a suitable tyre. Personally, we’ve all have a great experience with Toyo in the past, hence reaching out to them now.
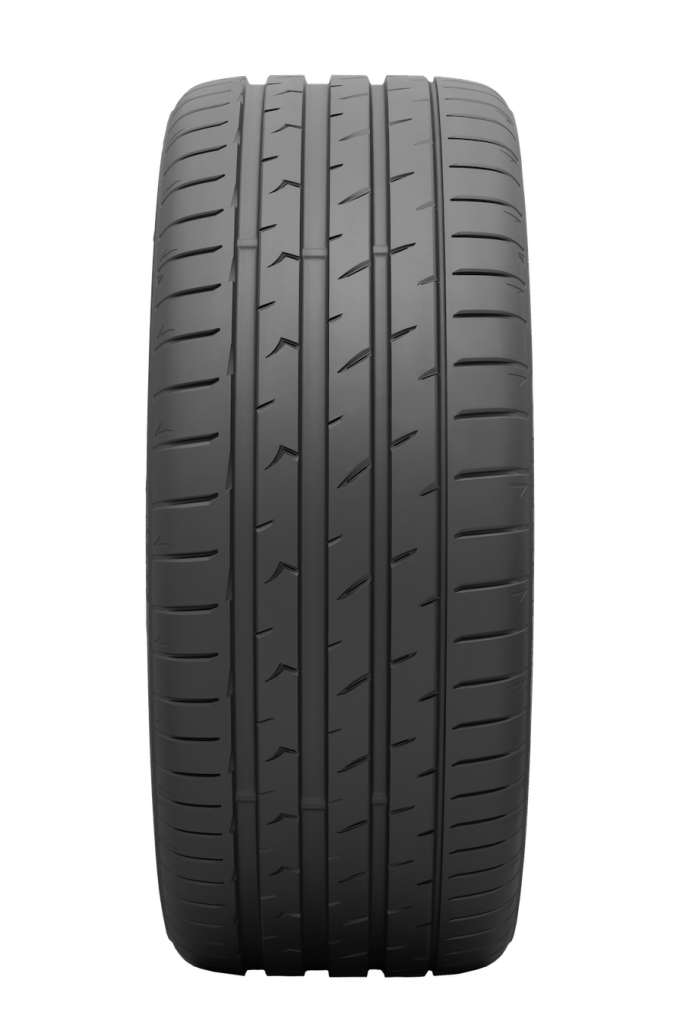
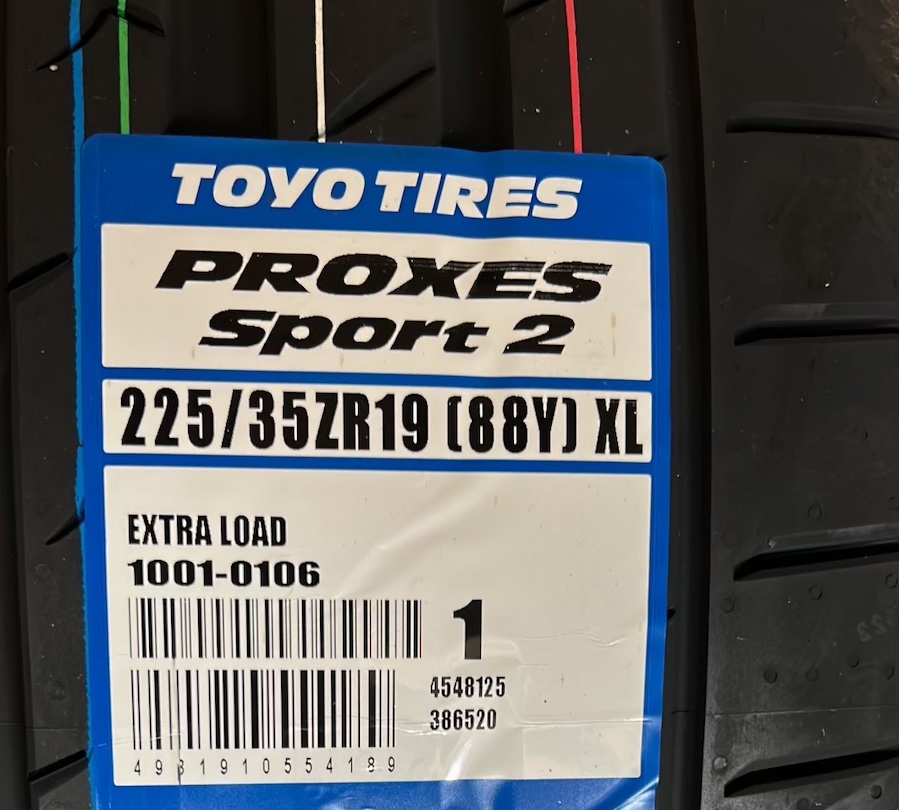
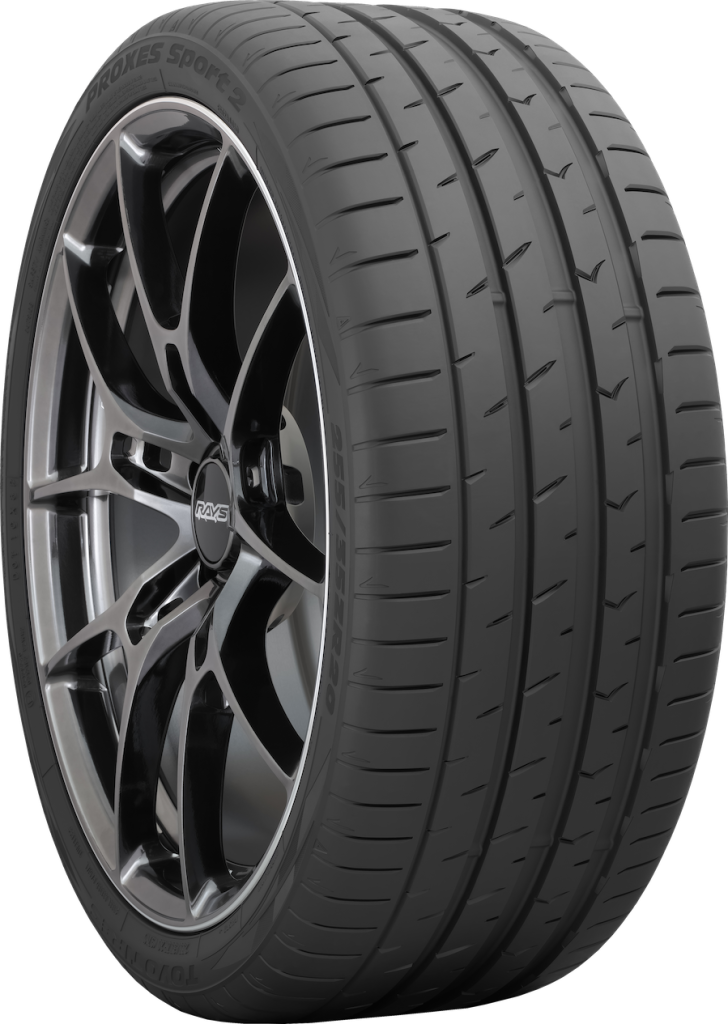
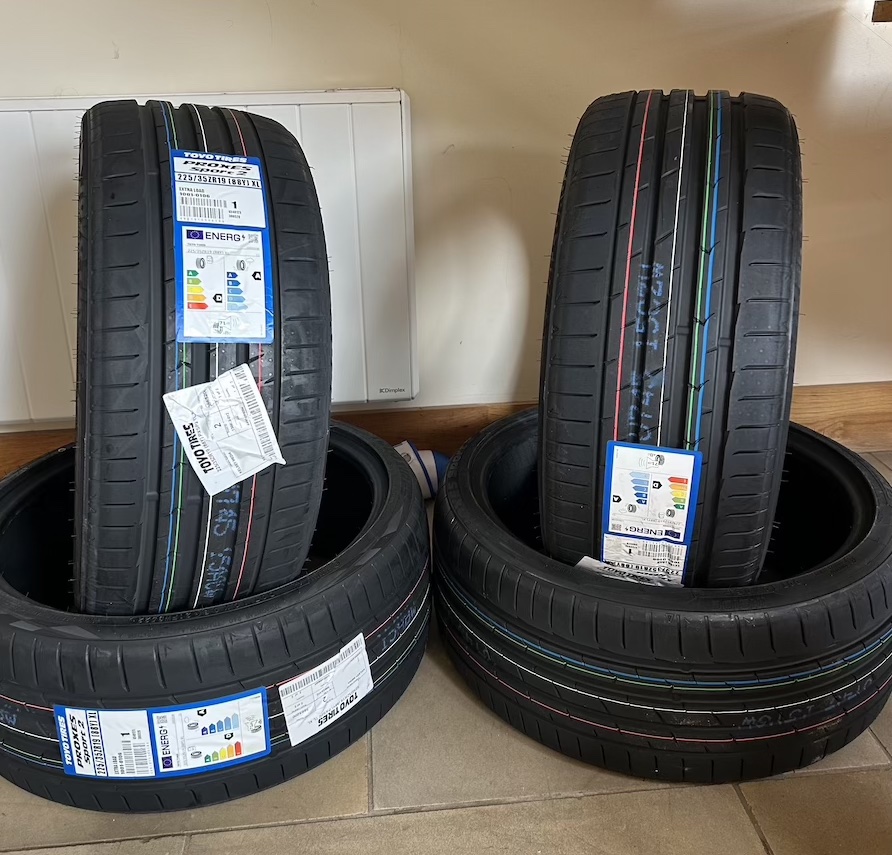
When we mentioned to Barry that we were after a 225/35 ZR19 which ticked all of these boxes, he came straight back to us with Toyo’s Proxes Sport 2 seen here. It’s not just a good looking tyre, but promises to be a great all rounder as well. We can’t wait to test it out soon. Read more about it soon, once we get the chassis upgrades in place…
Race Support Caddy Project (Part 7)
Once we’d decided a colour change was in order for our Race Support Caddy Project, there was only one solution that fitted with our ‘realistic’ budget. Yes, you guessed it – a full vinyl wrap.
Wrap superstar
When considering a wrap, there are three main factors to get right from the start. The first is not to skimp on the actual vinyl itself. Cheaper is definitely not better in this department, so be sure to select a high-end product to begin with. Thankfully, Jules already had this part covered having built up a strong working relationship in the past with vinyl producer, Arlon.

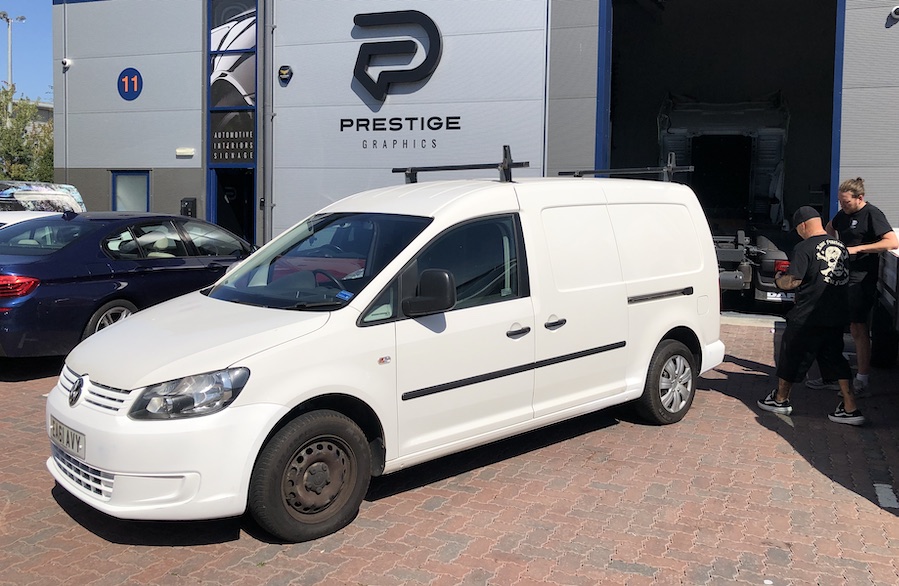
Secondly, it’s vital to find an experienced company to take care of the application process itself. After speaking with Ben Snowdon at Arlon, we were pointed in the direction of Prestige Automotive, based locally to us in Sittingbourne. Not only have Prestige been wrapping vehicles for over a decade, they also deal with all manner of vinyl applications. So, basically, it knows everything there is to know about applying vinyl to vehicles. Result!
Lastly, it’s important to ensure the vehicle you’re having wrapped is not only clean and rust free, but also free from any dents or bodywork imperfections. I guess two out of three wasn’t bad, right? Joking aside, we were aware our Caddy wasn’t the straightest or cleanest vehicle around, but then what did our publisher expect for £5000? That’s why we’d sent it off to Kode’s bodyshop beforehand to be prepped for wrapping.
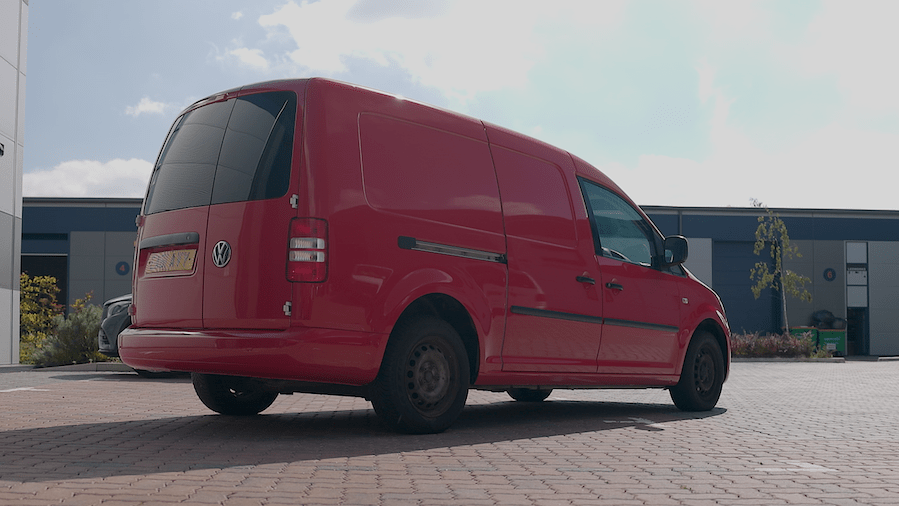
Red rum, red rum…
When it came to choosing a colour for our wrap we went with Gloss Red from Arlon’s Premium Colour Change (PCC) range. Thankfully, the colour is pretty much identical to the red shade that Teng Tools use. Also, PCC product features Arlon’s FLITE Technology, which enables fast and yet precise application. It also has excellent repositioning properties, clean removability (for further down the road) and even features a self-healing surface.

Prestige MD, Jamie Broughton was also quick to point out that another of PCC’s USPs is that it comes with a protective film in place. This ensures the vinyl arrives in perfect condition and can be removed just before application. It’s safe to say Arlon’s PCC ticked all of the boxes…
Easy life…
We were pleasantly surprised to hear that Jamie would be leading the application of our Caddy’s wrap. Jamie was proud to admit he’s been applying vinyl to vehicles since he was 17. Before any vinyl even leaves its packaging, Jamie told us that his team start the whole process by removing any parts of trim or light clusters that would otherwise get in the way. It’s far easier this way, rather than cutting around objects during application, and also leaves a better finish.

Once all parts have been removed, it’s then time to begin what is effectively a deep clean using fall-out remover, followed by a session with the clay bar. Not only will any imperfections show under the vinyl, so will any bits of grit or grime. The fall- out remover doesn’t just get rid of stuff you can see, but it also erases the stuff you can’t which might prevent the vinyl from sticking.
Race Support Caddy Project (Part 8)
After the prep work was carried out and various trim parts removed, it was finally time to wrap the Race Support Caddy Project. Thankfully, it was in good hands with Prestige Graphics…
New order
We asked Jamie at Prestige whether there was a particular order to the way vinyl is applied to a vehicle. He said that while generally they do try to start at the top and work their way down (in order not to scratch the surface you’ve just wrapped), it doesn’t always work out that way. Ultimately, no two vehicles or applications are exactly the same.
Easy as 1,2,3… maybe
For some reason, a lot of people think anybody can wrap a car and we’ll admit, at first glance the Prestige lads did make it look easy. I guess part of that comes with experience. Besides, it’s only as you watch Jamie and his experienced team move around the Caddy – getting to see the whole process unfold – that you begin to realise just what a skilled profession this is. Easy, it is not…
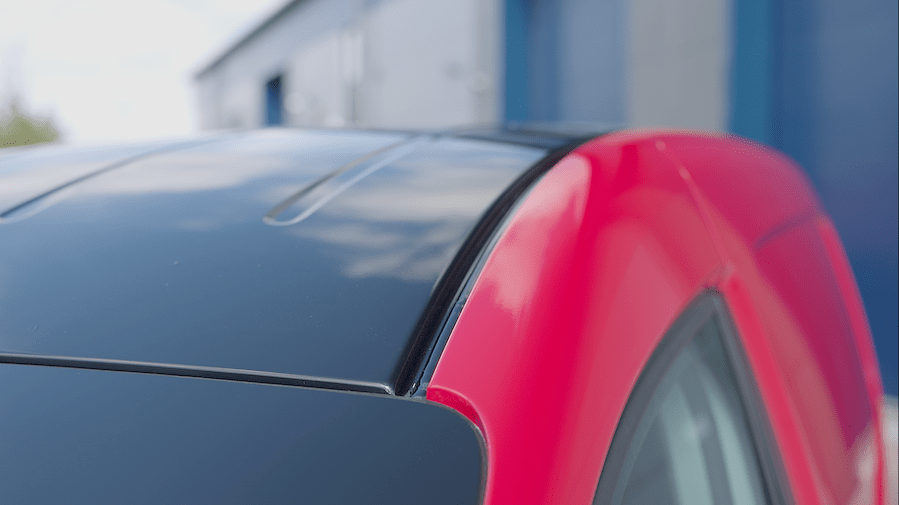
Back to black
It was surprising to see how quickly the Prestige team covered the bulk of the van, but it’s the smaller, more intricate areas that always take the time. We also slowed the process down a bit by deciding to opt for a gloss black roof – to break up the wash of red. We must say a huge thank you to Craig at Spandex for supplying the PCC black at such short notice.
True colours
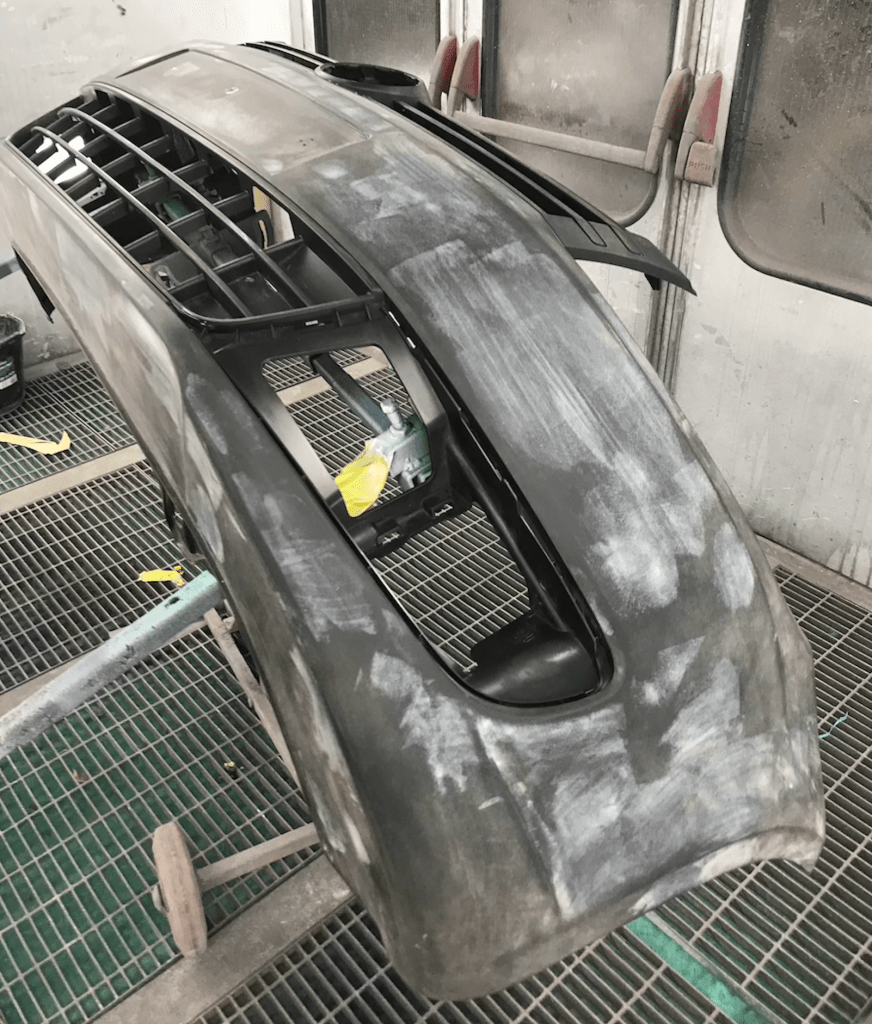
One small issue we did spot was that Kwok had been instructed to paint the front bumper and the integrated grille sections, so it could all be wrapped. The thing is, firstly the grille sections were so intricate that it would be almost impossible to wrap them perfectly. Secondly, it would look terrible colour- coded anyway. So, Midge quickly ran off with the front bumper to get the upper and lower grille sections painted in satin black. Nothing like a bit of last minute pressure, right?

Back on track
On arriving back at Prestige the following day, the guys had made quick work of the wrapping process and the Caddy was coming back together. While Jamie grabbed the bumper to work his magic on that, the Arlon logos were applied to the door mirrors. These were printed on hi-tac vinyl in order for them to stick to the textured plastic.
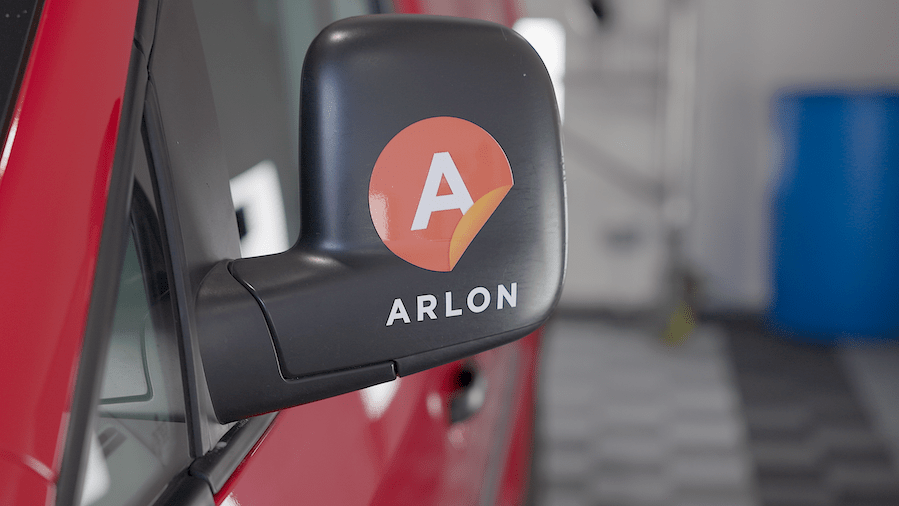
On the down low
An Arlon sun strip was also added, but we’re leaving the other Rennsport decals and sponsor logos until the rest of the modifications are finished. We don’t want to give everything away this early in the build.

Shut that door
It’s safe to say the transformation really is incredible and the quality of application is second to none. Our only small regret was choosing not to have the door shuts wrapped in order to keep the cost down. It’s worth noting that while wrapping can be a cheaper alternative to a full-on, high-end respray, it’s imperative that you buy a quality vinyl and choose an established company to apply it..
Somebody got wind?
This really isn’t a cheap DIY process! Since getting the van back, Midge has fitted a gloss black wind deflector along the front leading edge of the bonnet. This helps further enhance the van and give it a slightly more aggressive facade – not that it will need too much help once the air suspension and wheels go on shortly. Watch this space…
Race Support Caddy Project (Part 9)
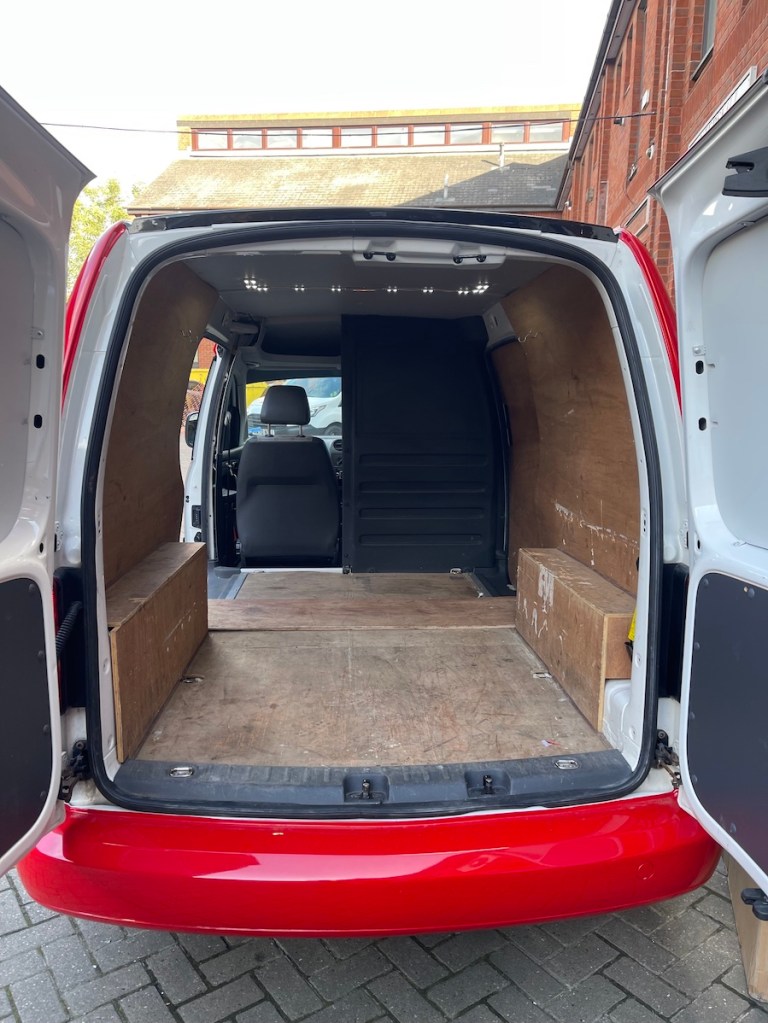
With our wrap complete it was time start kitting out the back of Project Race Support Caddy. But first, a trip to Teng Tools was in order to stock up on goodies…
Nice bit of kit
When it came to kitting out the back of our Caddy, Midge, Jules and myself attempted to come up with a suitable idea. Firstly, we needed to keep our sponsor, TengTools, happy. It also had to work with our Race Support theme and fit with our ‘sensible’ budget. In reality, Midge came up with an idea and ran with it…
Dreams become reality
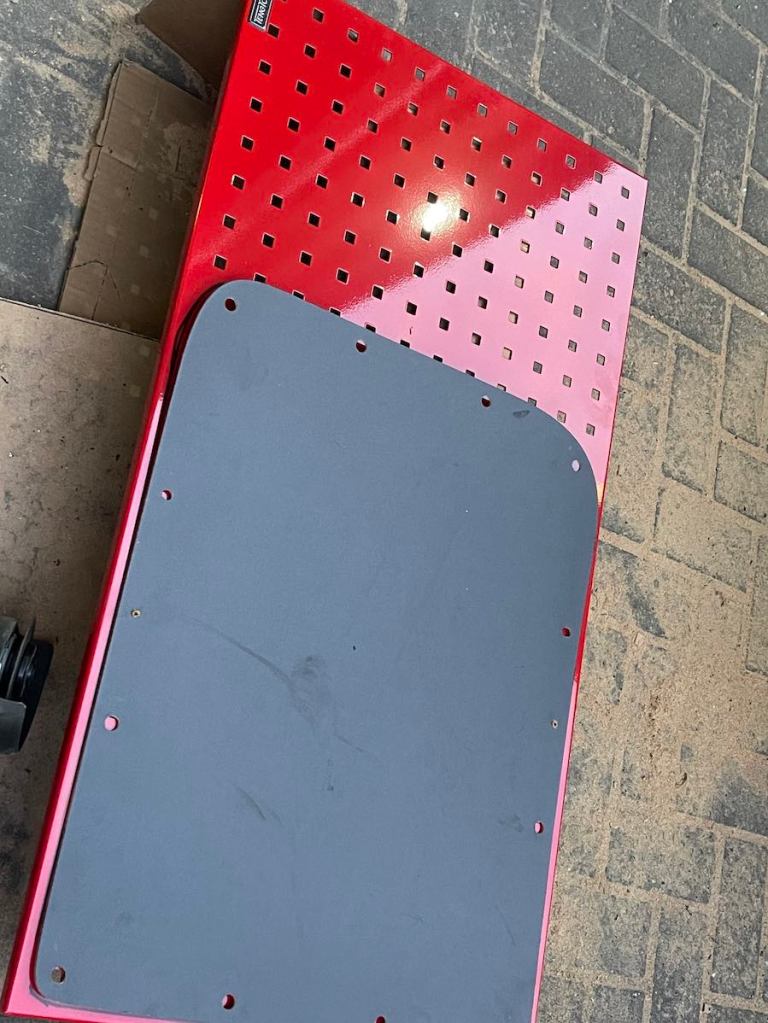
To be fair to Midge, he was the guy in charge of making this idea a reality. So, Jules and I didn’t put up too much of a fight. Ultimately, Midge’s idea was to have a huge chest-type tool box visible when you opened the rear doors. Then, perhaps, a couple of cubby holes above it, to house power tools etc.
True or false?
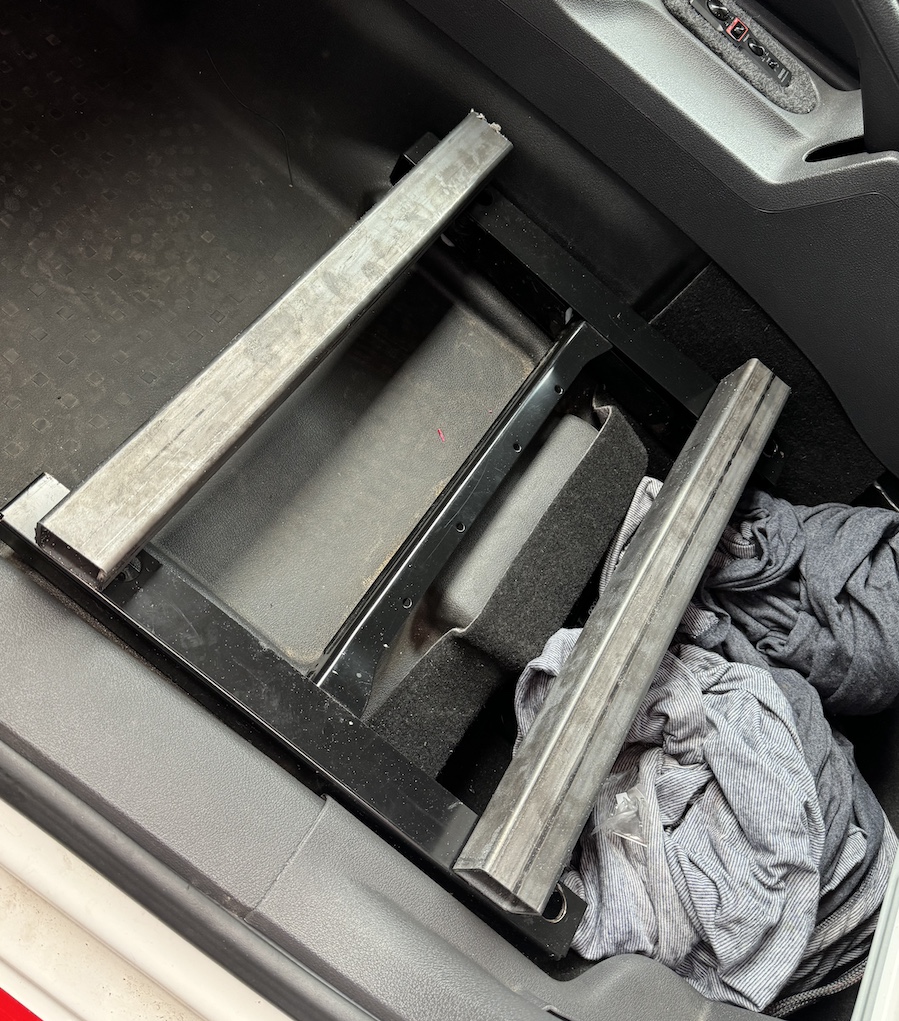
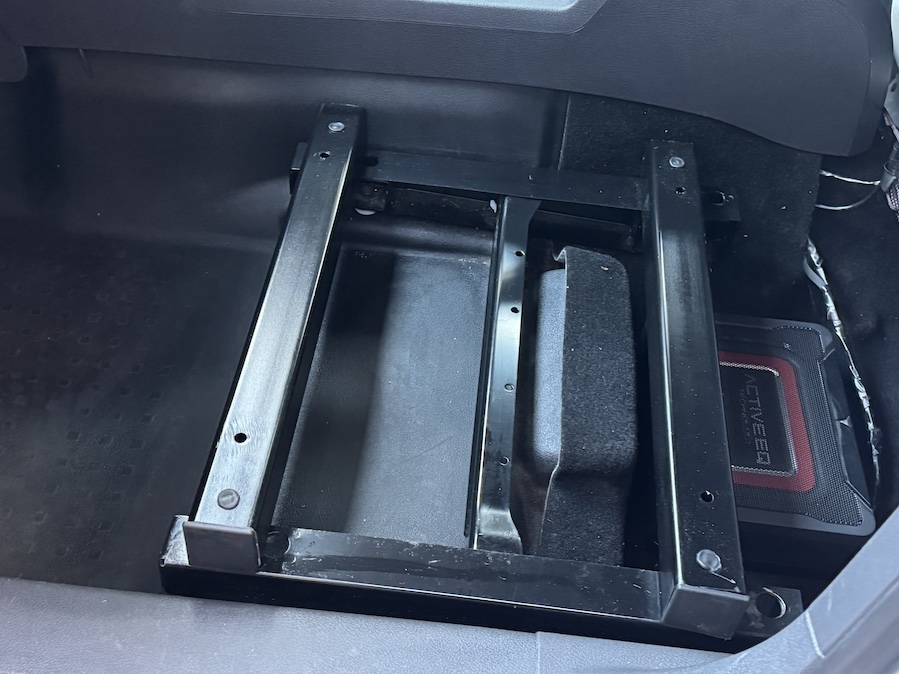
In the centre of the van would be another lower-level tool box mounted on top of a frame. This would house the Fly air tank and Air Lift management. A false floor would then fill the remaining floor area with various, open-top tool boxes and trays sunk into it.
Dem hose
Then, an air reel hose would be hidden below and a pair of slim tool cases mounted in the side of the raised floor. Each of these would be accessible through the sliding doors. Near the front of the van, just before the bulk heads, would be a hinged trap-door, beneath which we could hide other more unsightly tools.

Two into one don’t go
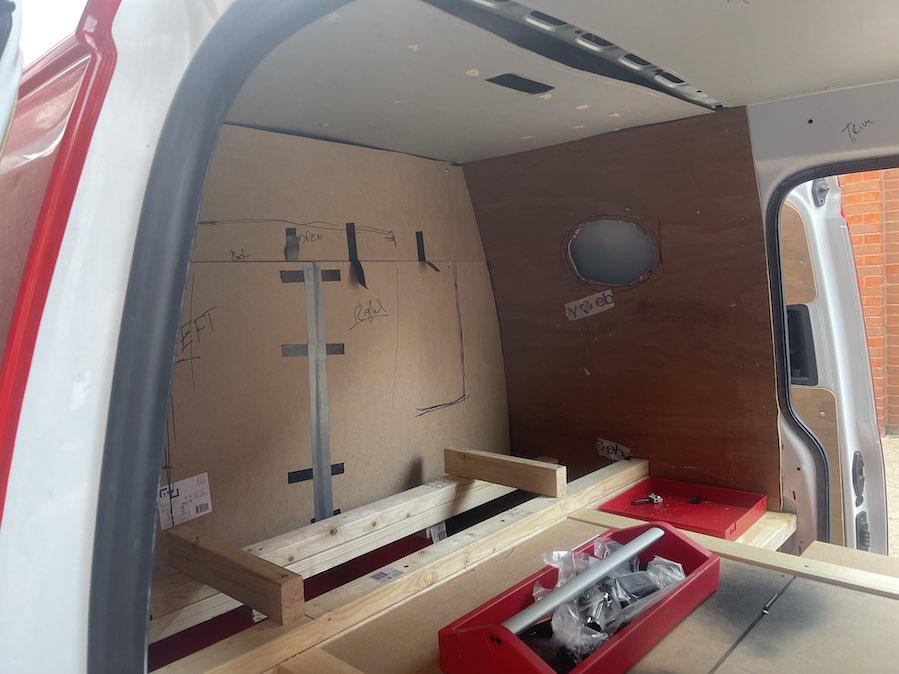
Before we could head up to Teng Tool’s HQ in Bedford, we first needed to take a bunch of measurements. Tis was so we knew exactly which tool boxes would fit where. Jules and I decided to leave Midge to this, while we headed off for a well-earned bacon butty.

Race Support Caddy Project (Part 10)
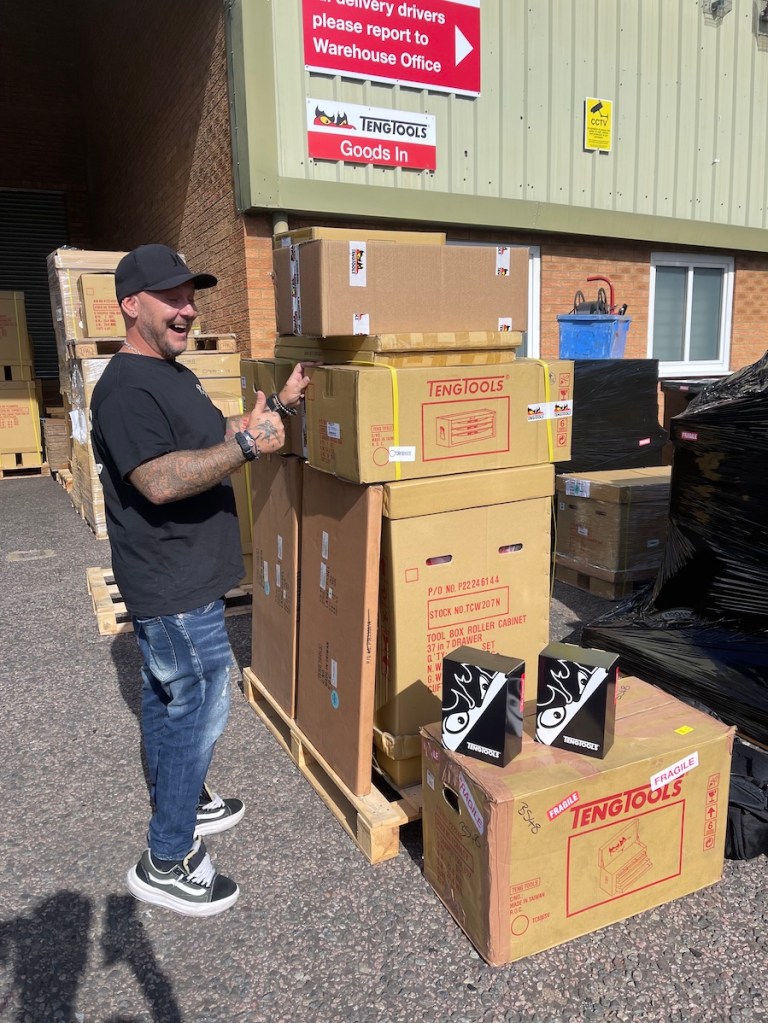
Once we’d worked out a plan and grabbed all the hardware from Teng Tool it was time for action. Our Project Race Support Caddy was about to get fully kitted out…
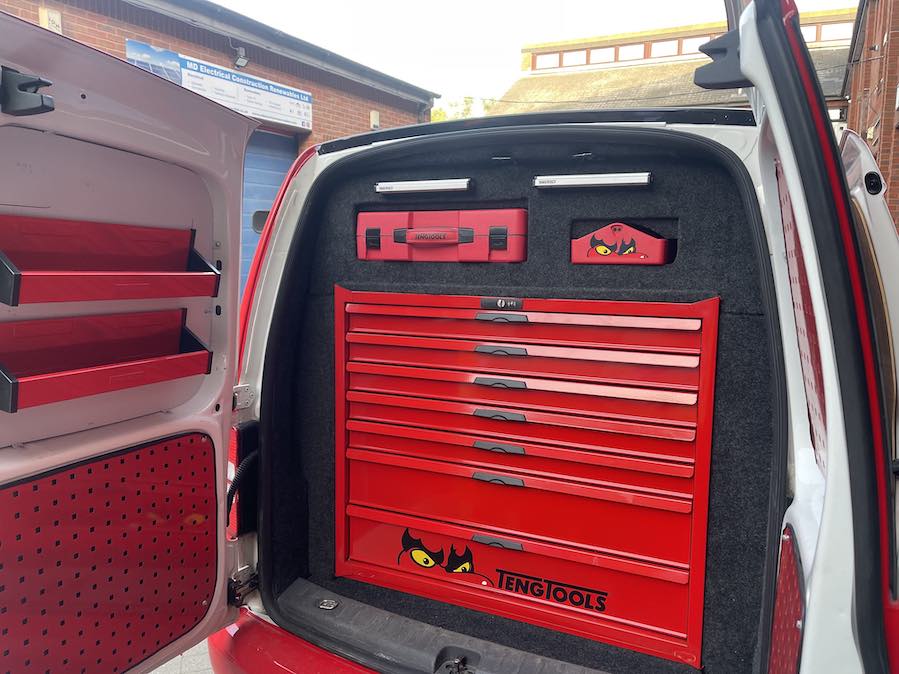
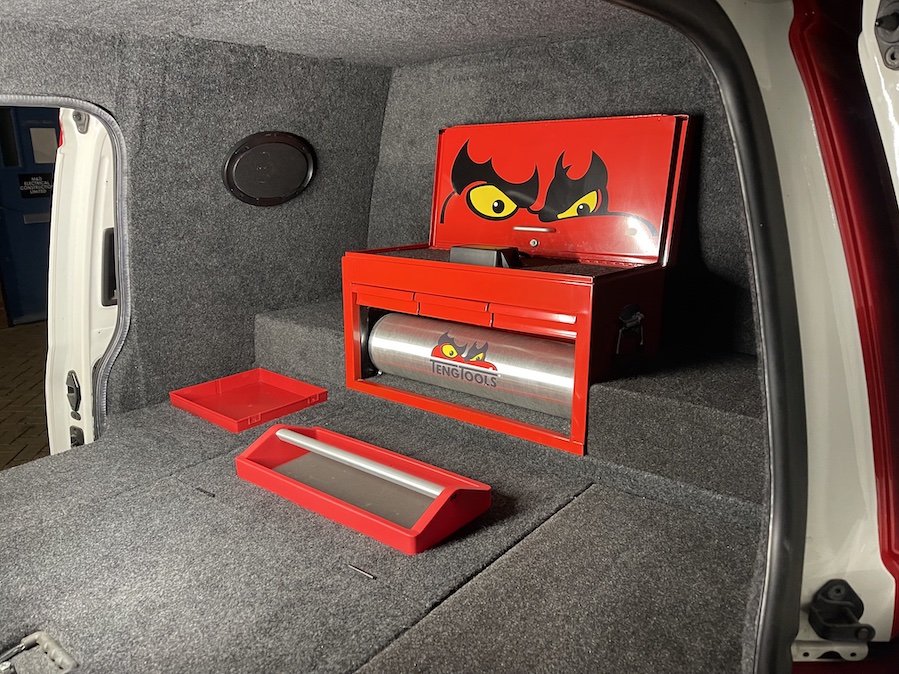
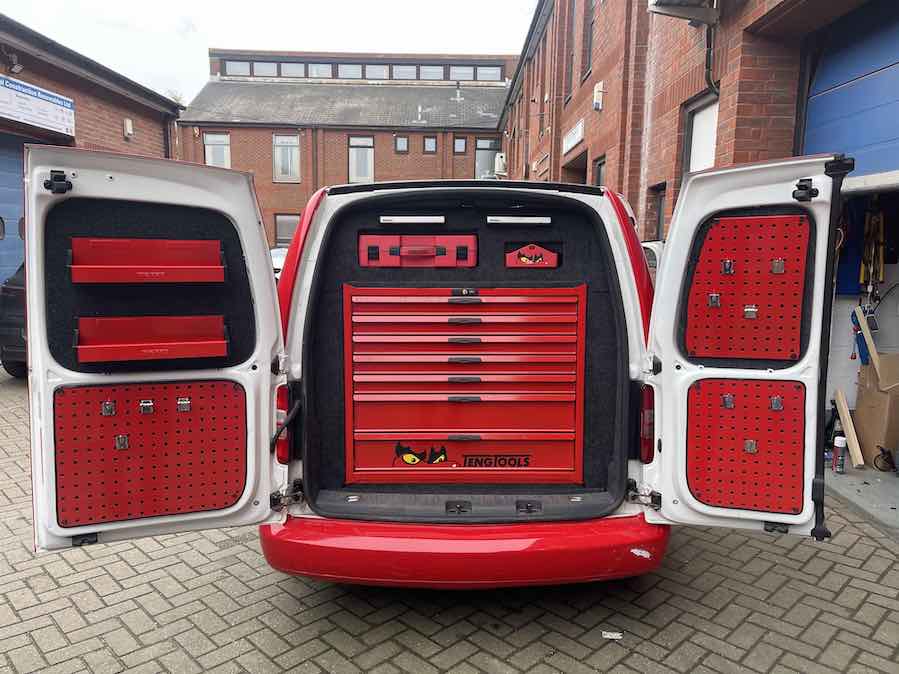
On arrival at Teng Tools, as you can imagine, Midge was like an excited kid in a sweet shop. It’s a good job we’d taken an empty Caddy with us, too. His wish list of parts was clearly going to fill the van! First things first, we needed to find a suitable tool box that would face out of the rear doors.
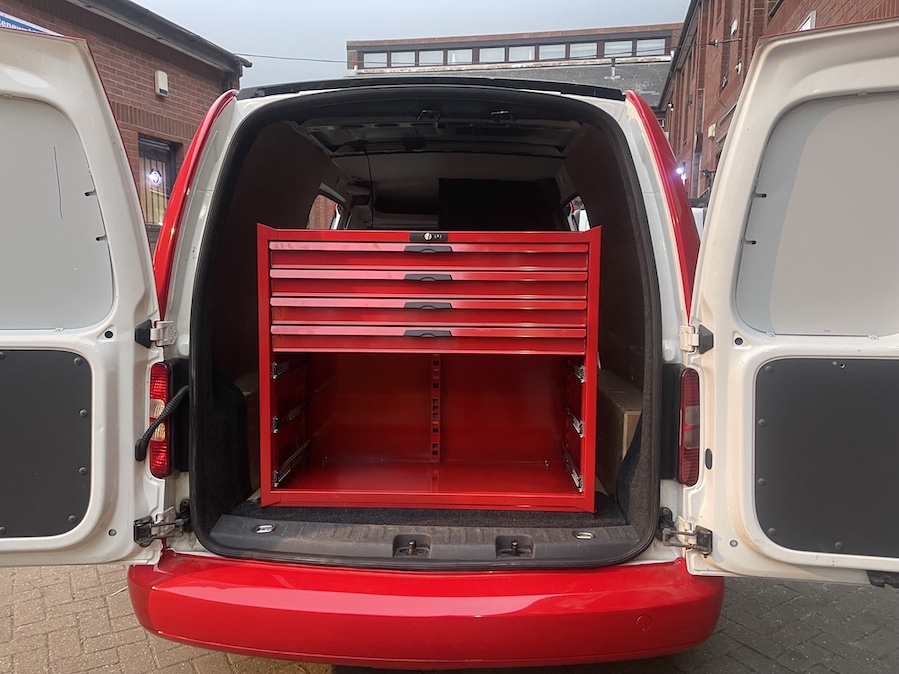
Action from the back section…
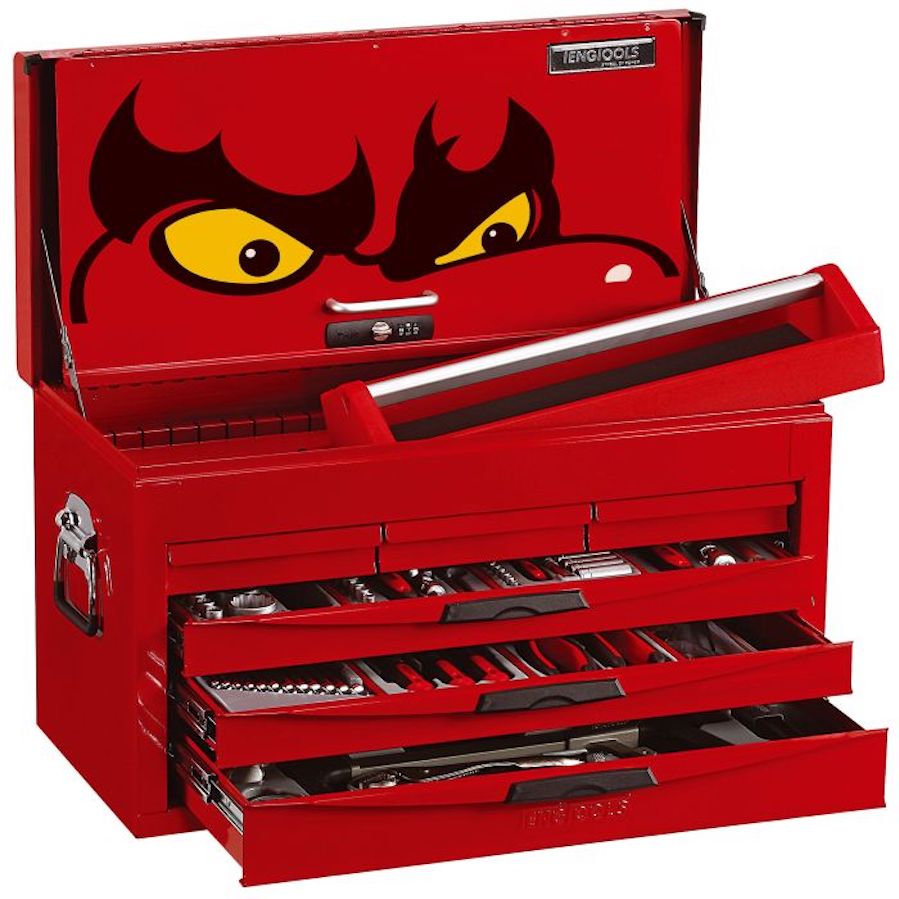
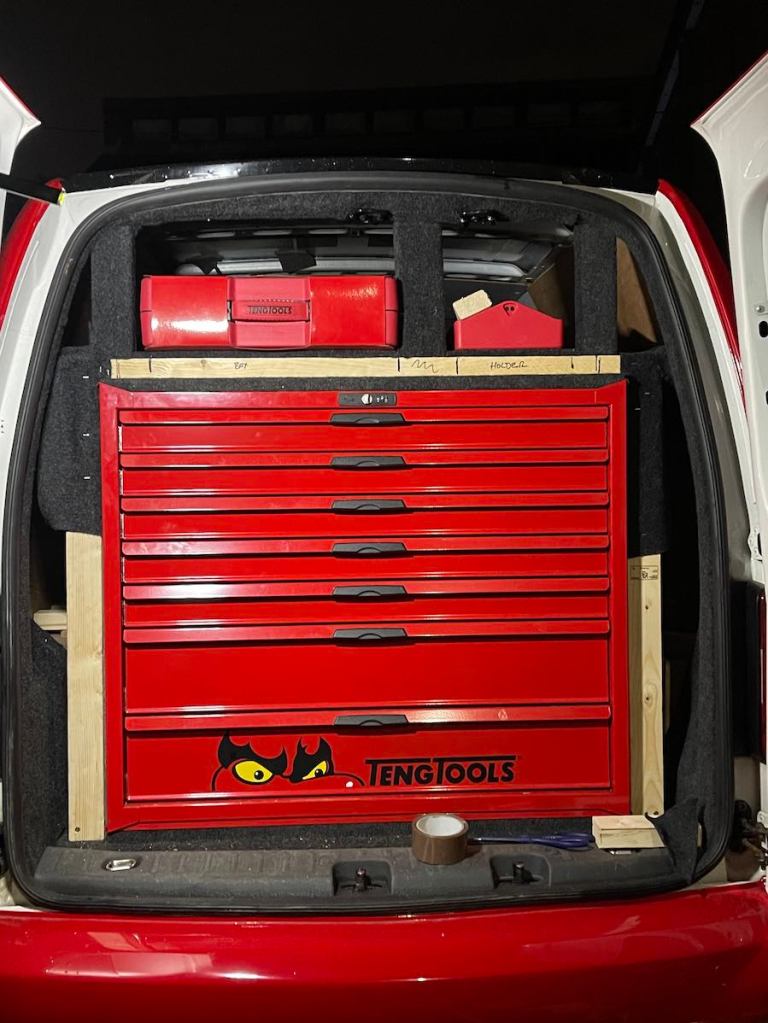
This would be the main focal point when viewing the Caddy from the rear, so it had to look good. After looking through the TengTools range, Midge chose a 7 Drawer Roller Cabinet (above). This features 37” drawers and is made up of two deeper lower drawers, with five more slimline items above. This would fill the rear space nicely, but still leave a small area above that Midge could box out above.
Box fresh thinking
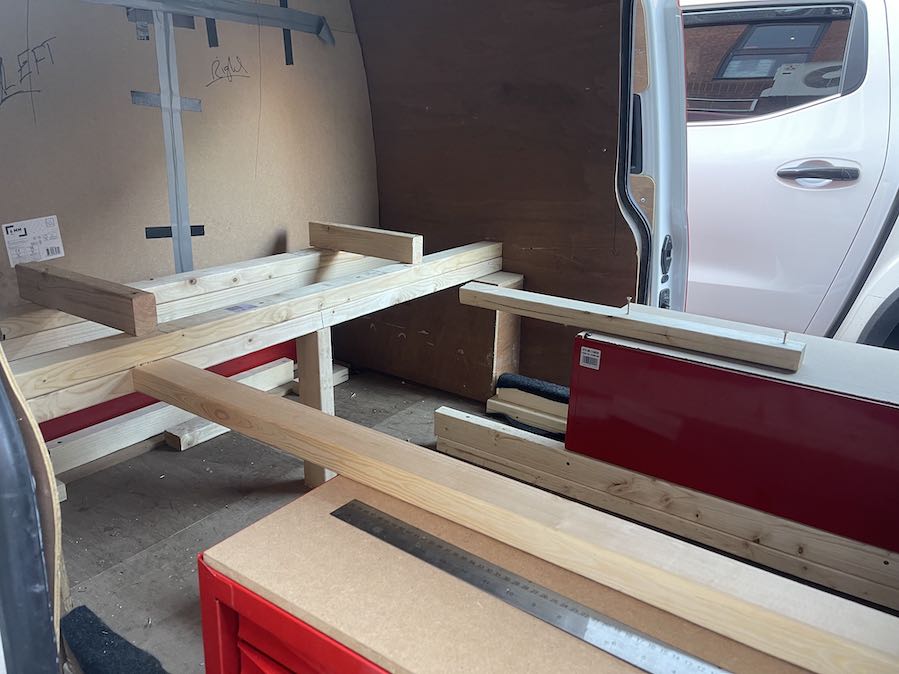
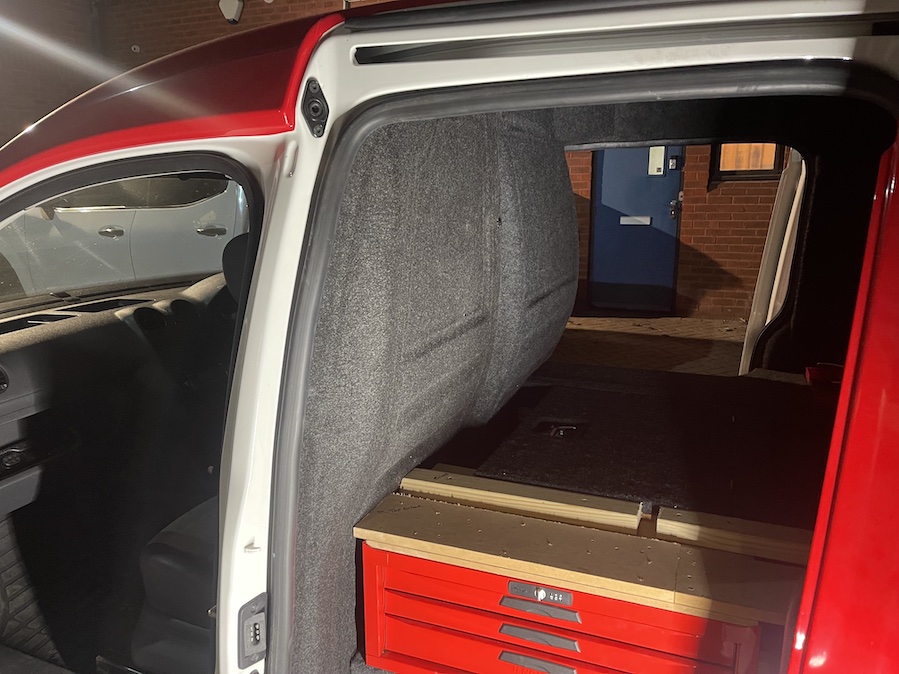
Next we needed a suitable box for the centre of the van, which would effectively back on to the 7 Drawer unit. These would be divided by an carpeted MDF wall. This unit would sit on a wooden frame fixed to the top of the inner wheel wells.
Open-top fuss
Ideally, it would house the air tank and the air ride management, plus all wiring and fixings. Midge chose the 6 Drawer unit as he could remove the bottom four drawers to house the air tank (leaving it exposed). The open top of the cabinet could have the management on display. The remaining two draws just below could hide any other connectors or wiring that didn’t need to be on display. Result!

Two’s company
A pair of tool boxes would be visible through each sliding door (one each side), Midge went for two 3 Drawer ‘Middle Boxes’. Not only would these look the part, they would also help support the false floor.
Sink or swim
Midge was able to sink a few tool boxes into this false floor and also hide the air hose reel. We hoped this would connect to the air tank and effectively feed a selection of power tools. Well, that’s the intention, anyway…
Busman’s holiday
Midge wasn’t quite able to finish the rear install before jetting off on yet another of his holidays. He did make great progress, though.
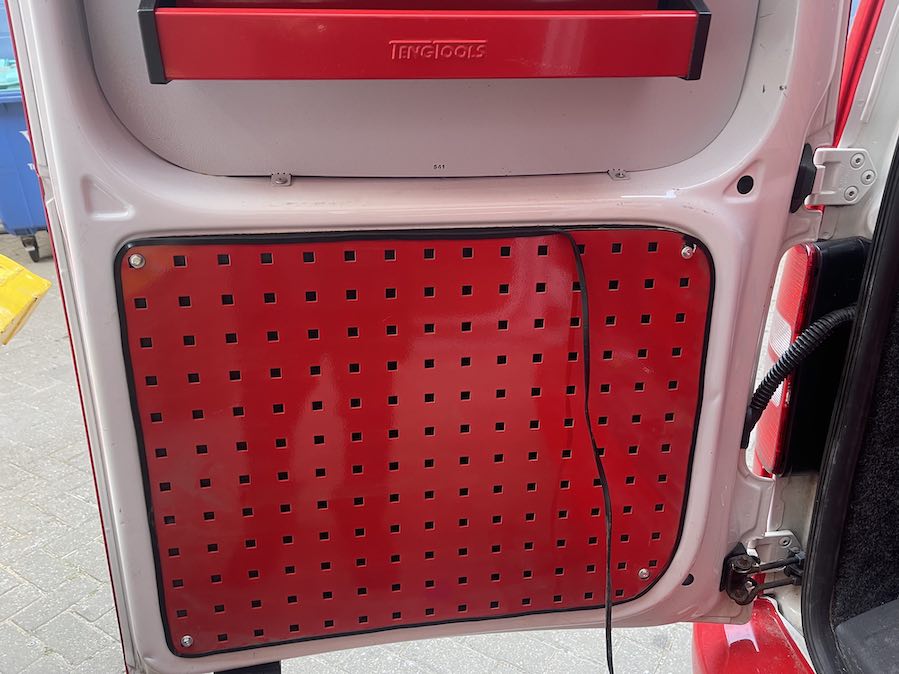
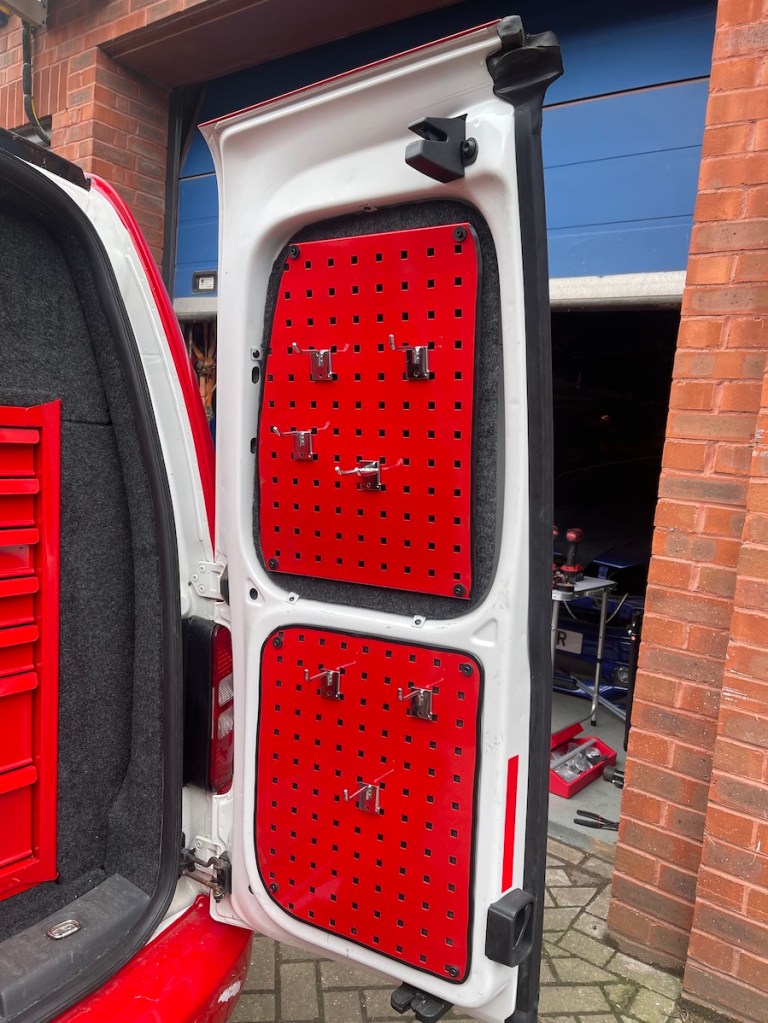
Nice racking
We love what he did with the TengTools racking. He basically cut it into sections that fitted perfectly into three of the rear door recesses.
Easy access
For the third recess, Midge mounted two open tool trays, which would be handy for easy access items.
Next time
Firstly, Midge will be wrapping up what he started here. We’ll also be moving into the front cabin where we plan to fit a pair of Corbeau buckets. More TengTools goodies will also be going in with a whole host of Kenwood audio. No rest for the wicked, hey?
Race Support Caddy Project (Part 11)
Last time we made a fairly big dent in decking out the back of our Project Caddy Race Support van. Well, this time, Midge hopes to finish it off.
After working out where everything was going to be located, now it all needed to be removed. Why, you ask? Well, so everything could be coated in grey carpet for an OEM look. Then we could make a final fix on all the parts and panels. Well, that was the plan, anyway.
eBay to the rescue
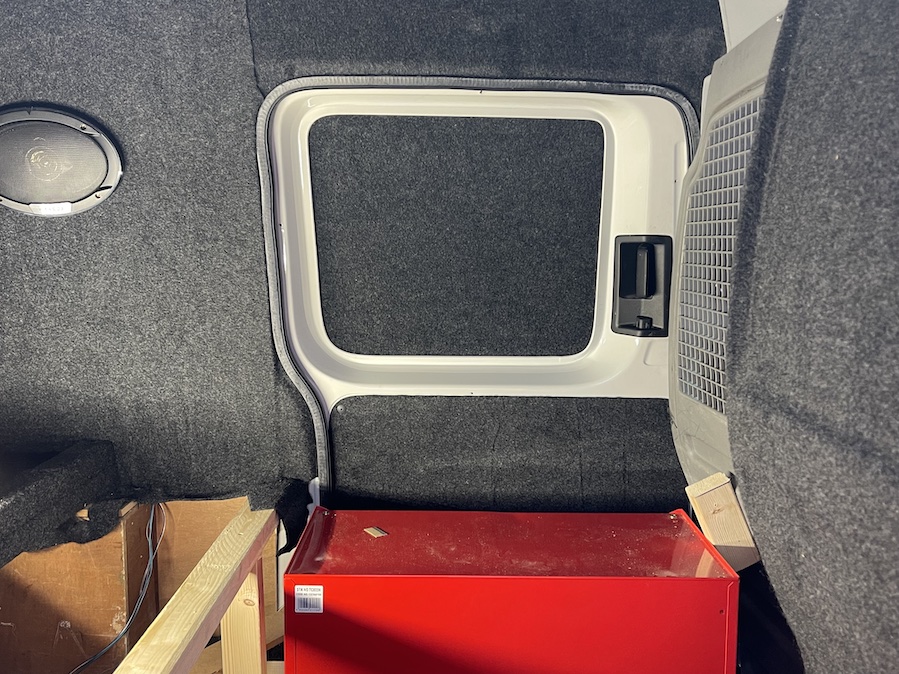
You may have noticed that our Caddy had been missing a rear bulkhead from the moment we bought it. Thankfully, replacements are pretty easy to find. We bought our replacement passenger’s item new from eBay. These do, however, need trimming a touch to ensure a neat fit. Once this had been done, the were removed and trimmed in the same carpet he’d be using throughout.
Carpet, right…
Starting at the front and working backwards, next up the boarded roof was covered in carpet as well. Both sliding door top and bottom panels also got the going over with carpet.
Do your cuffs match your collar?
While Midge was in door card mode, he also made two extra panels for top section of the back door recesses. Previously, only the lower sections featured carpeted door cards and it just looked a bit odd. This addition gave the whole back facade a more polished appearance.
I love it when a plan comes together
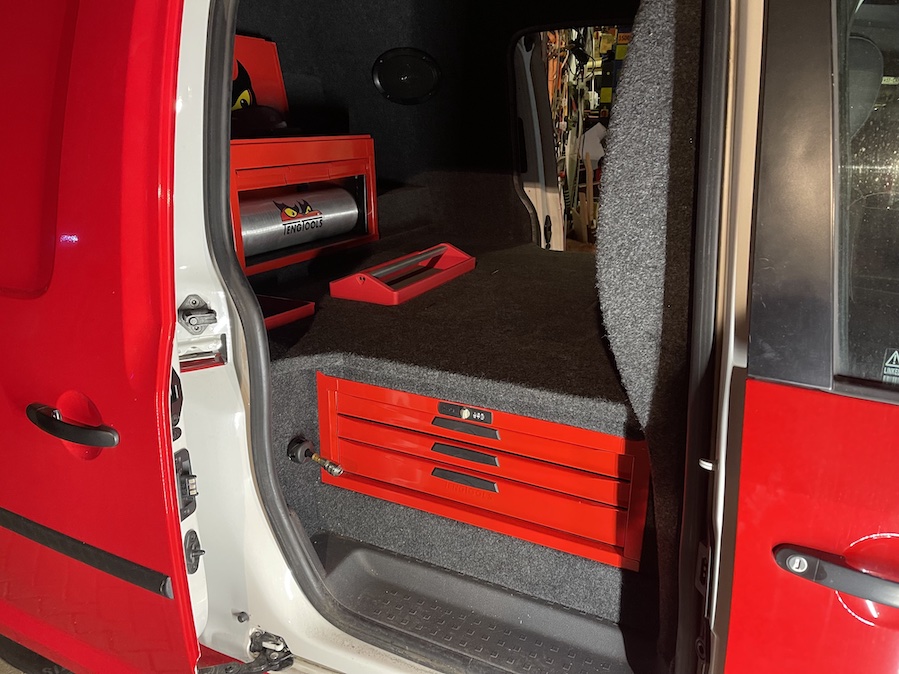
Moving back into the middle of the van, the false floor now looks fantastic with a coating of carpet. The side-facing tool boxes (accessible through each side door) are now totally enclosed. These are neat as they both feature combination locks on them, meaning the tools inside are safe. That is great if we were ever to leave the van unattended at an event.
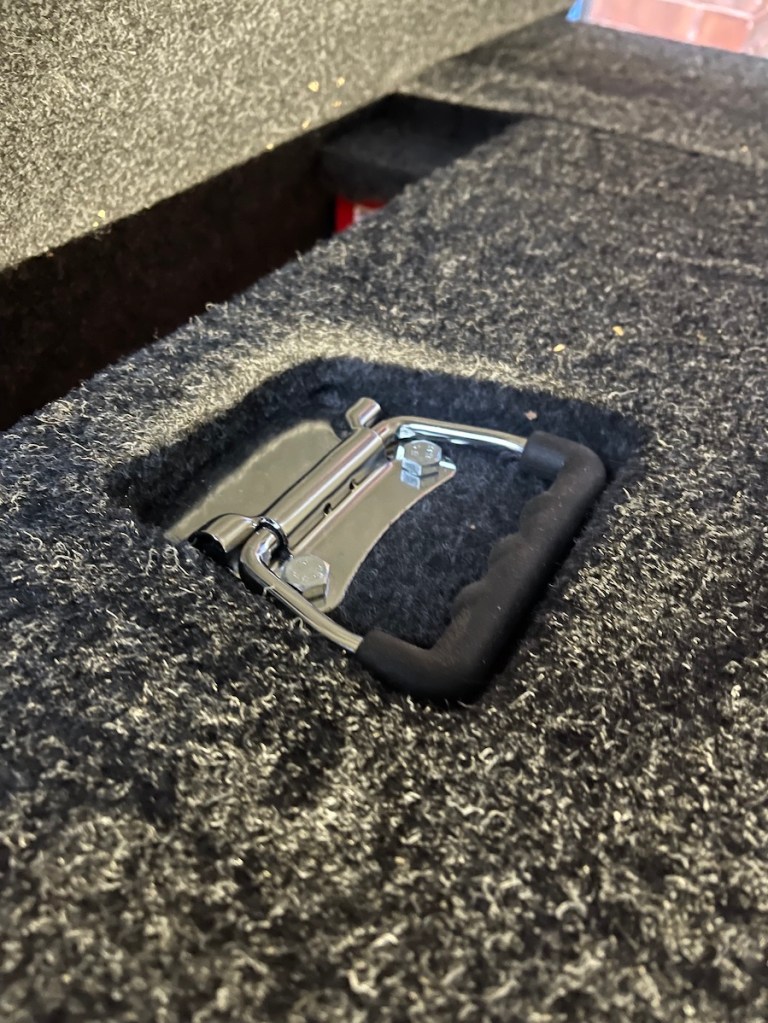
Stay away from that trapdoor…
The eagle-eyed amongst you may have also spotted the end of the air line poking througha hole on the near-side. This is connected to the Interstates air line reel, which is accessible through the trapdoor in the floor. To access this, Midge actually sunk a flush trapdoor handle into the floor. This keeps things neat and ensures a totally flat surface to help with sliding items around.
Race Support Caddy Project (Part 12)
This month we return to the back of Project Caddy Race Support van for more trimming and a spot of audio. You can never have too much in-car hi-fi, right?
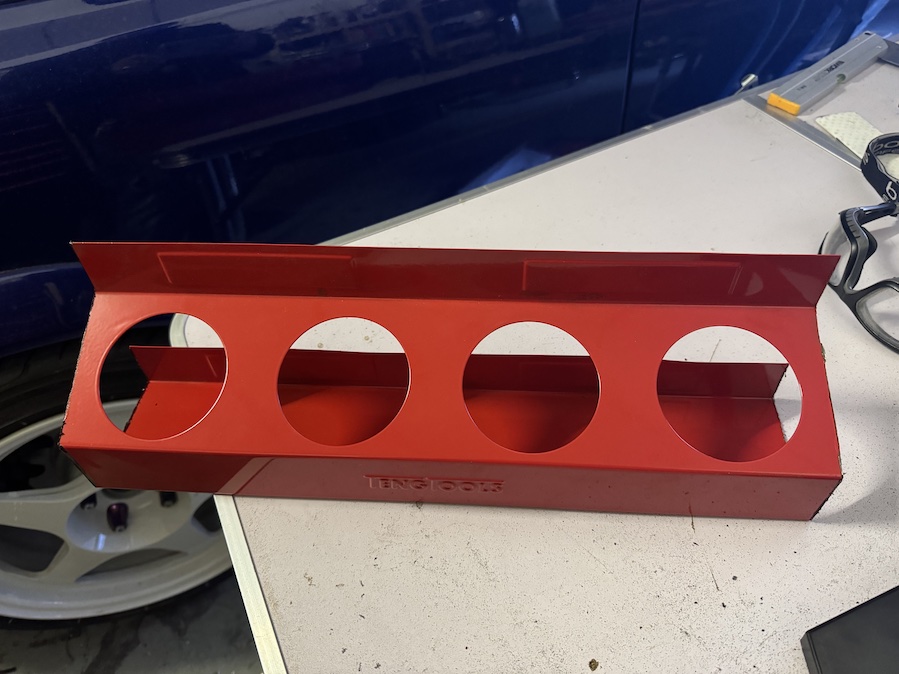
So, also sunken into the rear floor nearer the middle of the van is a hand-held Teng tool box. This not only looks neat, but is also totally practical being removable at any time. You might have also noticed the additional red storage tray to the side of that. This will eventually hold all the air tools – once we get our mitts on them.
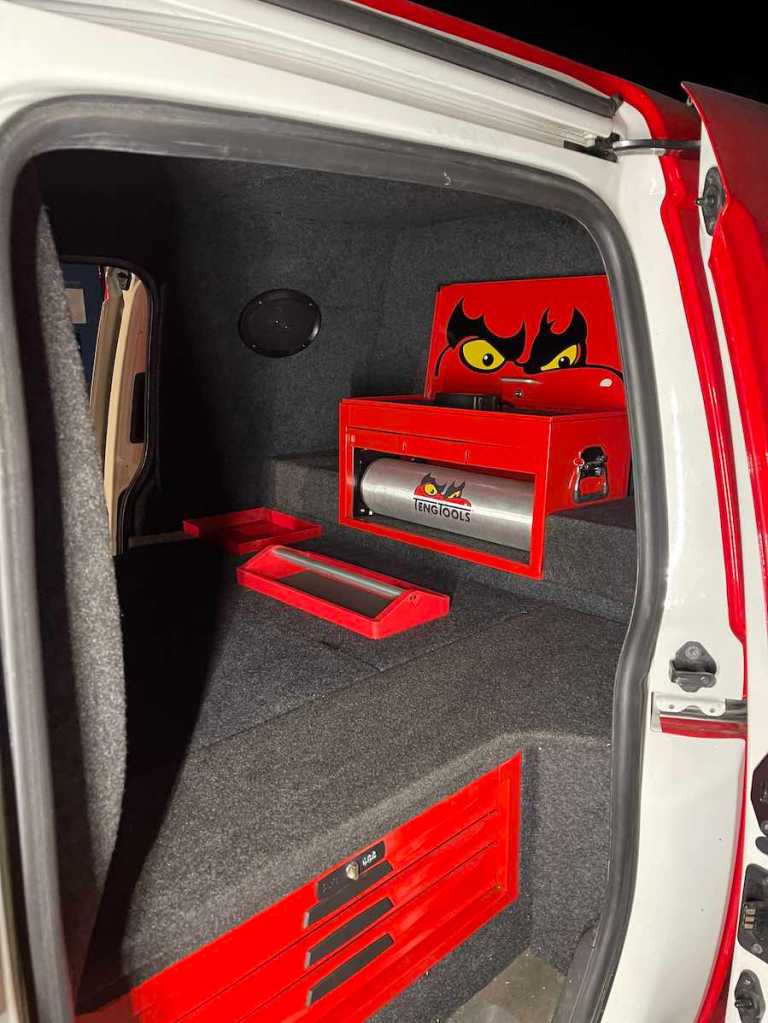
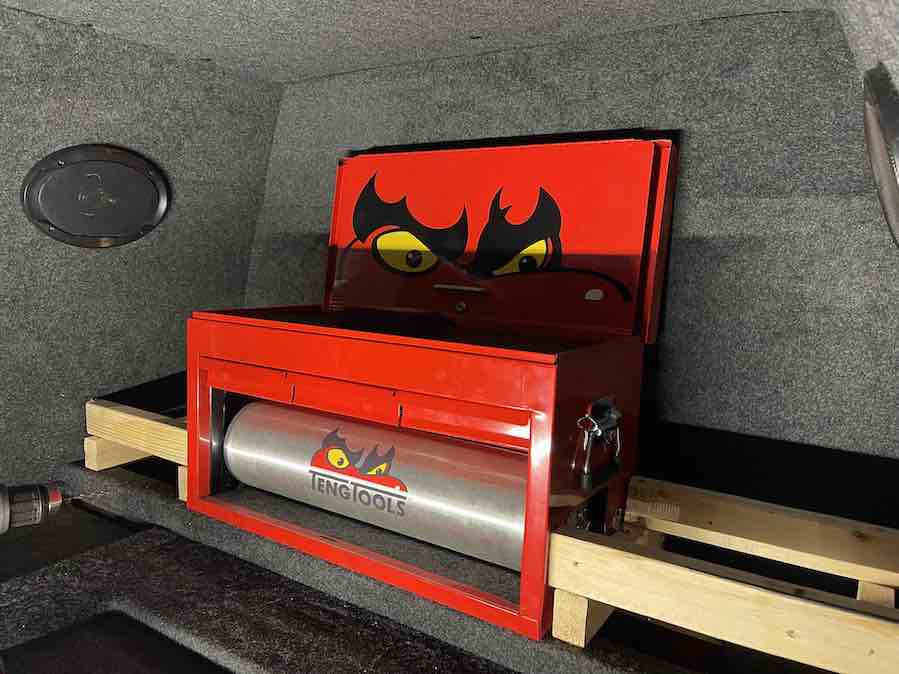
Centre stage
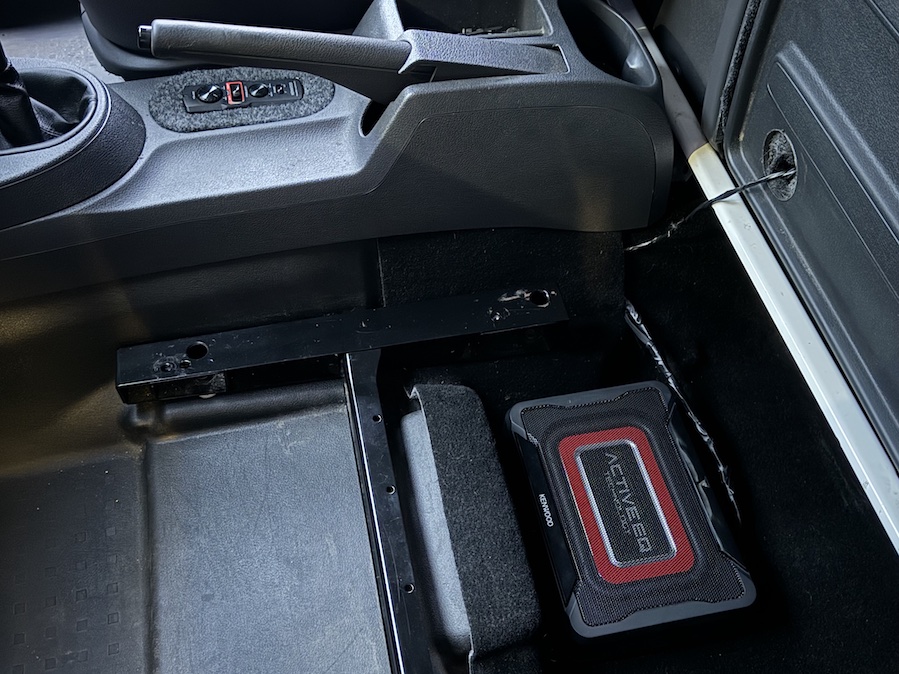
Taking centre stage in the middle section of the van, though, is a 6-Drawer Teng unit. This backs on to the central partition section (now carpeted), which divides the middle and the rear compartments. Not only does this box house the Fly air tank in the lower section, it also has the air management on top. It really is genius how Midge has packed so much into such a compact unit. All this while also hiding all air lines and fixings. So, where are the compressors hiding, we hear you ask? Well, they’re also hidden beneath the floor and accessible through the trapdoor.
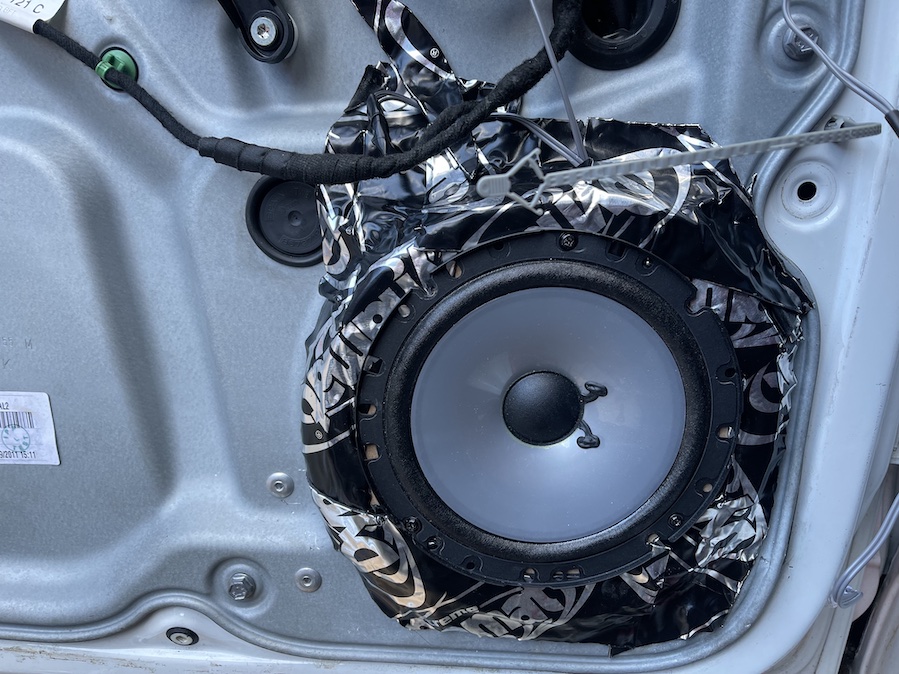
The bass… too… dark…
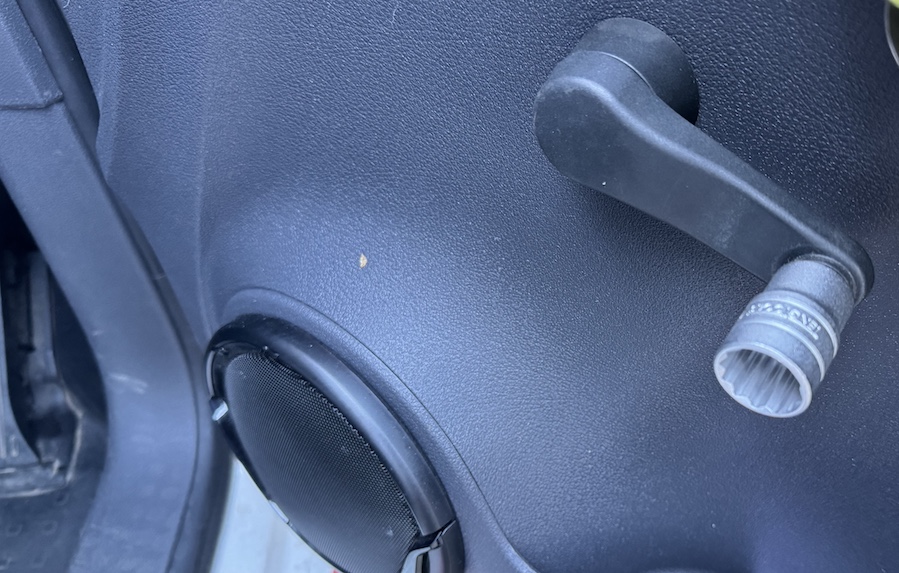
Next up, Midge fitted the 6×9″ 3-way speakers Kenwood supplied us as part of our audio package (more on that next time). These 80W speakers (500W peak power) are part of Kenwood’s Stage Sound Series. Once hooked up to the other Kenwood products, these should keep us entertained while at at the various shows we plan to attend.

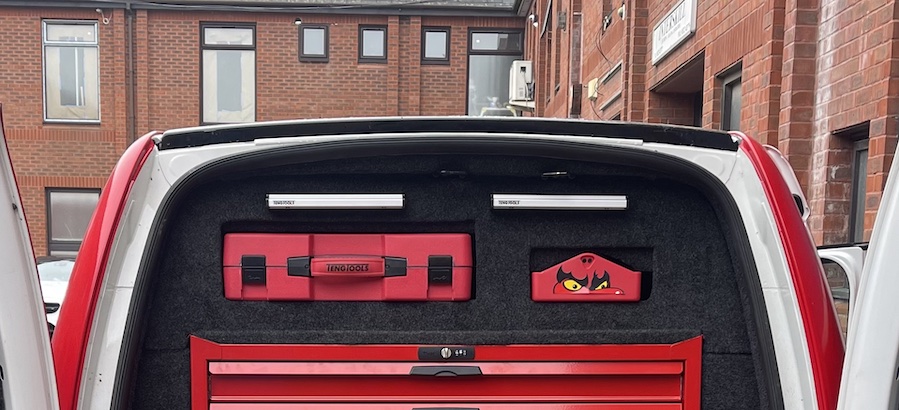
Light ’em up…
Out back, up top are two magnetic LED lights that are quick release for easy access. In the two cubby holes you have a tool tray and a mobile tool box with sections for smaller tools. The main, 7 Drawer box, is purely for hardcore tools. Then, the trays and hooks on the back doors are to store easy access stuff.
That’s a wrap… in the back, at least!
Apparently, this end result pretty much identical to the vision Midge had in his head way back when we first bought the van. As much as it pains us to say it, going by this build, he’s a little bit wasted working for us. What do you think?
Race Support Caddy Project (Part 13)
Last time we checked in, Midge was wrapping up the rear air-ride install of our Project Race Support Caddy. Since then, his attention has moved to the main cabin. Here’s what he’s been up to…
With the rear axle and Air Lift struts due any minute, we decided to wrap up the Caddy’s interior. Midge has already located the Air Lift ‘FLO’ seamless air tank and dual compressors out back. He’s also plumbed everything in ready to connect to the remaining air ride system as soon as it arrives.
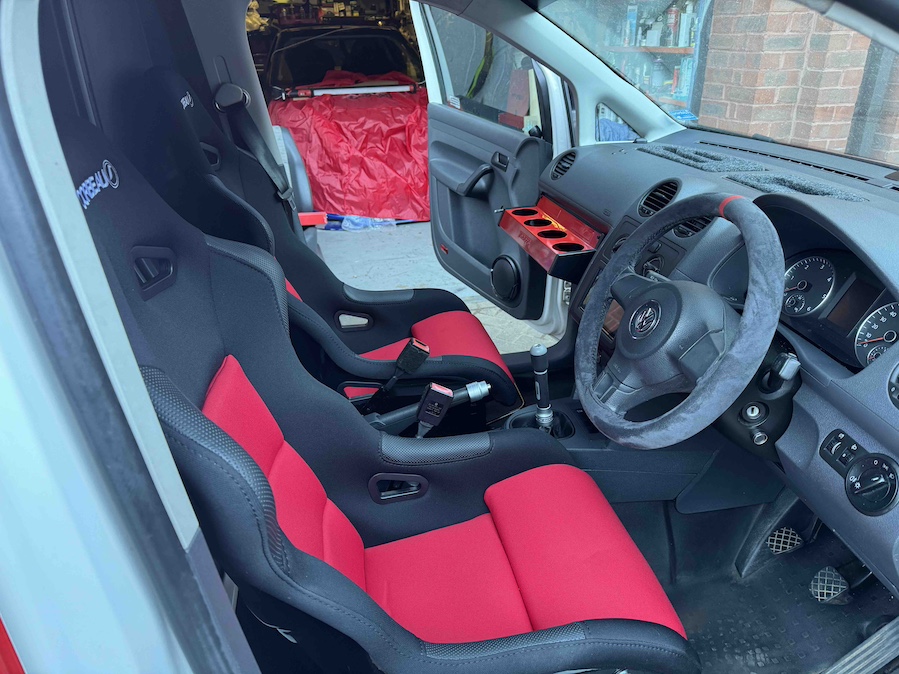
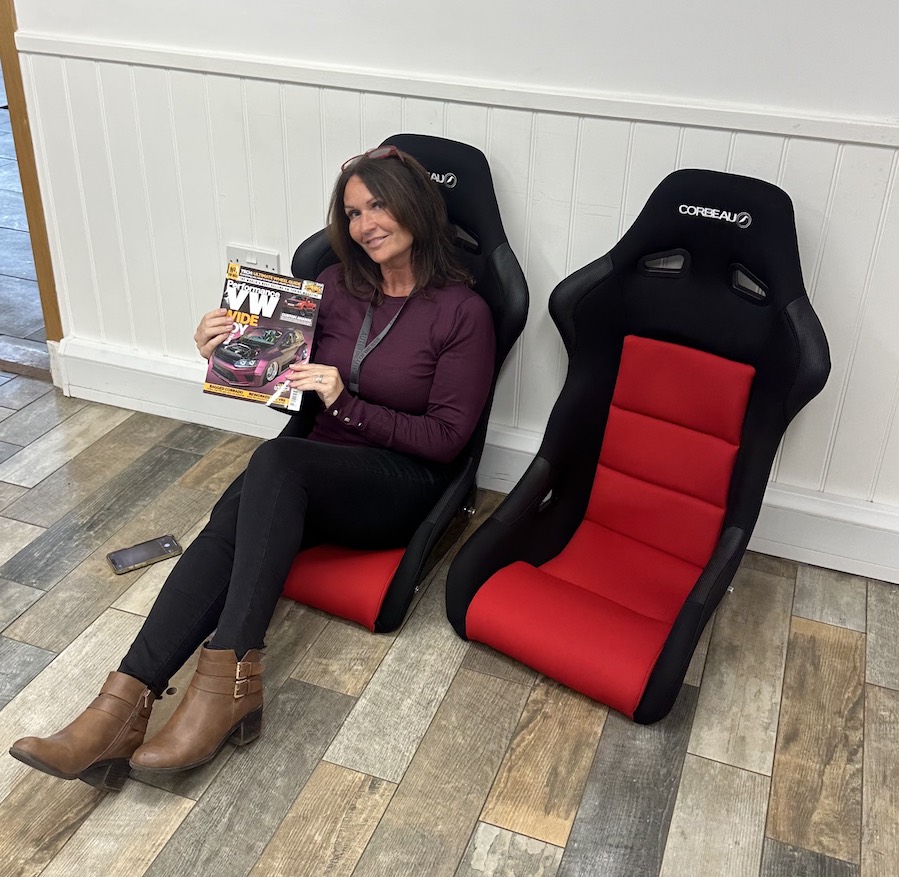
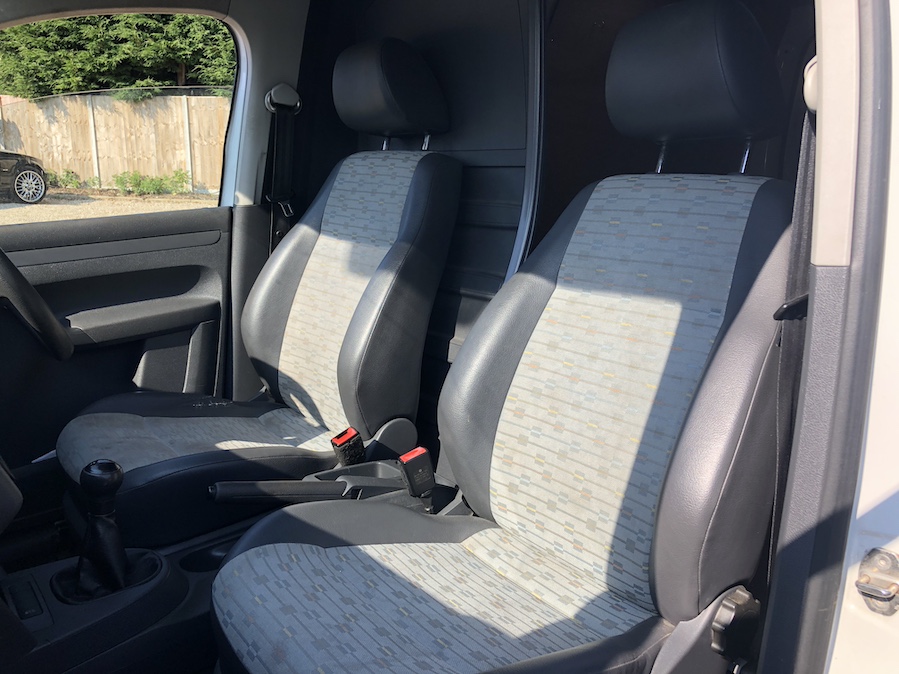
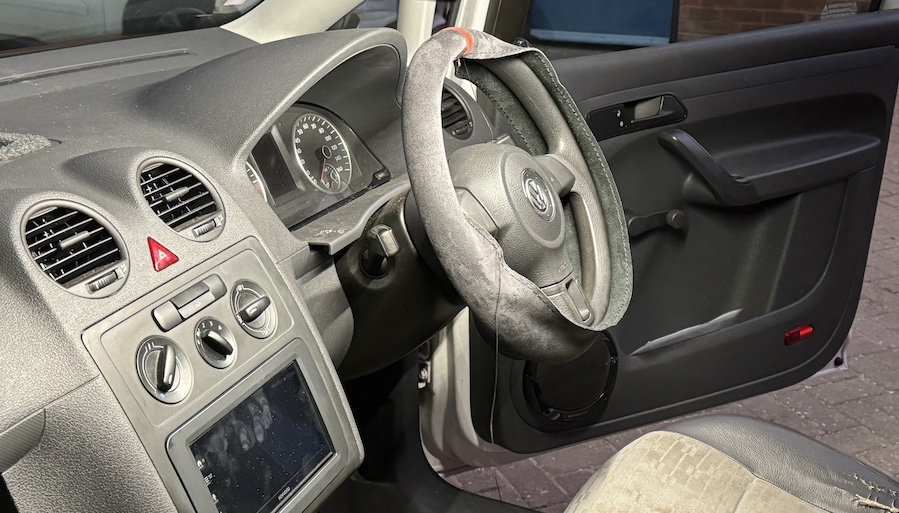
While in great condition for its age, our Caddy’s stock interior didn’t fit with the Race theme we were after. A quick call to our friends at Corbeau Seats soon saw us surfing their website in search of suitable seats. We wanted something that would help turn our Caddy’s drab interior into something worthy of any racetrack paddock.
On the recommendation of Corbeau’s MD, Vic Lee, we soon arrived at the Pro Sport bucket seat. This fixed bucket is a favourite with the track day enthusiast. Not only is this a great looking seat, it features side-mount fixings (like the more expensive FIA-approved items). Better still, it’s also available with red inserts, to match the other Teng Tools colour-coding.
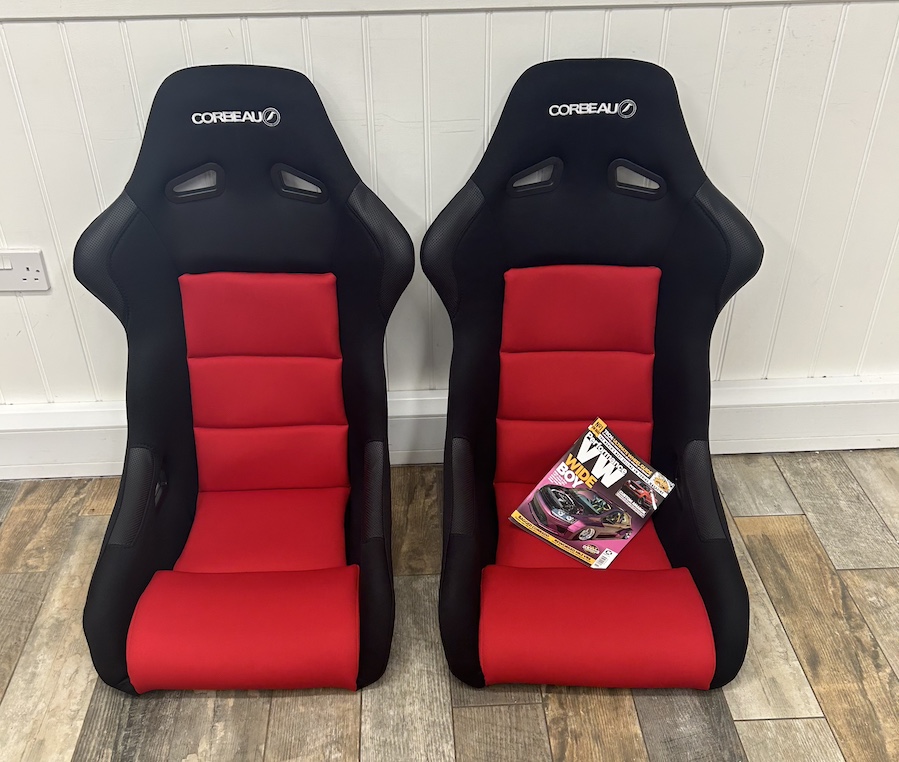
Oh, and they only cost £300 a pop! Triple whammy, or what? You may remember, we were trying to demonstrate what could be achieved with a realistic budget. So, basically, these seats certainly fitted with that brief. Even better, was the fact that after pulling the trigger on this order, the seats arrived at Kelsey HQ the very next day. Result!

Now, as lovely as the seats are, getting them fitted took more work than you might think. While they come from Corbeau with the side mounts and runners, there weren’t subframes. This is because every application is unique to the vehicle.
After contemplating buying a set from eBay for a few hundred quid, or adapting the original frames, Midge chose the ‘easier’ option. That’s right, he decided to make up a set from scratch instead. Here, he welded up some 4mm 50x50mm box-section mild steel and then painted them black for an OEM look.
The Alcantara steering wheel cover was actually more of Midge’s handiwork. He bought the kit from eBay and trimmed it himself the clever devil. Is there no end to this man’s talent?
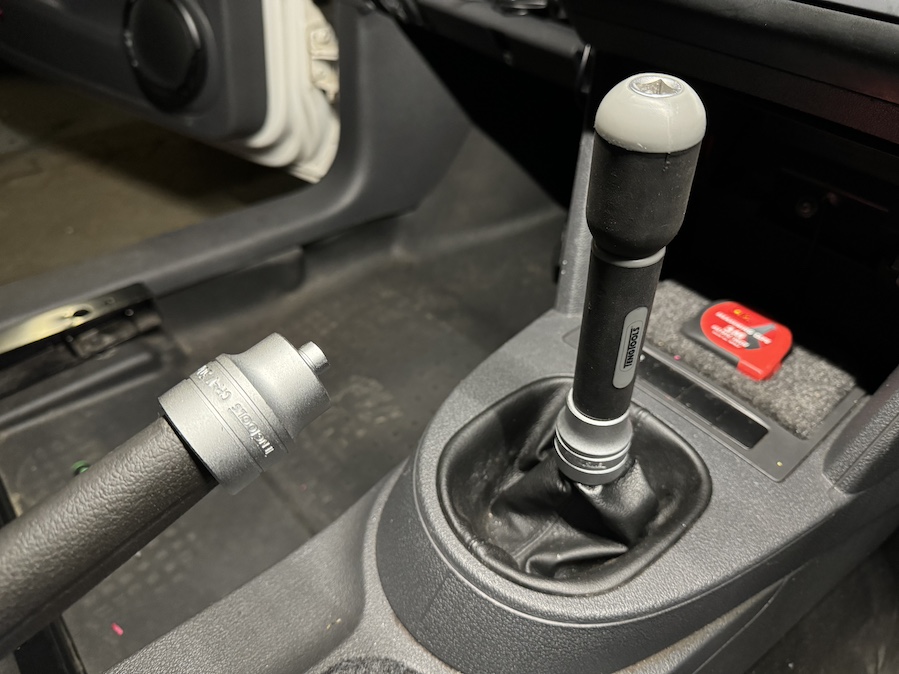
Other additions included the Teng Tools door winders, which are made from a couple of 3/8” Teng Tools sockets. There is also a trick handbrake release button (another socket) and gear knob made from a Teng Tools socket wrench driver. These final parts really were the icing and the cake in our mind.
We have to hand it to him, Midge did a mighty fine job and he didn’t moan once… maybe. As for the finished result. Well, see for yourself. The seats and wheel look absolutely amazing. Next time, we fit the Kenwood audio and a few custom additions…
Race Support Caddy Project (Part 14)
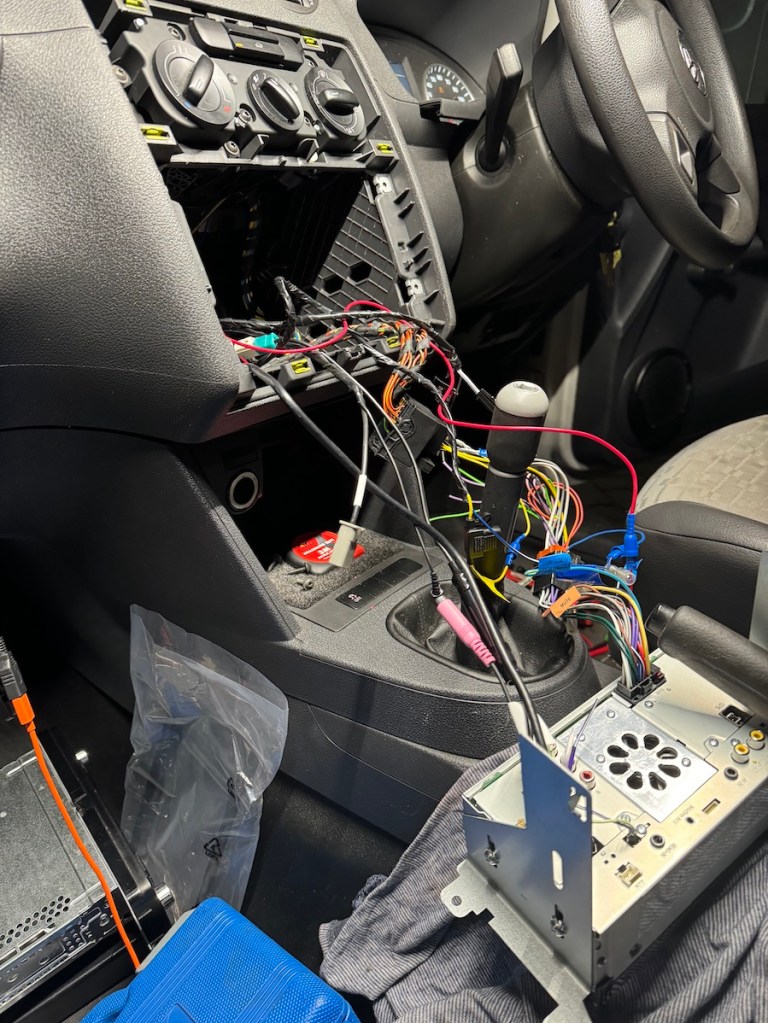
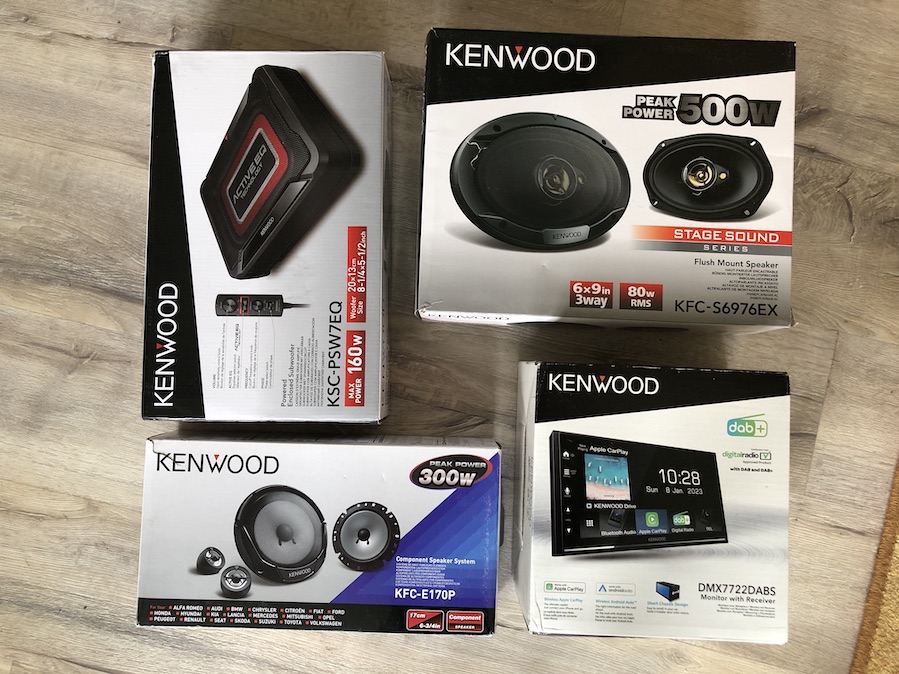
With the seats in place it was on to the all-important audio. This was kindly supplied by our old mucker, Keith Watkins, at Kenwood UK and fitted by our very own Midge. Time to bring this van well and truly up-to-date……

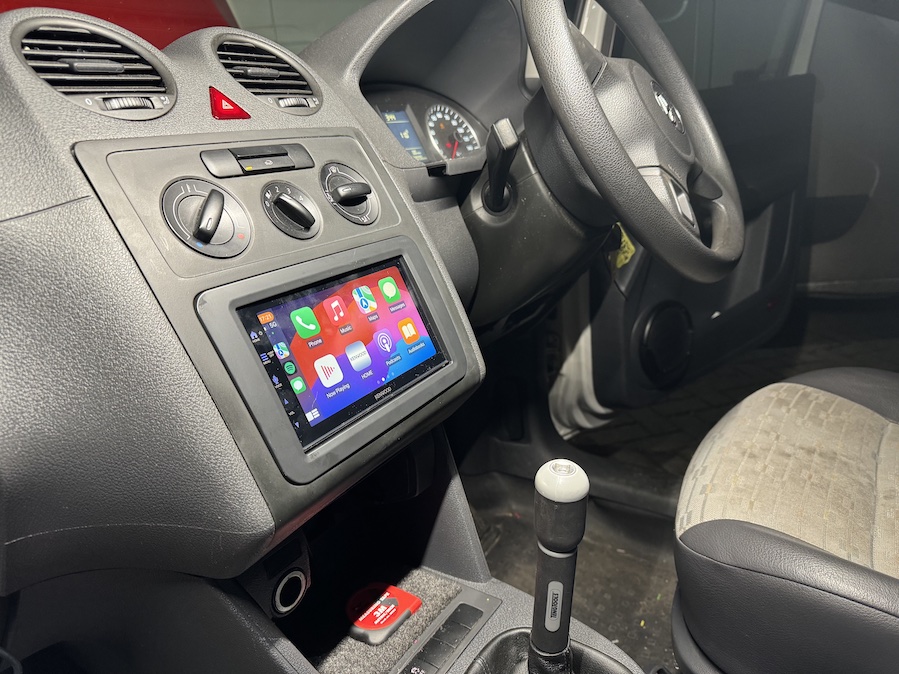
In order to bring the van’s cabin up to date we had to lose the single-DIN headhunt and retro Parrot hands-free kit. In their place went one of Kenwood’s finest, all-singing DMX7722DABS double DIN Monitor with Receiver units. It’s actually easier to list the stuff this Apple CarPlay and Bluetooth ready unit doesn’t feature than the stuff it does.
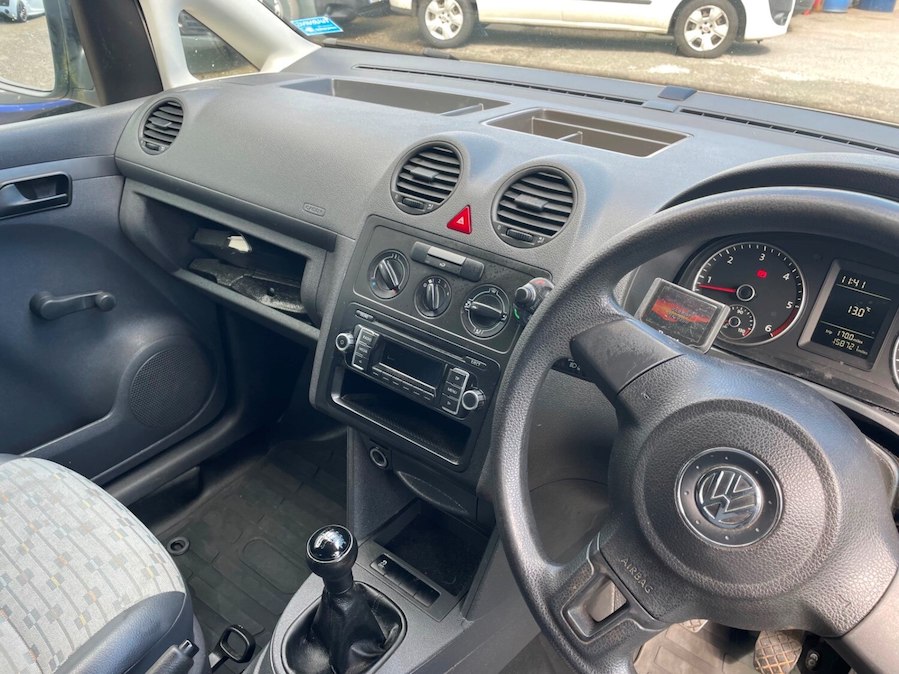
In order to have a permanent live to the headunit, Midge made up a custom wiring loom that did away with the Canbus turn-on. Instead, it now connects to the previous cigarette lighter’s power supply.
As well as the 500w Max RMS (KFC- S6976EX) 6x9s mounted out back, we also fitted 300w Max Component System (KFC-E170P) in the front doors.
The tweeters included in the kit were mounted in the top of the doors. Midge made up some custom MDF rings to help mount the speaker, and used sound deadening to ensure optimum performance.
Next up, he mounted one of Kenwood’s slimline, enclosed subwoofers (KFC-E170P) neatly under the passenger seat. The remote control for this was then mounted in a custom MDF centre console enclosure. Genius!
In terms of the quality of sound, for such a relatively simple system, the result really is something else. This is perhaps down to the front cabin area being such a confined space. The head unit itself is an absolute game changer, because it does literally everything you need. From connecting to your phone for voice calls or Apple CarPlay, offering full DAB and having an awesome navigation system.
While Midge was getting creative with the carpeted MDF, he also made storage pockets to sit snugly in the various cubby holes throughout. These allow easy-access to various Teng Tools, including a tape measure (in the centre console), an adjustable spanner and utility knife (in one of the upper dash sections). Oh, and there’s a small socket set in the other insert.
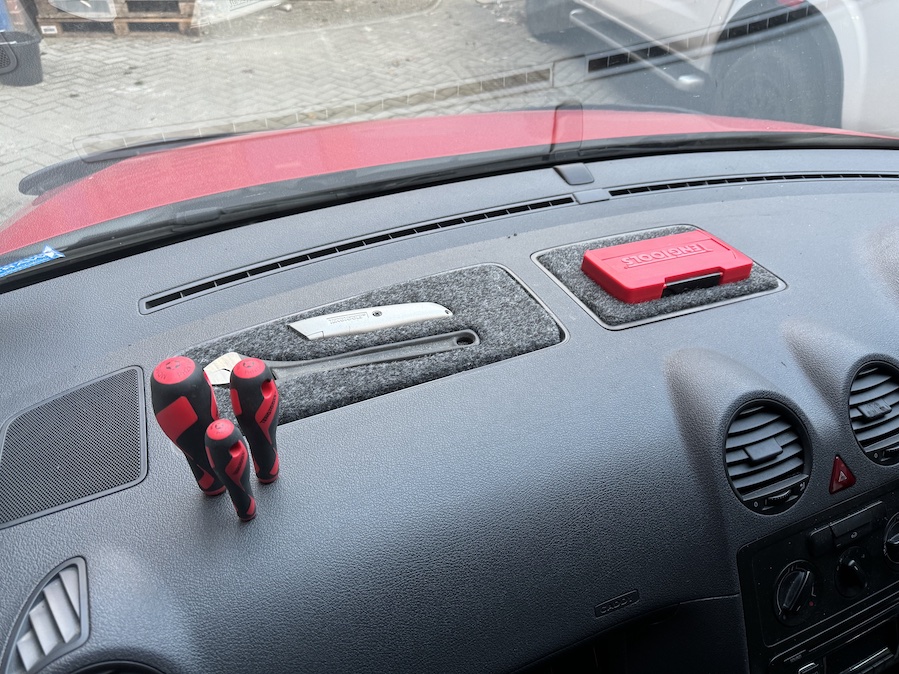
Next up was the custom bottle holder, which doubles as a drinks holder for those drive through visits. This was made by using a magnetic Teng Tools bottle holder that would usually stick to the top of a tool box. He simply cut it down to size and then fitted the black plastic end plates before securely fixing it to the dashboard.
After this was finished it was on to the new floor mats. The plain black items looked far too bare for our liking, so Midge knocked up some custom heal plates. He did this using Teng Tools branding from the excess racking that he’d used out back. Again, these weren’t just a practical addition, but also added a touch more colour into the cabin.

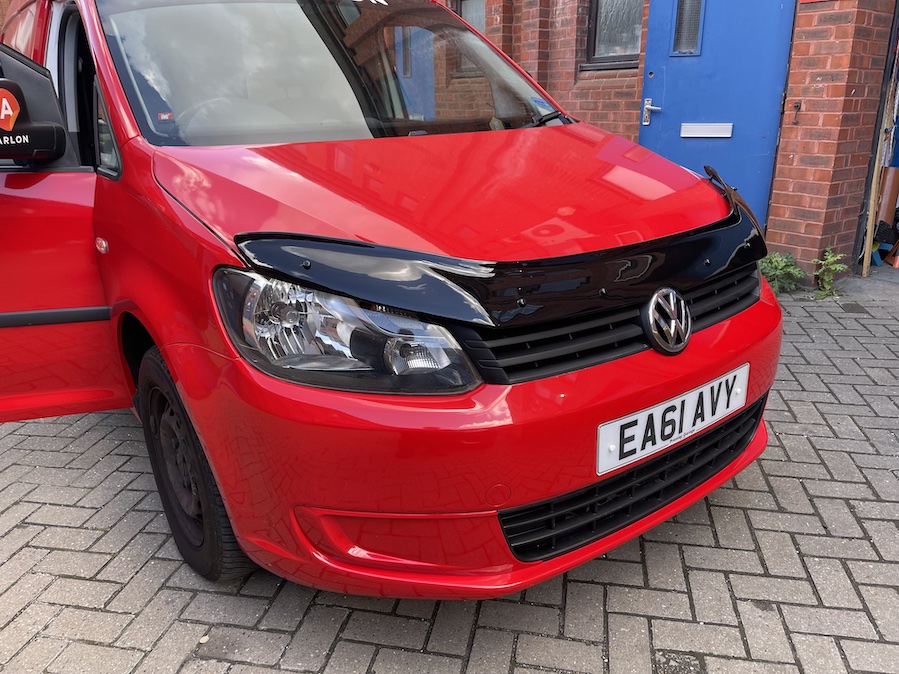
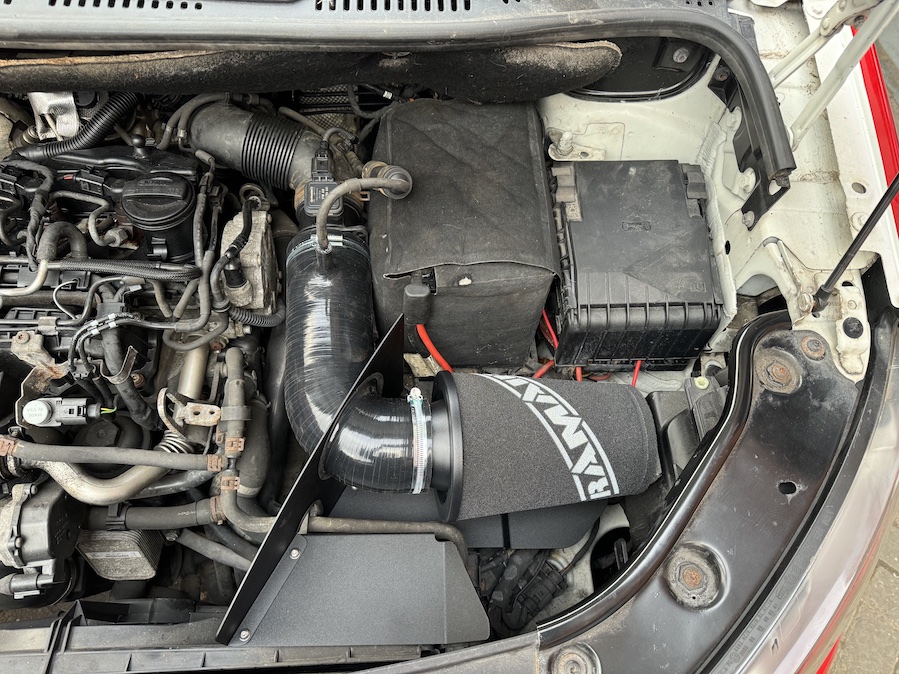
While we never planned to go overboard with the Caddy’s engine, we couldn’t resist fixing one of RamAir’s cold air-feed induction kits. Not only was this a doddle to install, it looks far better than the factory air box, too. It also sounds great and chances are will gains us a couple of bhp in the process.
Race Support Caddy Project (Part 15)
Our Project Race Support Caddy was nearing completion. All we needed to do to wrap the project was fit our chosen rolling stock. Oh, and swap the somewhat primitive stock suspension, plus throw on some graphics. How hard can it be?

The old saying ‘Wheels Maketh The Car’ is correct, to a degree. That being said, even the best wheels will still look a bit pants if the vehicle in question doesn’t sit right. After Midge had fine tuned the interior, we needed to sort the chassis to complement the Arlon wrap.

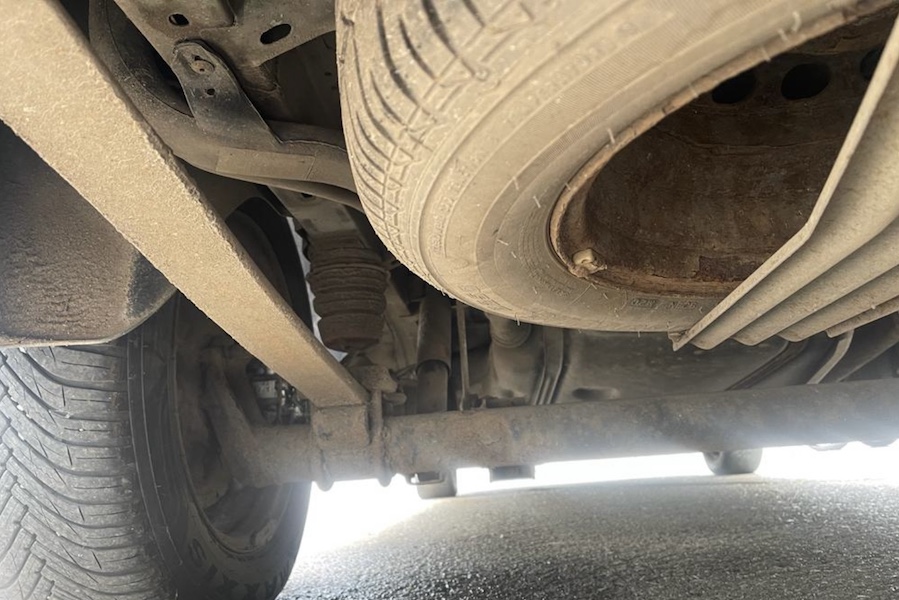
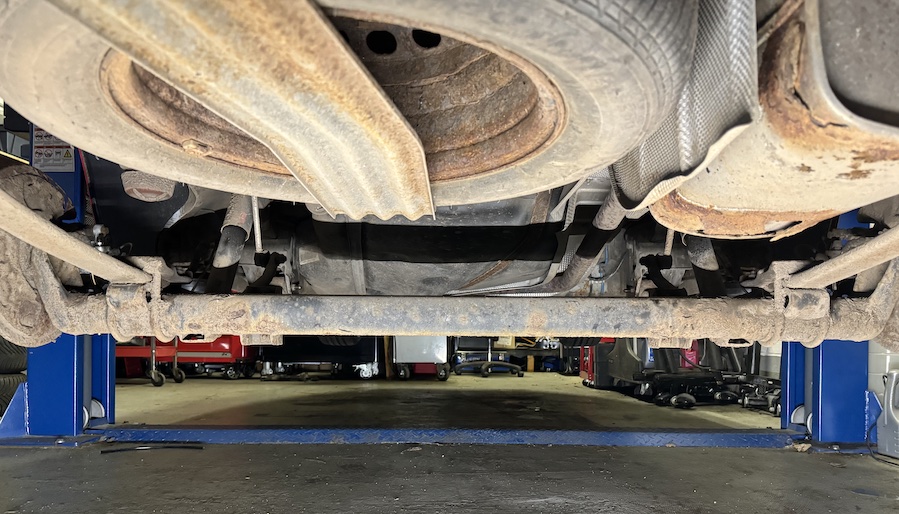
Caddy 2k owners will be aware the end front features traditional dampers, but out back is a bit different. It’s basically a pretty primitive leaf spring set up, which is perfectly fine for the Caddy’s usual workhorse role.
When it came to suspension we wanted our Caddy to sit super low, so air suspension was a no brainer. Air Lift Performance were quick to join the party, but it only offers an off-the-shelf kit for the front. Thankfully, we then discovered Only Charged Dubs offered its own custom independent rear axle set-up. We could either run air or static on this. Result!
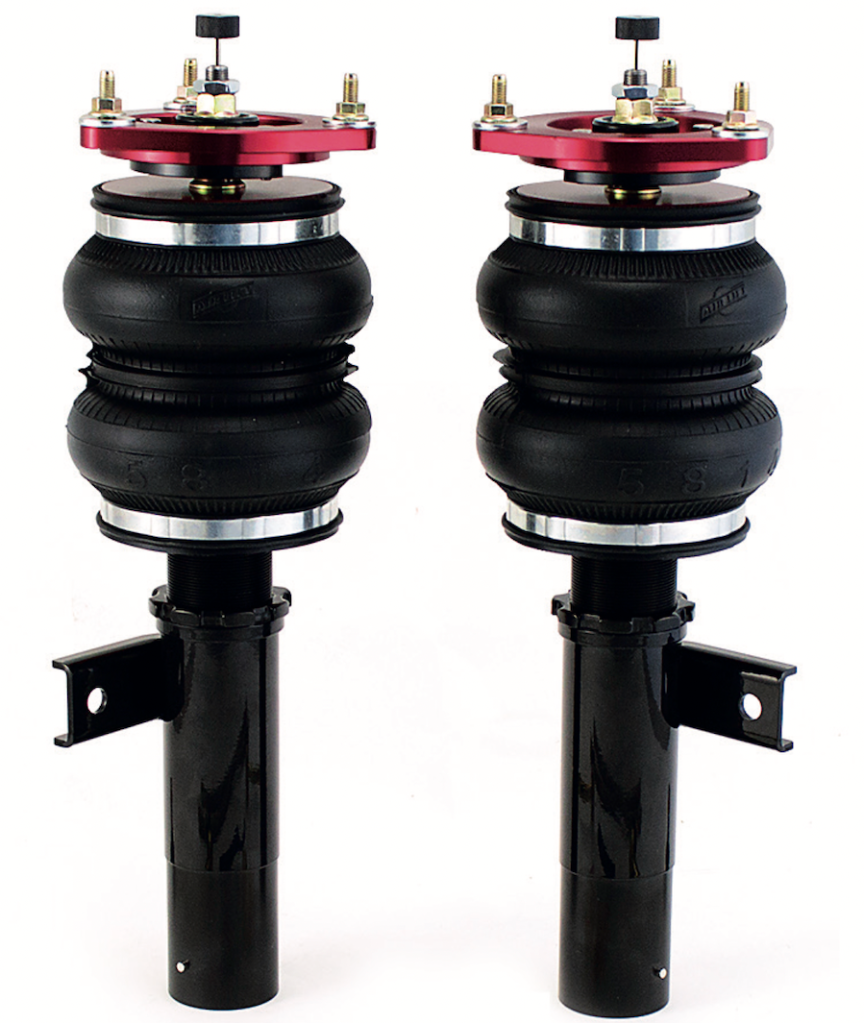
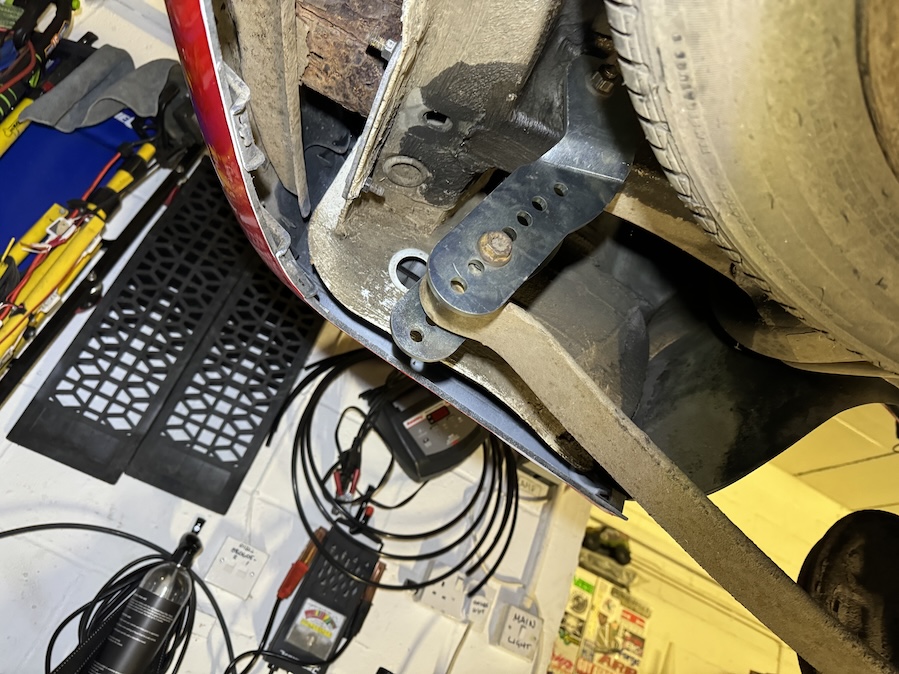
Initially we spoke to Mike over at Air Lift in the States and ordered up one of its SLAM strut kits for the front. This came with its 3P management, a seamless FLO air tank and Viair 444C compressor. We’ve run Air Lift kits countless times before. Not only does it fit as you’d hope, and perform impeccably, it’s also incredibly reliable as well.
We then got wind that OCD was having supply issues with its axles. This meant we had to go back to the drawing board when it came to sorting the rear solution.

Thankfully, Midge wasted no time with the air ride preparations inside the Caddy. He’d incorporated our air tank, management and compressor into the custom centre build of the van. So, once the Air Lift struts arrived it was a relatively easy task to swap them.
Out went the tired, factory struts replaced for the fresh, familiar black and red air bagged items. “I’d already done the management wiring and compressor plumbing, so it was just a case of connecting everything up.”

While the front suspension was in bits, Midge also swapped the knackered old droplinks for new items as a precautionary measure. And that was the front pretty much sorted, except for the alignment. This would be carried out once the back end was sorted and the wheels fitted. Roll on next month…

Race Support Caddy Project (Part 16)
With the front suspension sorted, it was time to slam the back-end to make sure both ends matched. Trouble is, our first solution to get around the leaf-springs on our Race Support Caddy had gone out the window. We needed another solution, and fast…
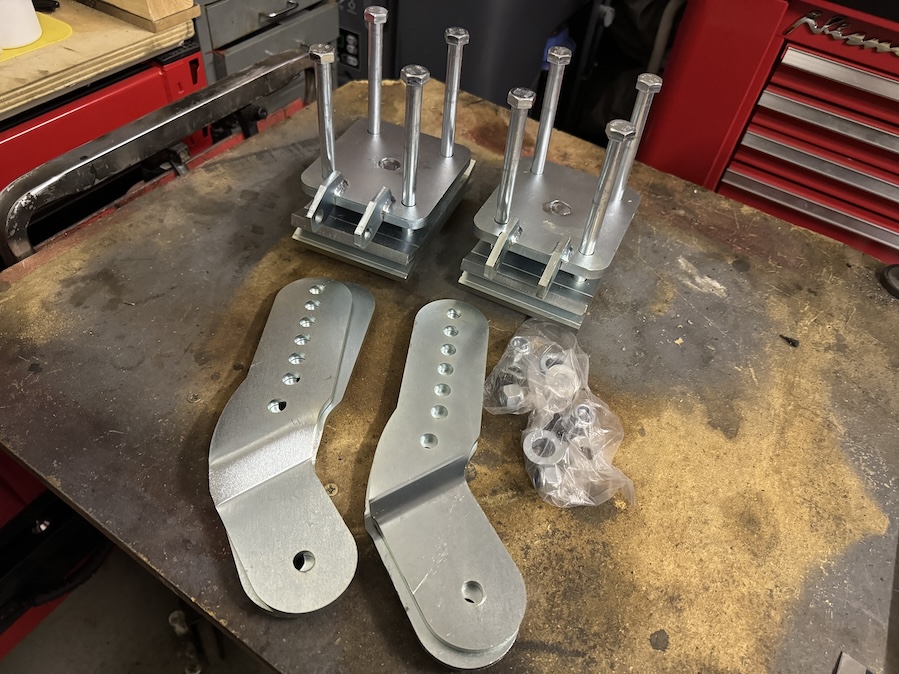
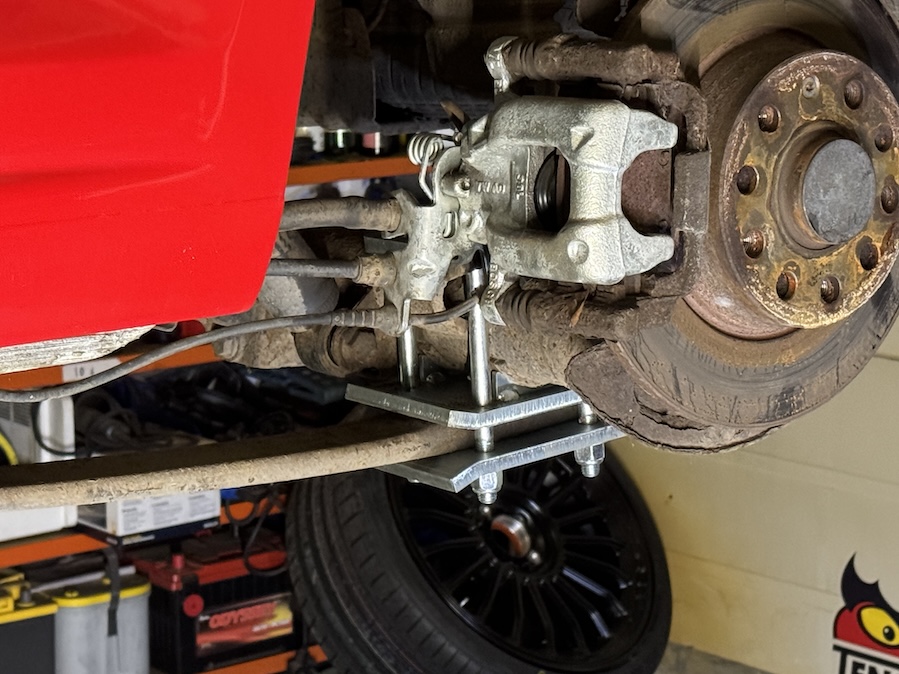
With the original idea of fitted one of OCD’s independent rear axles out the window, it was time for plan B. After looking around other options, we decided keeping it static made a lot of sense. It would also be considerable cheaper, too…
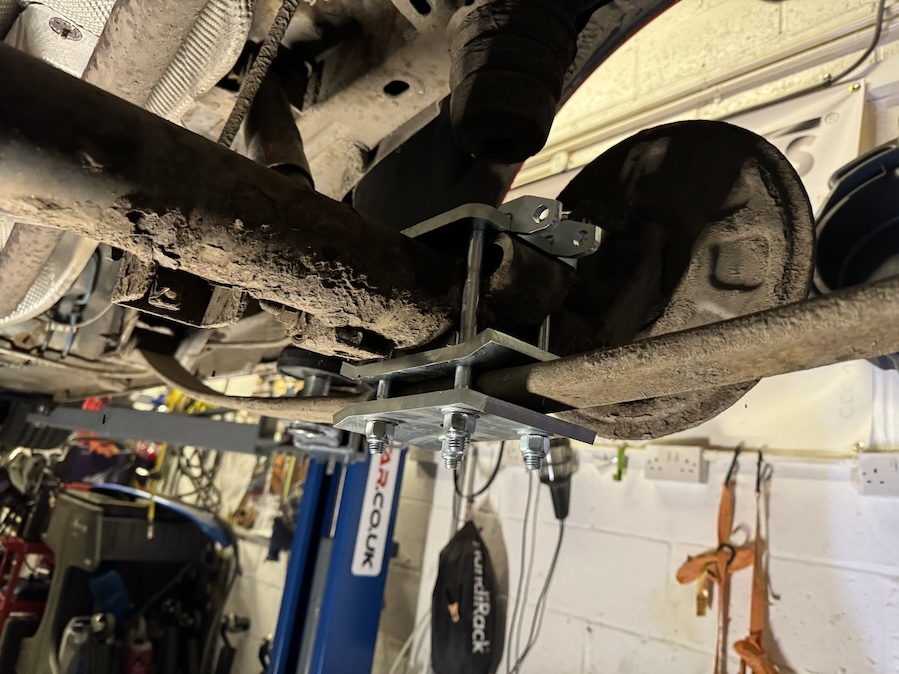
After some searching, we soon discovered Darkside Developments’s axle flip kit. This allows lowering of between 50- and 100mm. Result! The kit is great value at just over £200, is fully adjustable, CNC laser cut and zinc coated. It allows you to basically remove and flip the axle so the leafs are under the axle rather than over it.
Better still, on super low applications, there is also the ability to adjust where the wheel is located in the rear wheel arch. The wheel will naturally move further forwards in the arch the lower you go, so this allows you to adjust that too.
It’s worth noting that adjusting the axle isn’t as quick as say it is on coilovers (where you just need to wind the collars up or down). In this case, you do need to drop the axle and move the leafs further up or down the bracket. It’s straightforward to do, but a lot easier if you’re using a ramp, like we did with ours.
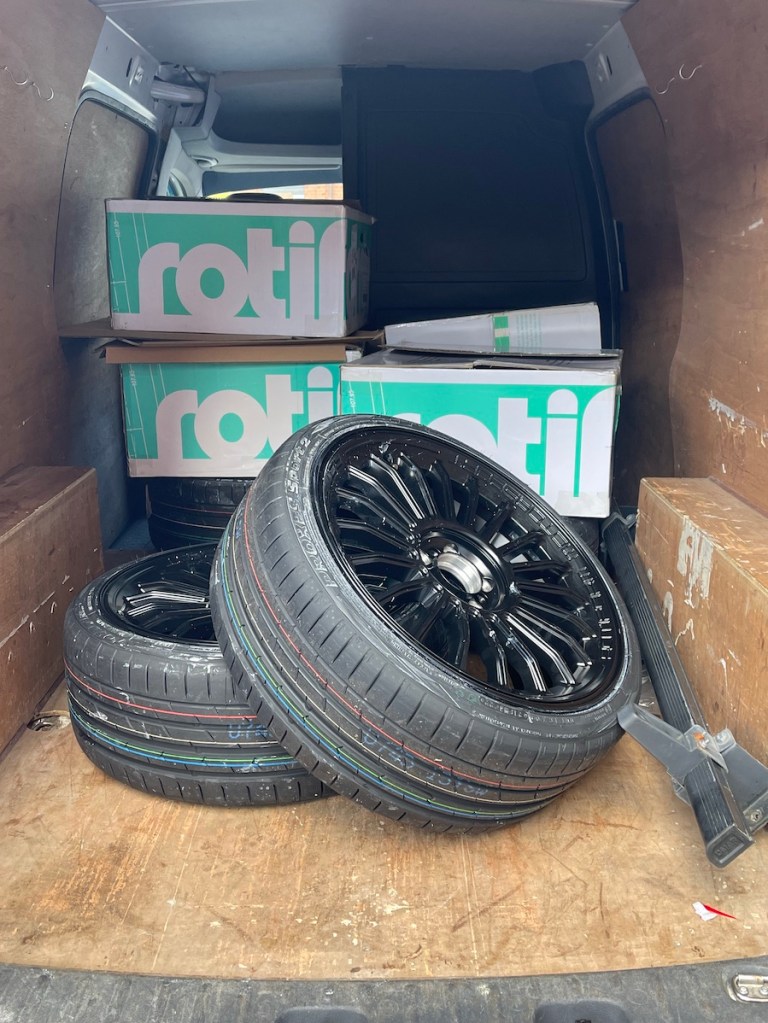
Before Midge finalised where the rear axle would sit, he decided now was as good a time as any to fit up the rolling stock. You may remember from the second instalment that we had opted for Rotiform’s motorsport-inspired BUC-M.
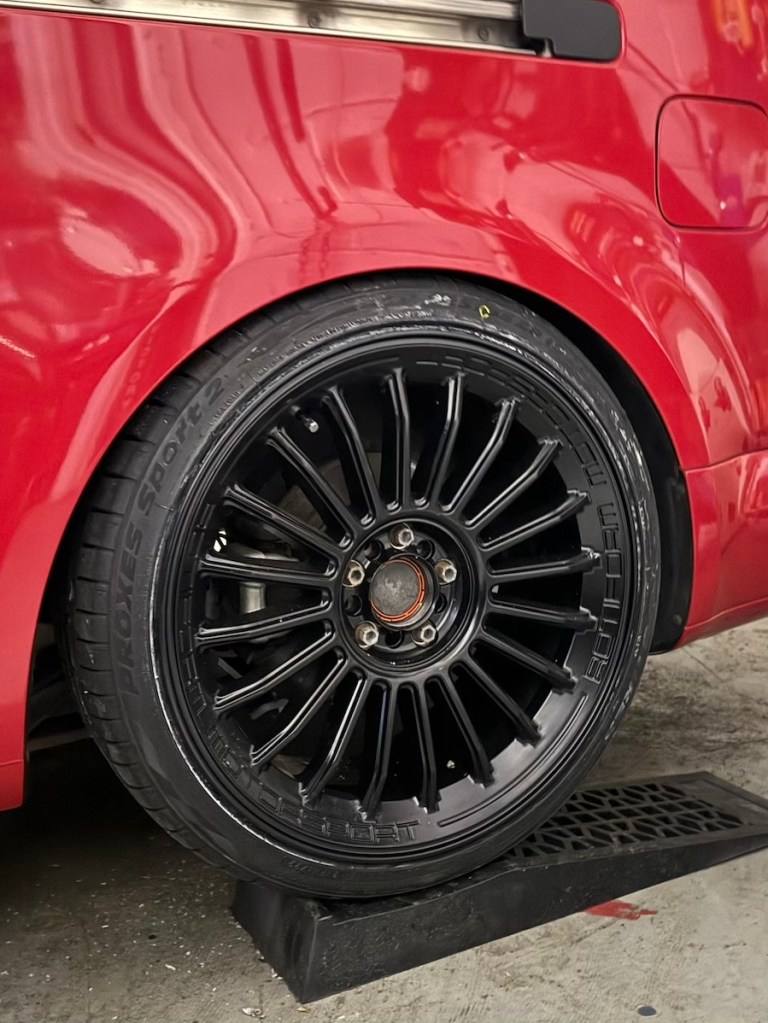
Not only does the wheel have ‘Rotiform Motorsport’ engraved in it, it’s also designed to run with Rotiform’s AeroDiscs. The AeroDiscs are also another motorsport- inspired touch which nod to 80’s Touring Cars and Sportscars. These discs are literally bolted to the wheels using the neat centre lug fixing.
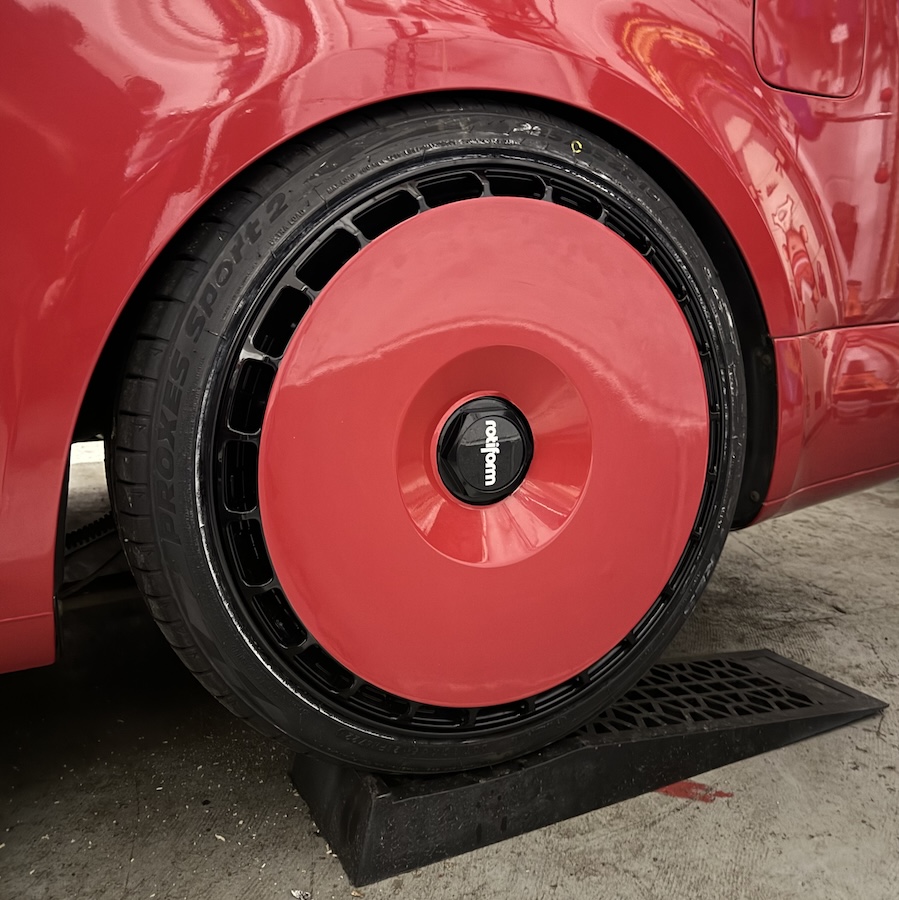
We had originally intended to only run the discs on the front wheels (like some of the race teams did back in the day). However, after having the centres wrapped in Arlon’s red vinyl, we soon concluded that fitting all four looked far better.
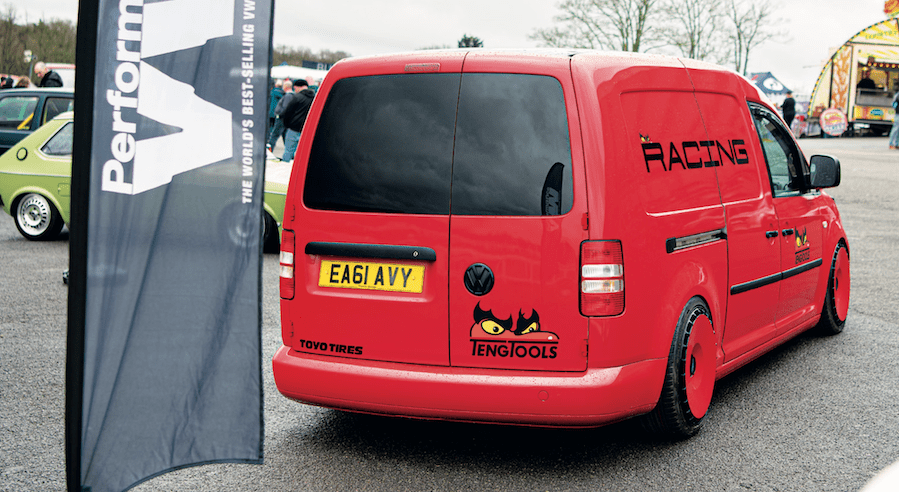
Toyo came on board early on and supplied a set of its fantastic Proxes Sport 2s in 225/35 ZR19 fitment. If ever there was a great all-round performance tyre, then this is it. It looks good, performs exceptionally and is really good value for money.
Once bolted up, the wheels sat perfectly and the ride height Midge had set it to was spot on. With the AeroDiscs fitted, we were also still able to open both sliding doors which cleared with millimetre precision. Okay, the latter was more luck than judgement, but you always need a spot of good luck when building a project.

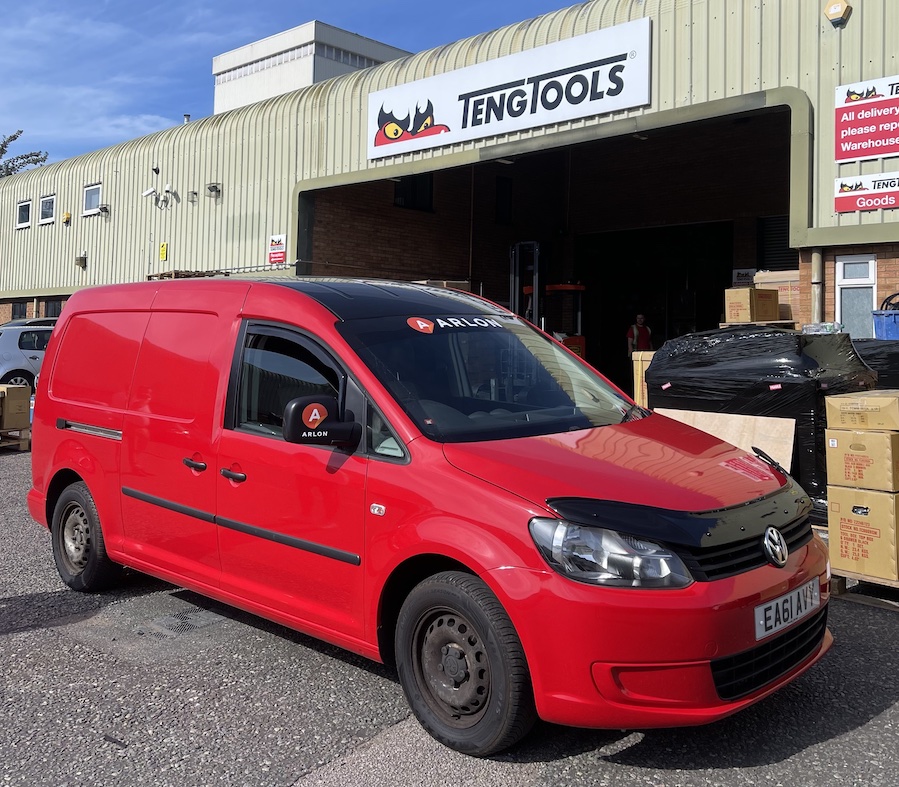
Standing back and admiring our handiwork, one thing quickly dawned on. That was just how close to the original Helen Stanley’s artist impression our finished van was. It was missing just one thing, though.

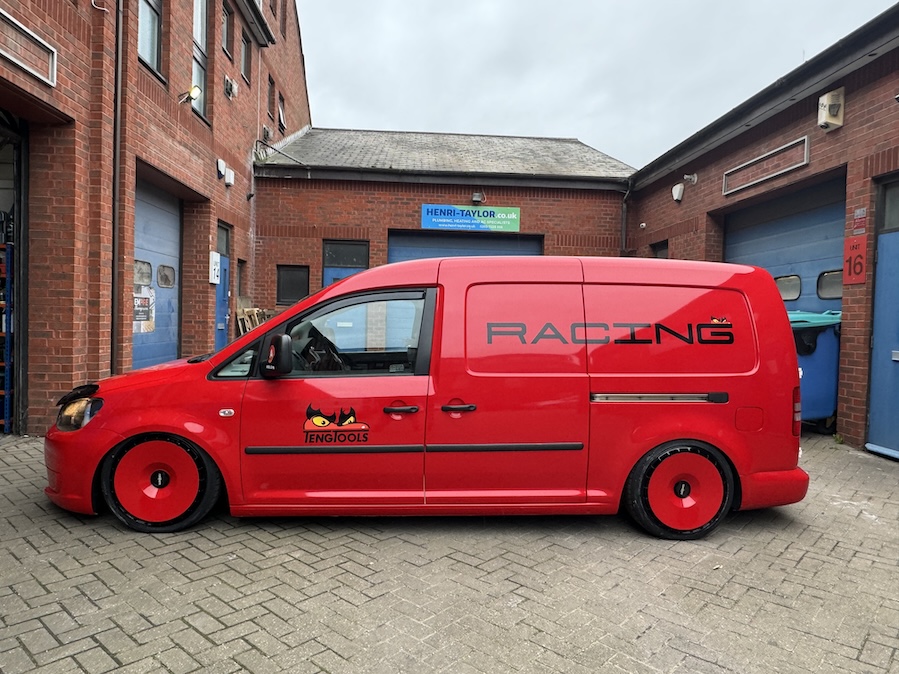
That’s right, the Porsche-inspired ‘Racing’ decals and Tent Tools branding. Luckily, Prestige had already printed these out for us at the wrapping stage, so it was just a case of Midge applying them.

And what a finishing touch they were. Not only did the van look the part, but it was fully functional, too. You can also really see where our ‘Rennsport’ inspiration had come from, even if it was subtle.
To say it went down well at its Volksworld Show debut was an understatement. There was even a very early ‘Porsche’ Race Support Van in attendance at the show for comparison. What are the chances of that?